Turning the Pages: Introduction to Memory Paging on Windows 10 x64
Introduction
0xFFFFFFFF11223344 is an example of a virtual memory address, and anyone who spends a lot of time inside of a debugger may be familiar with this notion. “Oh, that address is somewhere in memory and references X” may be an inference that is made about a virtual memory address. I always wondered where this address schema came from. It wasn’t until I started doing research into kernel mode mitigation bypasses that I realized learning where these virtual addresses originate from is a very important concept. This blog will by no means serve as a complete guide to virtual and physical memory in Windows, as it could EASILY be a multi series blog post. This blog is meant to serve as the prerequisite knowledge needed to do things like change permissions of a memory page in kernel mode with a vulnerability such as a write-what-where bug to bypass kernel mitigations such as SMEP or NonPagedPoolNx through page table entries.
Let’s dive into memory paging, and see where these virtual memory addresses originate from and what we can learn from these seemingly obscured 8 bytes we stumble across so copiously.
Firstly, before we begin, if you want a full fledged low level explanation of nearly every aspect of memory in Windows (which far surpasses the scope of this blog post) I HIGHLY suggest reading What Makes It Page?: The Windows 7 (x64) Virtual Memory Manager written by Enrico Martignetti. In addition to paging, we will look at some ways we can use WinDbg to automate some of the more admittedly cumbersome steps in the memory paging process.
Paging? ELI5?
Memory paging refers to the implementation of virtual memory by the MMU (memory management unit). Virtual memory is mapped to physical memory, known as RAM (and in some cases, actually to disk temporarily if physical memory needs to be optimized elsewhere).
One of the main reasons that memory paging is generally enabled, is the concept of “resource sharing”. For example, if we have two instances of the calc.exe - these two instances can share physical memory. Sharing physical memory is very important, as RAM is an expensive resource.
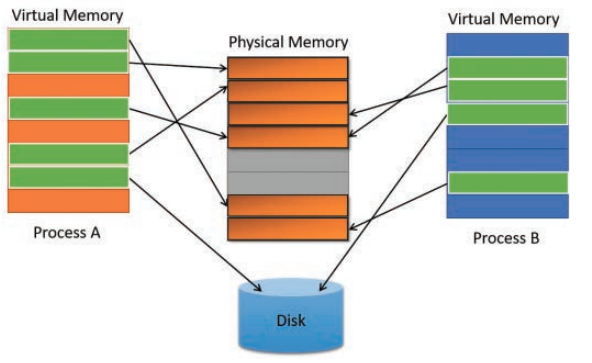
Take a look at the below image, from the Windows Internals, Part 1 (Developer Reference) 7th Edition book to get a better understanding visually of virtual to physical memory mapping.
In addition to this information, it is important to note that a physical memory page is generally 4 KB (2 MB and even 1 GB pages can be addressed, but that is beyond the scope of this blog) in size on x64 Windows. We will see how this comes to fruition in upcoming sections of this post.
Before diving straight in to some of the lower level details, it is important to note there are a few different “paging modes” that can be utilized. Paging modes refer to the way paging is executed. The paging mode we will be referring to and using (as is default on basically every x64 version of Windows) is Long-Mode Paging.
Are We There Yet?
If we want to understanding WHAT paging actually does, let’s take a look a moment and analyze how paging is actually enabled! Looking at some of the control registers will show us if/how paging is enabled and what paging mode are we using.
According to the Intel 64 and IA-32 Architectures Software Developer’s Manual, the CR0 register is responsible for paging being enabled.
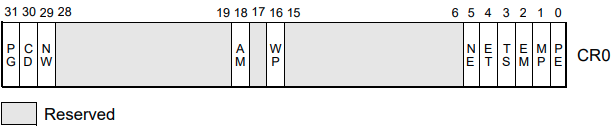
CR0.PG refers to the 31st bit of the CR0 register. If this bit is set to 1, paging is enabled. If it is set to 0, paging is disabled.
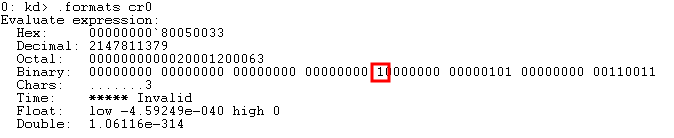
The above image is from a default installation of Windows 10 x64, showing the 31st bit of the CR0 bit is set to 1.
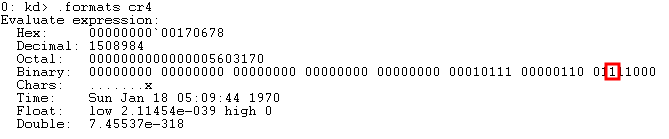
We now know that paging is enabled based on the image above - but what kind of paging are we using? Referring again to the Intel manual, we notice that the CR4 control register is responsible for implementing the paging mode we are using.
As mentioned previously, the paging mode we are using is called Long-Mode Paging. Long-Mode Paging is another way of saying that Physical Address Extension, or PAE, is enabled. PAE enables 64-bit paging. If PAE was disabled, only 32-bit paging would be possible.
The 5th bit of the CR4 register is responsible for PAE being enabled. 1 = enabled, 0 = disabled.
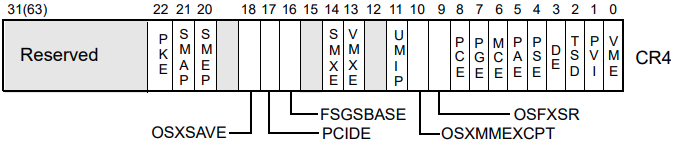
We can also see, on a default installation of Windows 10 x64, PAE is enabled by default.
Now that we know how to identify IF and WHAT KIND of paging is enabled, let’s get into virtual to physical address translation!
Let’s Get Physical!
The easiest way to think about a virtual memory address, and where it comes from, is to look at it from a different perspective. Don’t take it at face value. Understanding what the virtual address is trying to accomplish, will surely shed some light on this whole process.
A virtual address is simply a computation of various indexes into several paging structures used to fetch the corresponding physical page to a virtual page.
Take a look at the image below, taken from the AMD64 Architecture Programmer’s Manual Volume 2.
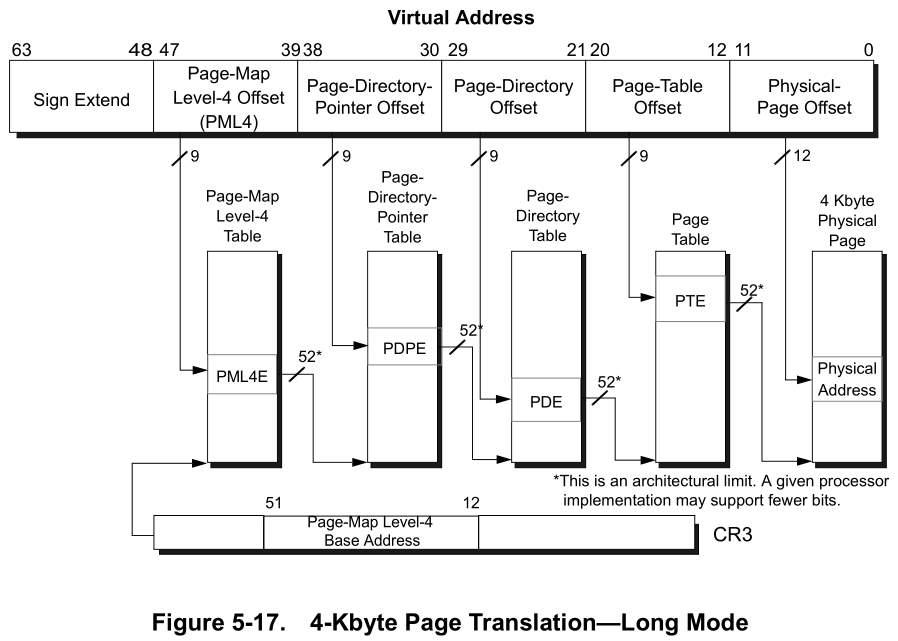
Although this image above looks very intimidating, let’s break it down.
As we can see, the virtual address in this case is a 64-bit virtual address. The first portion of the address, bits 63-48, are represented as “Sign Extend”. Let’s leave this on the back burner for the time being.
We can see there are four paging structures in use:
- Page-Map Level-4 Table (PML4) (Bits 47-39)
- Page-Directory-Pointer Table (PDPT) (Bits 38-30)
- Page-Directory Table (PDT) (Bits 29-21)
- Page Table (PT) (Bits 20-12)
Each 8 bits of a virtual address (47-39, 38-30, 29-21, 20-12, 11-0) are actually just indexes of various paging structure tables.
In addition, each paging structure table contains 512 page table entries (PxE).
So in totality, each paging structure is really a table with 512 entries each.
For each physical memory page the MMU wants to attribute to a virtual memory page, the MMU will access an entry from each table (a page table entry) that will “lead us” to the next paging structure in line.This process will go on, until a final 4 KB physical page (more on this later) is retrieved.
Think of it as needing to pick a specific entry from each table to reach our final 4 KB physical memory page. We will get into some very high level mathematical computations on how this is done later, and seeing the exact anatomy of a virtual address in WinDbg.
Now that we have some high level understanding of the various paging structures, and before diving into the paging structures and the CR3 register (PML4, I am looking at you) - let’s circle back to bits 63-48, which are represented as “Sign Extend”
Canonical Addressing
In a 64-bit architecture, each virtual memory address has a total of 8 bytes, compared to a 4 byte x86 virtual memory address.
Referring back to the above section, we can recall that bits 63-48 are not accessing any paging structures. What is the purpose of this? It has to do with the limitations of the MMU.
Technically, a 64-bit system only uses 48 bits of its total power. This is because if a 64-bit system allowed all 64 bits to be addressed, the system would need to be able to address 16 exabytes of total virtual memory. 1 exabyte is equivalent to 1000000 terabytes (TB). The MMU would not be able to keep track of all of this from a translations perspective firstly (efficiently), and secondly (and most importantly) systems today cannot support this much virtual memory.
The CPU implements a “governor” of sorts, which limits 64-bit addresses to 48-bit addresses. An address in which bits 63-47 are sign extended is known as a canonical address.
Sign extending bits 63-47 limits the virtual address space to 256 TB of RAM. This is still a lot, but it is still feasible.
Let’s take a look to see how this all breaks down.
Referencing the Intel manual again, sign extending occurs in the following manner. Bit 47 is responsible for what bits 63-47 will be set to.
If bit 47 is set to 0, bits 63-48 will also be set to 0. If bit 47 is set to 1, bits 63-48 will be set to 1 (resulting in hexadecimal F’s in the virtual address).
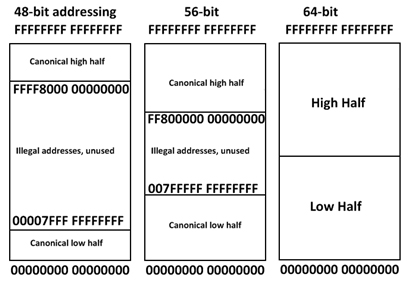
The below chart, from Intel shows what addresses are valid and what addresses are invalid, in accordance with canonical addressing and sign extending. Note that we are only interested in the 48-bit addressing chart. 56-bit addressing refers to level 5 paging and 64-bit addressing refers to using the whole 64-bit address space.
Let’s look at two examples below.
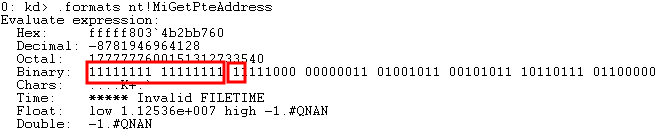
The first example is the address KERNELBASE!VirtualProtect which has a virtual memory address of 00007ffce032cfc0. Breaking the address down into binary, we can see bit 47 is set to 0. Subsequently, bits 63-48 are also set to 0.
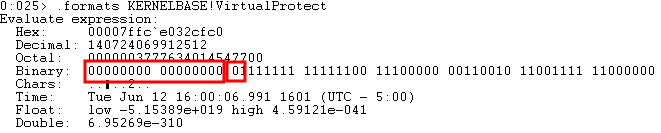
Generally, user mode addresses are going to be sign extended with a 0.
Taking a look at a kernel mode address, nt!MiGetPteAddress, we can see in this case bit 47 is set to 1. Meaning bits 63-48 are also set to 1, resulting in all hexadecimal F’s occurring in the virtual address as seen below.
Now that we see how addressing is limited, let’s get into the breakdown of a virtual address.
(Question to you, the reader. Now that we know 64-bit systems only utilize 48 bits, do you see a clear need for 128-bit processors in the near future?)
The Anatomy of a Virtual Address (In All of Its Glory)
Let’s talk about paging structures and page table entries once again before we get into breaking down a virtual address.
Recall there are 4 main paging structures:
- Page-Map Level-4 Table (PML4)
- Page-Directory-Pointer Table (PDPT)
- Page-Directory Table (PDT)
- Page Table (PT)
As a point of contention, a page table entry for each of these structures removes the “T” from the acronym and replaces it with an “E”. For instance, an entry from the PDT is known as a PDE. An entry from the PT is known as a PTE and so on.
Recall that each one of these structures is a table that has 512 entries each. One PML4E can address up to 512 GB of memory. One PDPE can address 1 GB. One PDE can address 2 MB. Finally, one PTE can map 4 KB, or a physical memory page.
Note that the actual size of each entry is 8 bytes (the size of a virtual memory address in a 64-bit architecture).
Let’s talk about PML4 table briefly, which cannot be talked about without mentioning the CR3 register.
The CR3 register actually contains a physical memory address, which actually serves as the PML4 table base. This can be seen in the image below, where CR3 loads an actually physical memory address.
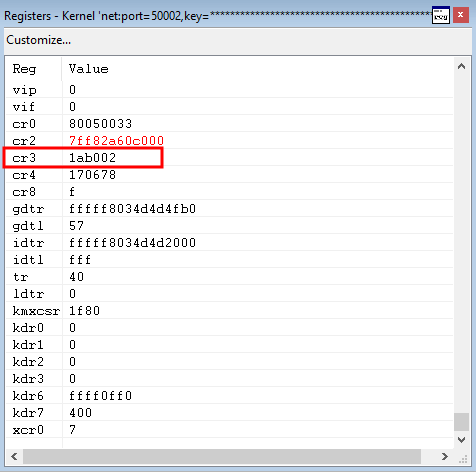
This is how the paging process begins, as the PML4 can be fetched from the CR3 register.
Again, to reiterate, The PML4 (via the CR3 register) indexes the PDPT table and fetches an entry. The PDPT indexes the base of the PDT table and fetches an entry. The PDT table indexes the PT table and fetches a 4 KB physical memory page.
Before moving on, there is one special thing to note, and that is the actual page table (PT).
Once the page table (PT) has been indexed in bits 20-12, bits 11-0 no longer need to fetch an index from any other paging structures. Bits 11-0 actually serve as an offset to a physical memory page 4 KB in size. Recall that an offset is the distance between two places (generally from a base, the PT in this case, to another location). Bits 11-0 simply serve as the actual distance from the page table base to the actual location of the physical memory. We will see this outlined very shortly when we perform a page translation in WinDbg.
Now that we understand at a bit of a lower level how each paging structure is indexed, let’s take it an even lower level.
Finally, an Example!
VirtualAlloc() is a routine in Windows that creates a region of virtual memory and returns a pointer to this virtual memory.
In our example, the virtual memory address 510000 is a virtual memory address that was created by KERNELBASE!VirtualAlloc. Let’s run the !pte command in WinDbg to see what we are working with here.

One thing to notate before moving on, WinDbg references a few paging structures and entries a bit differently. Namely, they are:
- PXE = PML4E
- PPE = PDPE
Moving on, we can see each structure’s entries can all be found at their respective virtual addresses, shown above as:
- PML4E at
FFFFF6FB7DBED000 - PDPE at
FFFFF6FB7DA00000 - PDTE at
FFFFF6FB40000010 - PTE at
FFFFF68000002880
This is because the !pte output converts the entries to virtual addresses before being displayed. We don’t care so much about the virtual addresses (for the time being) because we are trying to see how virtual addresses are converted into physical addresses.
In order to reach our goal, right now we only care about pfn which we can see from the !pte output. Let’s understand the pfn means firstly, as this will help us understand the output of !pte and fetching a physical page associated with a virtual page.
A PFN, or page frame number, refers to the next paging structure in the hierarchy. PFNs work with PTEs, in that PTEs fetch the PFN for the next paging structure. That PFN is then multiplied by 0x1000 (4 KB) to retrieve the physical address of the next paging structure. We will hit more on this now.
In the output of !pte we see there is a PML4E. A PML4E , as we know, will fetch the base address of the PDPT table. From there, it will index an entry from the next table, known as a PDPE.
The PFN, as we can see from the output in WinDbg in the earlier screenshot, that PML4 is using to index the PDPT table is 7bbc8. This means this should be the page frame number for the PDPT, as we know a page frame number refers to the next paging structure in the hierarchy.
We will now use !vtop to convert the PDPT to a physical address to verify that the PML4E entry is indexing the correct paging structure.

Let’s breakdown this command firstly.
The 7be59000 value in the above command is the base paging structure in the CR3 register, the PML4 physical address. When using !vtop, you use this address to specify the base paging structure. After that, we have the virtual address we want to convert.
As we can see, the PDPT is located at a physical address of 7bbc8000! This is perfect, because this is the PFN value used by the PML4 structure to index the next paging structure, PDPT. Recall earlier, that we multiply the PFN (7bbc8 in this case) by 0x1000, which gives us a physical memory address of 7bbc8000 - which represents the PDPT.
Let’s verify in WinDbg with !dd, which will dump physical memory, that the virtual address of the PDPE and the physical address both are the same.
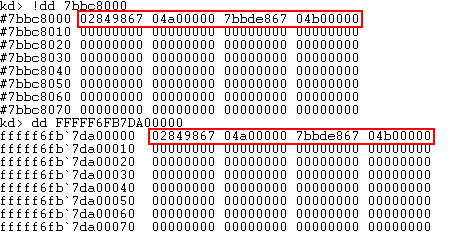
As we can see, the physical and virtual memory addresses contain the same values.
Too Many Acronyms!
This is an ideal example to show that a physical page of memory is actually NOTHING MORE than a PFN multiplied by 0x1000 and an offset to the physical memory page! A PFN, as we can recall, is a reference to the base of the next paging structure.
Since we converted the PDPT address (which is a base address to begin with), there was no offset in the physical translation, meaning that the PFN was appended with 0’s.
This is mainly because we were fetching the base address of a paging structure, which means it won’t be offset from anything.
If our virtual address would have been FFFFF6FB7DA00008, for instance, our physical address would have been 7bbc8008. This is because the address is at an offset of 0x8 from the base of the PFN!
Awesome, we know know what a physical memory address looks like at a high level. But each entry in a paging structure (a PTE) contains more metadata. What does this metadata look like and how is it useful?
PTEs - For Real This Time
Let’s take a look back at an image that was already displayed, in the !pte output.
More specifically, let’s take a look at the PTE entry, furthest to the right.
PTE at FFFFF68000002880
contains 7A9000007BBA9867
pfn 7bba9     ---DA--UWEV
Let’s take a look at the entry, more specifically the contains line which contains 7A9000007BBA9867.
We can clearly see the PFN here, in between the 7A900000 and 867. But what do these other numbers mean? Additionally, what does ---DA--UWEV mean? These refer to “control bits”, which provision various permissions, features, etc to the memory page. Let’s take a look at each of these bits.
Here are a list of some of the possible control bits. These bits are the ones we care about, and it is not an exhaustive list.
P- The PTE is valid if this bit is setR/W- Writing is enabled if this bit is setU/S- If this bit is set, the page is a user mode page. If this bit is clear, the page is a supervisor (kernel) mode pageD- If this bit is set, a write has been made to this page, making it a “dirty” pageA- If this bit is set, this memory page has been referenced at some point
Mouth Of The River
Again, this was by no means meant to be an exhaustive and comprehensive “tell all” of memory paging. This article barely scratched the surface. However, understanding things like control bits and virtual memory and having that as prerequisite knowledge allows you to understand bypassing mitigations such as NX in kernel pool memory, or more ways of bypassing SMEP. The next post will go into bypassing SMEP and NX in the kernel by way of the prerequisite knowledge laid out here.
You know the drill, any comments, questions, corrections, feel free to reach out to me. Until then!
Peace, love, and positivity! :-)